


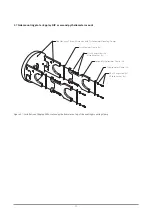


• Attach both the shading drive arms with the designated screws. Ensure the counter weights are facing down. Do not
completely tighten the screws yet, some movement for installing the T-bar is required, see figure 3.16.
•
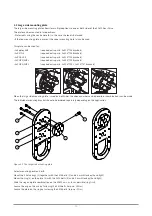
Install the T-bar (without ball rods). Install the plastic shoulder washers onto the threaded studs of the T-bar. Insert the shoul-
der washers into the side arm end holes. Install the outer flat washers and the locking nuts ensuring that all the bushings are
properly seated into the side arms. Only loosely install the locking nuts at this stage.
•
Tighten the shading drive arm screws and mount the second side plate to the axis with its two screws after aligning the two
shading drive arms, see figure 3.16.
•
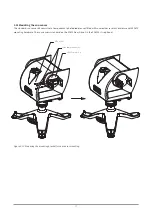
Now tighten the T-bar locking nuts until most of the clearance is gone between the arms and shoulder washers. Do not tighten
snugly, ensure that the T-bar rotates freely but has minimal sideways movement.
•
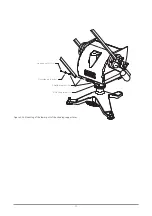
Install the shading drive arm to the T-bar. Install the shoulder washers into the holes as shown. Only tighten the locking nut
to minimize clearances, ensure free rotational movement.
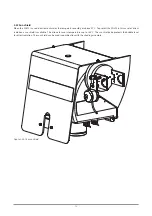
Figure 3.16. Mounting of the shading drive arm
M5x35 cap screw (2x)
M5 lock washer (2x)
M5 flat washer (2x)
Zenith mounting plate
M5x35 cap screw (2x)
M5 lock washer (2x)
M5 flat washer (2x)
Shading drive arm 2
Locking nut M5 (1x)
Flat nylon washer (1x)
Shoulder
washer (2x)
Shading drive arm 1
Shading T-bar
Shoulder washer (2x)
Flat nylon washer (1x)
Locking nut M5 (1x)
Detail A
See Detail A
42
L
Содержание SOLYS Gear Drive
Страница 1: ...SOLYS2 Sun Tracker SOLYS Gear Drive Sun Tracker Instruction Manual...
Страница 2: ...2...
Страница 4: ...4...
Страница 6: ...6...
Страница 10: ...10...
Страница 38: ...Figure 3 12 Mounting the sun sensor M5 locking nut 3x Shoulder washer 6x Compression spring 3x Sun Sensor 38...
Страница 39: ...Figure 3 13 Adjustment of the sun sensor 21 0 5 mm 3x 39...
Страница 61: ...6 Insert the Ethernet cable Contacts on this side 61...
Страница 78: ...78...
Страница 80: ...80...
Страница 86: ...86...
Страница 88: ...88...
Страница 112: ......


