background image

V2.0 

2.3.4 

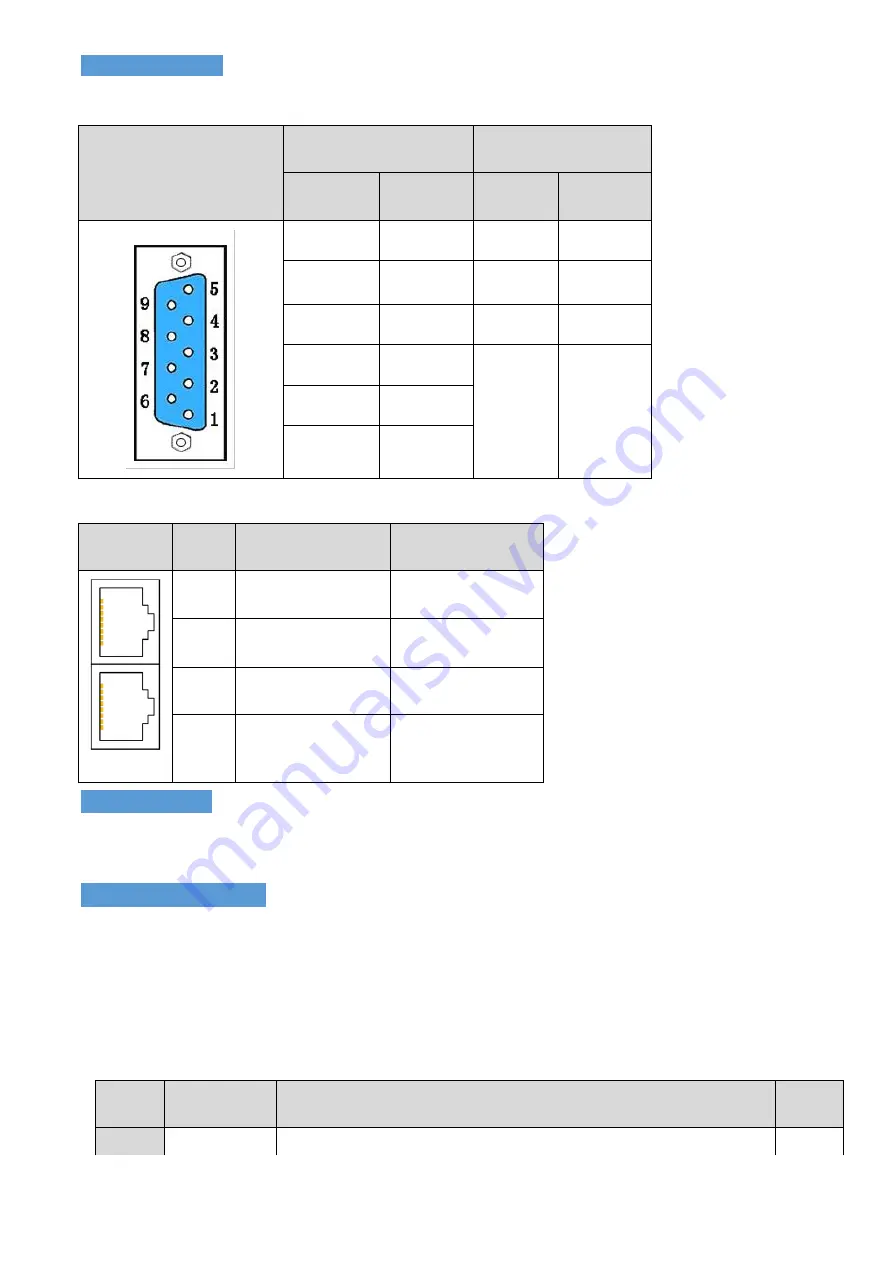
总线通讯接口


2-4 

驱动器

X4

通讯接口定义


2-5 

驱动器

X10

通讯接口定义


3 Easy Use

功能


Easy  Use

旨在为用户快速设定控制环参数,免去伺服调试的繁琐步骤,调整后的性能可以满足大部分应用

场合;并另外开辟独立区域,方便用户设置常用的重要参数。


3.1 Easy Use

操作步骤


1


EASY

流程包含常用参数,请逐一确认,最后通过

EA00

保存重启。

EASY

流程执行完后,请运行机器,如

果性能理想,则不需要执行

tunE

流程。否则,再执行

tunE

流程


2


tunE

流程为惯量测定流程,最后通过

tn00

保存。通过

tn03

进行惯量测定后,驱动器将根据整定结果更

改刚性等级(

tn01

)。


3


请运行机器,如果性能不理想,再通过

tn01

逐级修改刚性等级,请注意一边调整,一边观察机器性能。


接口


RS485

接口


CANopen

总线接口


针脚号


信号


针脚号


信号


RX+ 

CAN_L 

TX+ 

GND 

GND 

CAN_H 

+5V 


RX- 

TX- 

接口


针脚号


信号


描述


8

7

6

5

4

3

2

1

8

7

6

5

4

3

2

1


TD+ 

发送信号正端


TD- 

发送信号负端


RD+ 

接收信号正端


RD- 

接收信号负端


数码管

编码


名称


描述


默认值


EA01 

电机型号


参考表一,更改后需要保存并重启驱动器。


404b 

Содержание 2S

Страница 1: ...牌信息确认驱动器型号与您所订购的型号是否一致 2 请检查产品是否在运输过程中有损坏 采用螺丝刀确认驱动器上所有固定螺丝有无松动 3 请按以下产品配件清单核收产品 确认是否有缺少 产品配件清单 物品 数量 驱动器 1 台 Kinco 2S 系列伺服驱动器使用指南 1 本 服务指南 1 张 合格证 1 张 接 线 端 子 422S SCSI 36P 插头 1 个 6P 接线端子 头 1 个 432S 622S SCSI 36P 插头 1 个 6P 接线端子 头 1 个 6P 母座端子 1 个 4P 母座端子 1 个 如以上任一项有问题 请及时与本公司或您的供应商联系 深圳步科电气有限公司 www kinco cn ...

Страница 2: ...注意事项 注意 请勿使用汽油 稀释剂 酒精 酸性或碱性洗涤剂擦拭外壳 以免外壳变色或破损 请确保产品在运输和存储过程中的环境安全 使用原厂包装进行存储和运输 请在熟悉产品相关知识和遵守安全注意事项的前提下对驱动器进行操作 请严格按照图 1 1 所示的安装方式正确安装伺服驱动器 驱动器与电机动力电缆 抱闸线缆以及编码器电缆不能过度拉伸 避免任何异物进入驱动器内 螺丝 金属屑等导电异物或可燃性异物进入驱动器内可能引起 火灾和电击 安全起见 请不要使用有损伤或零件损伤的伺服驱动器 警告 注意电击危险 电缆一定要可靠安装到电源接口上 连接电缆时 务必断开电源 接触带电部件会造成严重伤害 并可能导致死亡 本产品使用时一定要安装在电箱内 并且确定所有保护措施都已正常启动 在维护时 维修和清洁工作以及长时间服务中断时 在接触带电部件之前要注意 通过电源开关关闭电气设备的电源 并防止其再次打开 充电指示灯...

Страница 3: ...力线 X3 动力电源和电机接口 充电指示灯 X5 RS232接口 X6 编码器接口 固定电机电缆屏蔽夹 X1 输入输出接口 操作面板 X4 总线通讯接口 PE 逻辑电源 抱闸电源 抱闸接口 X2 逻辑电源与抱闸接口 CD FD432S的X3与X7端口 AC220V R S T RB U V W 动力电源 外接制动电阻 电机动力线 PE RB DC DC 直流母线接口 R S T RB U V W 动力电源 外接制动电阻 电机动力线 PE RB DC DC 直流母线接口 CD FD622S的X3与X7端口 AC380V 图 2 1 驱动器外观结构组成说明 ...

Страница 4: ...电缆屏蔽夹 安全接地螺丝 图 2 2 驱动器外部接线图 警告 在接通驱动器电源前 请确保所有防护罩和电气柜门已经关闭 在安装和维护驱动器时 必须切断所有电源 驱动器断电至少十分钟之后 测量驱动器直流母线电压低 于 36V 或驱动器充电指示灯 CHARGE 熄灭才可接触 一定不要移除安全设施 不要接触带电部分和器件 在驱动器上电之前请务必正确连接 PE 线 并将驱动器外壳良好接地 2 3 驱动器端子定义说明 2 3 1 数字输入输出端 图 2 3 X1 端口定义 ...

Страница 5: ... 2 4 X1 接口接线图 2 3 2 动力电源与电机接口 表 2 1 CD FD412S 422S 驱动器 X3 接口定义 引脚名称 引脚功能 UVW 伺服电机 UVW 相输出 PE 电机 PE 线 L N 驱动电源输入 L N 单相线电压 200 240VAC 15 20 47 63Hz 412S 2 0A 422 4 0A 电源接地 TN S TN C TN C S TT 不 可角接地 RB RB 外接制动电阻 ...

Страница 6: ...S 驱动电源输入 单相线电压 200 240VAC 10 47 63Hz 11 0A 三相线电压 200 240VAC 10 47 63Hz 11 0A 612S 622S 驱动电源输入 三 相 线 电 压 380 415VAC 10 47 63Hz 612S 5 5A622S 7 0A 电源接地 TN S TN C TN C S TT 不 可角接地 RB RB 外接制动电阻 DC DC 直流母线接口 432S 输入电压 DC310V 20 612S 622S 输入电压 DC540V 20 接口 针脚号 信号 描述 功能 2 TX 驱动器数据发送端 可连接上位机软 件 Kinco servo 进行调试与监控 3 RX 驱动器数据接收端 5 GND 信号地 ...

Страница 7: ...EASY 流程执行完后 请运行机器 如 果性能理想 则不需要执行 tunE 流程 否则 再执行 tunE 流程 2 tunE 流程为惯量测定流程 最后通过 tn00 保存 通过 tn03 进行惯量测定后 驱动器将根据整定结果更 改刚性等级 tn01 3 请运行机器 如果性能不理想 再通过 tn01 逐级修改刚性等级 请注意一边调整 一边观察机器性能 接口 RS485 接口 CANopen 总线接口 针脚号 信号 针脚号 信号 2 RX 2 CAN_L 3 TX 3 GND 5 GND 7 CAN_H 6 5V 7 RX 8 TX 接口 针脚号 信号 描述 8 7 6 5 4 3 2 1 8 7 6 5 4 3 2 1 1 TD 发送信号正端 2 TD 发送信号负端 3 RD 接收信号正端 6 RD 接收信号负端 数码管 编码 名称 描述 默认值 EA01 电机型号 参考表一 更改后需要保存...

Страница 8: ...进制显示 超过 10000 的数值以十六进制显示 关于十进制和十六进制的显示方法见表四 1000 EA04 电子齿轮比分母 1000 EA05 模拟速度因数 当 EA02 写入 6 7 时有效 模拟输入电压和电机转速的关系 单位是 rpm V 注 在高分辨率情况下模拟速度因素设置太高有可能无效 300 EA06 报警输出极性 限位开关 应用场合 负载类型 数码管从右到左分别代表 1 负载类型 影响控制环参数 0 没有选择 1 皮带 2 滚珠丝杠 2 应用场合 影响控制环参数 0 点到点模式 1 CNC 模式 2 主从跟随模式 3 限位开关 0 默认限位开关设置 DIN5 和 DIN6 1 屏蔽所有限位开关 4 OUT2 的报警输出极性 0 输出常闭 1 输出常开 1001 EA00 保存参数 写入 1 保存所有参数 写入 2 保存所有参数并重启驱动器 更改电机型号后必须重启驱动器 写入 3...

Страница 9: ...增益 公式 Kvp VC_LOOP_BW K_Load 4096 其中 VC_LOOP_BW 为速度环带宽 注 出于安全考虑 在编辑状态修改惯量比时 不需要按 SET 确认 数据也会立 即生效 但只能逐级调整 皮带 50 丝杠 30 tn03 惯量测量 写入 1 使能电机并进行惯量比测量 此时电机会轻微抖动 测量成功后将根据 惯量比写入刚性等级 4 13 且 tn03 显示 1 测定过程包含以下动作 1 屏蔽所有外部信号的控制 2 工作模式切换为 11 3 使能驱动器 4 对象 0x2FF00C 设为 11 5 电机轴抖动并获取结果 6 还原所有外部信号的控制 若测量失败 tn03 将置 1 2 3 或 4 刚性为 10 惯量比为 30 0 1 tn04 整定距离 整定时轴移动距离 0 01 例如数码管上显示 0022 代表 0 22 圈 最大值为 0 4 圈 22 tn00 保存参数 写...

Страница 10: ...4 264 95 66 20 3334 1200 733 5 334 120 83 21 3889 1400 1032 6 389 140 100 22 4723 1700 1032 7 473 170 118 23 5556 2000 1765 8 556 200 146 24 6389 2300 1765 9 639 230 164 25 7500 2700 1765 10 750 270 189 26 8612 3100 1765 11 889 320 222 27 9445 3400 12 1056 380 268 28 10278 3700 13 1250 450 340 29 11112 4000 14 1500 540 360 30 12500 4500 15 1667 600 392 31 13889 5000 注 当修改刚性或惯量比令 Kvp 大于 4000 再提升刚性对...

Страница 11: ...长按退出到上一级状态 按下 键可增加设定值 长按可快速增加数值 按下 键可减小设定值 长按可快速减小数值 亮 代表十六进制 灭 代表十进制 SET 用于进入选择的菜单 进入此参数设定状态 当参数设定完后确认输入参数 FFF F 闪烁 表示未成功配置电机 请保证更改电机型号后保存参数并重启驱动器 开始 执行EASY流程 运行机器 观察性能 执行TunE流程 通过Tn03测定惯量 Tn01调整刚性等级 运行机器 观察性能 结束 通过上位机软件调节 控制环参数 不满意 满意 不满意 调整刚性等级无法解决 满意 图 3 1 操作流程图 ...

Страница 12: ...型 电子齿轮比分子 电子齿轮比分母 从左到右 分别代表报警输出极性 限位开关 应用场合 负载类型 具体参考表二 模拟速度因数 单位rpm V 脉冲模式控制下不需要设置 写入 1 保存所有参数 写入 2 保存所有参数并重启驱动器 更改电机型号后必须重启驱动器 写入 3 只重启驱动器 写入 10 初始化参数 MODE MODE SET 电机型号 闪烁编辑状态 按MODE键移位 下同 SET 确认参数 右下方 第一位小数点亮 下同 SET 长按MODE SET SET SET SET SET SET SET 可循环 图 3 1 Easy 流程图 ...

Страница 13: ... 出于安全考虑 在编辑状态修改刚性或惯量比 不需要按 SET 确认 数据也会立即生效 但只能逐级 调整 3 5 试运转操作说明 数字面板试运行操作步骤 按 MODE 键 进入 F004 组 选择对象地址 d4 18 确认电机型号 按 MODE 键 进入 F000 组 选择对象地址 d0 02 设定目标速度 速度单位为 RPM 建议先以低于 100RPM 的速度试运转 以避免人身伤害和财产损失 按 MODE 键 进入 F006 组 进行按键测试 默认值为 d6 40 先使用 调节数据到 d6 31 再按 数据会自动变为 d6 15 再使用 调节数据到 d6 25 按 SET 键 试运转操作激活 此时数码管显示为 abc d 电机处于松轴状态 当长按 或 时 电机自动使能 分别按照 目标速度 或 目标速度 来运行 试运转期间 数码管将实时显示电机速 度 电机默认逆时针方向为正转 面对电机轴侧方...

Страница 14: ...15 按 d6 25 电机按设定目标速度运行 长按 为正方向 长按 为负方向 按键测试 按下MODE 按下MODE 按下MODE 按下SET 按下SET 按下SET 按下SET 数码管显示 abc d 图 3 4 试运转操作步骤 Kinco 伺服上位机调试软件操作步骤 进入菜单栏 驱动器 控制面板 F004 用户通过 F004 组对话框 电机型号 配置电机 设置完毕按回 车键确认 并重启驱动器 取消 I O 控制中定义的 驱动器使能 和 驱动器工作模式控制 打开基本操作界面 将 工作模式 设为 3 速度设为 100RPM 完成后将 控制字 改为 f 如需反 方向运转 设置速度为负值即可 ...

Страница 15: ...150D 0230 20A K 4HKC P4 3450 SMG130D 0100 20A K 4LKG P3 3350 SMG130D 0100 10A K 4LKG P5 3550 SMG130D 0150 20A K 4LKG P7 3750 SMG130D 0200 20A K 4LKG P6 3650 SMG130D 0150 20A K 4HKG P8 3850 SMG130D 0200 20A K 4HKG PC 4350 SMG130D 0300 20A K 4HKG YZ 5A59 SMS40S 0005 30J K 5LKU ZZ 5A5A SMS40S 0005 30K K 5LKU YY 5959 SMS40S 0010 30J K 5LKU ZY 595A SMS40S 0010 30K K 5LKU Y0 3059 SMS60S 0020 30J K 3LKU ...

Страница 16: ...ether all fixing screws on the drive are loose 3 Please check and accept the products according to the following product parts list to confirm whether there is any shortage Product parts list Articles Quantity Driver 1 set Kinco 2S Servo Driver User Guidance 1 copy Service guide 1 sheet Certificate 1 sheet Ter min al 422S SCSI 36P Plug 1 6P Wiring terminal head 1 432S 622S SCSI 36P Plug 1 6P termi...

Страница 17: ...rtation Please be familiar with the product knowledge and safety precautions before operating the driver Please strictly install the servo driver according to the installation method shown in Figure 1 1 Driver and motor s power cables brake cables and encoder cables cannot be over stretched Avoid any foreign objects entering the driver conductive foreign objects such as screws and metal chips or f...

Страница 18: ...terface Secure the motor cable and shield clip X1 I O Interface Front panel X4 bus interface PE control power supply Brake power supply brake interface X2 Control power supply and brake interface X3 X7 interface of CD FD432S AC220V R S T RB U V W Power supply External brake resistor Motor power cable PE RB DC DC DC BUS R S T RB U V W Power supply External brake resistor Motor power cable PE RB DC ...

Страница 19: ...st be cut off After the driver is disconnected for at least ten minutes the dc bus voltage of the measuring driver is lower than 36V or the charging indicator of the driver is off Be sure not to remove safety devices and do not touch live parts and devices Be sure to connect the PE wire correctly and ground the drive housing properly before the drive is powered on 2 3 Port definition instructions ...

Страница 20: ...ons Table 2 1 X3 port definition For CD FD412S 422S driver Pin PIN function UVW U V W phase power output for servo motor PE Motor earthing L N Supply power inputL N Single phase 200 240VAC 15 20 47 63Hz 412S 2 0A 422S 4 0A Supply ground systems TN S TN C TN C S TT not corner earthed RB RB Externalbrake resistor ...

Страница 21: ... 10 47 63Hz 11 0A 3 phase 200 240VAC 10 47 63Hz 11 0A 612S 622S Supply powe 3 phase380 415VAC 10 47 63Hz 612S 5 5A622S 7 0A Supply ground systems TN S TN C TN C S TT not corner earthed RB RB Externalbrake resistor DC DC DC bus interface 432Sinput voltage DC310V 20 612S 622S input voltage DC540V 20 X3 Pin Signal Descriptions Function 2 TX Send data The upper computer software Kinco servo can be con...

Страница 22: ...mpleting process of EASY please run the machine If the performance is satisfying it is unnecessary to execute the process of tunE Otherwise please execute the process of tunE 2 Please write 1 into tn03 to start the inertia measuring and then the servo will adjust the parameters of control loop automatically by the result 3 Please run the machine If the performance is unsatisfying please change the...

Страница 23: ...oltage and speed of motor and the unit is rpm V Perhaps to be invalid if the factor is too big when the encoder is with high resolution 300 EA06 1 Load Type 2 Application 3 Limit Switch 4 Polarity of Alarm Output The meaning of each LED from right to left 1 Load Type influences the control loop 0 no shaft load 1 belt drive 2 ball screw 2 Application influences the control loop 0 P2P 1 CNC 2 Master...

Страница 24: ...03 will show the error code tn04 Measuring Distance Distance of inertia measuring 0 01 For example 0022 represent 0 22 motor revolutions the maximum is 0 4 revolutions 22 tn00 Saving parameters Write 1 to save all the parameters Write 2 to save all the parameters and restart the servo Write 3 to reboot the servo Write 10 to initialize the parameters Notice Users MUST reboot the driver if changing ...

Страница 25: ...000 1765 8 556 200 146 24 6389 2300 1765 9 639 230 164 25 7500 2700 1765 10 750 270 189 26 8612 3100 1765 11 889 320 222 27 9445 3400 12 1056 380 268 28 10278 3700 13 1250 450 340 29 11112 4000 14 1500 540 360 30 12500 4500 15 1667 600 392 31 13889 5000 Notice When the setting of stiffness or inertia ratio makes the Kvp value bigger than 4000 it isn t useful to raise stiffness any more and it will...

Страница 26: ...n hexadecimal otherwise in decimal SET Enter the selected menu Enter the status of parameters setting affirm the parameters Display FFF F No motor configured please operate according to the flow chart of Easy and make it sure to save the parameters and reboot the servo START Execute the flow chart of EASY Jog the machine evaluate the performance Measure the Inertia Ratio by Tn03 Adjust the Stiffne...

Страница 27: ...r to Talbe 2 Analog Speed Factor Unit is rpm V Write 1 to save all the parameters Write 2 to save all the parameters and restart the servo Write 3 to reboot the servo Write 10 to initialize the parameters Notice Users MUST reboot the driver if changing the motor type MODE MODE SET Motor Type LED is blinking Press MODE can shift the parameters below display in the same way SET Confirm the parameter...

Страница 28: ...del Press MODE to enter F000 group select the object address d0 02 and set the target speed Its unit is RPM It is recommended to run at a speed lower than 100RPM to avoid personal injury and property damage Press MODE to enter F006 group and conduct key test The default value is d6 40 Use to adjust the data to d6 31 first then press to automatically change the data to d6 15 and then use to adjust ...

Страница 29: ...ection and long press is the negative direction Figure 3 4 Block diagram of trail operation steps Kincoservo Operating procedure Enter menu bar driver control panel F004 the user configures the motor through the motor model dialog box of f004 group press enter key to confirm after setting and reboot the driver Cancel the drive enable and drive operating mode control defined in I O control Open the...

Страница 30: ...0 SMG130D 0100 10A K 4LKG P5 3550 SMG130D 0150 20A K 4LKG P7 3750 SMG130D 0200 20A K 4LKG P6 3650 SMG130D 0150 20A K 4HKG P8 3850 SMG130D 0200 20A K 4HKG PC 4350 SMG130D 0300 20A K 4HKG YZ 5A59 SMS40S 0005 30J K 5LKU ZZ 5A5A SMS40S 0005 30K K 5LKU YY 5959 SMS40S 0010 30J K 5LKU ZY 595A SMS40S 0010 30K K 5LKU Y0 3059 SMS60S 0020 30J K 3LKU Z0 305A SMS60S 0020 30K K 3LKU Y1 3159 SMS60S 0040 30J K 3L...

Отзывы: