104
Software Design
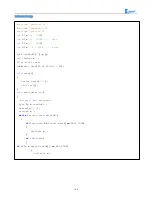
#include "protocol.h"
#include "hummerbot.h"
#include "process.h"
int
E1
=
5
;
//PWMA
int
M1
=
9
;
//DIRA --- left
int
E2
=
6
;
//PWMB
int
M2
=
10
;
//DIRB --- right
byte readbuff
[
32
]
=
{};
int
readlen
=
0
;
ST_protocol recv
;
hummerbot hbot
(
E1
,
M1
,
E2
,
M2
,
13
,
A0
);
void
setup
()
{
Serial
.
begin
(
9600
);
hbot
.
init
();
}
void
read_data
(
void
)
{
unsigned
char
avilable
;
byte
*
p
=
readbuff
;
memset
(
p
,
0
,
32
);
readlen
=
0
;
while
(
Serial
.
available
()>
0
)
{
if
(!
avilable
&&
Serial
.
peek
()==
START_CODE
)
{
avilable
=
1
;
}
if
(
avilable
)
{
if
((*
p
=
Serial
.
read
())
==
END_CODE
)
{
avilable
=
0
;
Содержание Hummer-Bot
Страница 1: ...Hummer Bot Instruction Manual Github https github com keywish keywish hummer bot...
Страница 7: ...4...
Страница 8: ...5...
Страница 9: ...6...
Страница 10: ...7...
Страница 13: ...10 Fig 2 2 Several commonly usedArduino...
Страница 15: ...12 After the completion as shown...
Страница 16: ...13 The second step is to Welding wire on the motor...
Страница 17: ...14 After the completion as shown...
Страница 19: ...16 Fig 3 1 3 Diagram of Aluminum Alloy Bracket Installation...
Страница 20: ...17 Fig 3 1 4 Diagram of Motor Installation Fig 3 1 5 Fixing Screw for Motor...
Страница 24: ...21 Fig 3 1 10 Diagram of Wheel Installation Fig 3 1 10 Diagram of Wheel Screw Fixation...
Страница 29: ...26 Fig 3 1 15 Diagram of Tracing Module Installation...
Страница 30: ...27 Fig 3 1 16 Diagram of Screw Brackets Fig 3 1 17 The Back of Complete Installation...
Страница 32: ...29 First install the screws on the UNO After the completion as shown...
Страница 33: ...30 Then install UNO on acrylic plates Fig 3 1 20 Diagram of Arduino Mainboard and Battery Box Installation...
Страница 43: ...40 Fig 3 1 33 Diagram of Wires Arrangement Fig3 1 34 the Effect of Whole Assembly...
Страница 56: ...53 Fig 3 2 11 Diagram of Data with Obstacles Fig 3 2 12 Diagram of Data without Obstacles...
Страница 69: ...66 Fig 3 2 22 Diagram of Steering Gear Fig 3 2 23 Composition of Steering Gear...
Страница 93: ...90 Fig 3 2 42 Receiving Head Position Fig 2 3 43 Installation of Receiving Head...

