background image


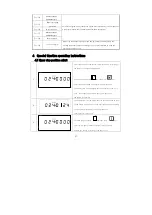
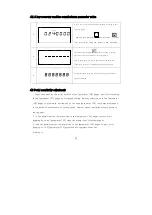
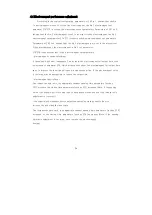
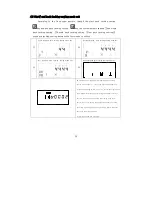
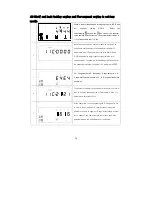
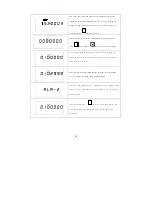
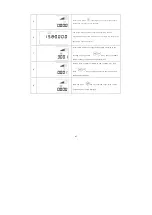
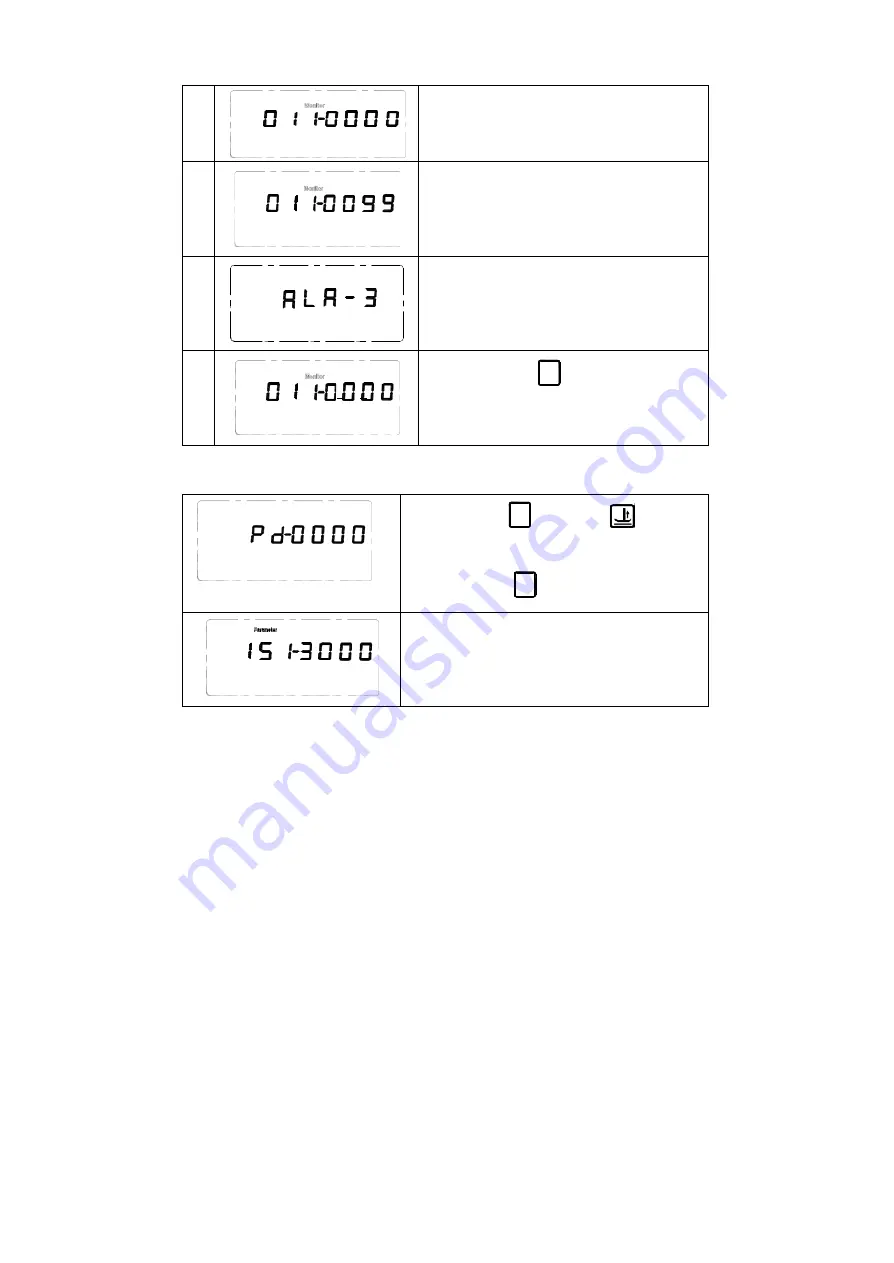
The fifth step, adjusted the parameter number to 010, including the 

number  of  needle  monitoring  function,  so  that  each  turn 

finished stitch, stitch count is increased by 1. 


The  sixth  step,  when  the  needle  reached  the  upper  limit 


(parameter 154), for example, when the needle reached to 100. 


Operation panel  display ALA-3,  suggesting that  the  needle number 

alarm, show that the needle number has reached 154, the number of 

needle set alarm. 


The seventh step, press 

key to cancel the alarm, and re- 

start counting, meter needle alarm number still is determined by 

154 parameters. 


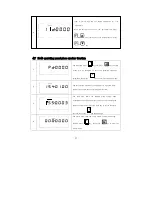
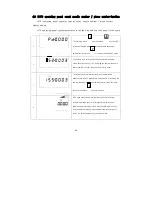
4.8 H-43 operating panel count needle number function 


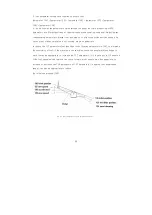
The  first  step,  press 

key,  then  press 

key,  the  LCD 


screen   will   be   prompted   to   enter   the   password   technician 

parameters, then press 

key  to enter the technician mode; 


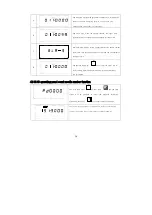
The second step, adjusted to 151 parameters, input the count needle 

number, for example the set alarm needle number for 3000 pin;


38 

Содержание Siruba C007K

Страница 1: ...C007K VC008 電控參數說明書 ELECTRONIC CONTROL PARAMETER MANUAL ...

Страница 2: ...明 4 2 2 操作面板各按鍵功能說明 6 3 系統參數設置說明 8 3 1 技術員參數表 8 3 2 系統員參數表 14 3 3 監控參數表操 22 3 4 安全報警 22 3 5 故障代碼表 23 4 特殊功能操作說明 24 4 1 上停針位調整 24 4 2 一鍵恢復機頭廠家參數值 24 4 3 腳踏板靈敏度調整 25 4 4 電磁鐵性能調整 25 4 5 前後固縫模式設置 26 4 6 前後固縫與四段縫超長針數設置 27 4 7 H 43 操作面板計件數功能 28 4 8 H 43 操作面板計針數功能 29 4 9 H 70 操作面板計針數 計件數功能 30 i ...

Страница 3: ...裝控制箱及其他部件時 請先關閉電源並拔掉電源插頭 為防止干擾或漏電事故 請做好接地工程 電源線的接地線必須牢 固的方式與大地有效連接 所有維修用的零部件 須由本公司提供或認可 方可使用 在進行任何保養維修動作前 必須關閉電源並拔掉電源插頭 控制 箱裡有高壓危險 必須關閉電源五分鐘後方可打開控制箱 本手冊中標有 符號之處為安全注意點 必須注意並嚴格遵守 以免造成不必要的損害 1 產品安裝 1 1 產品規格 產品型號 ASD58 55 ASU58 55 ASD58 75 ASU58 75 電源電壓 AC 220 20 V 電源頻率 50Hz 60Hz 最大輸出功率 750W 1 2 介面插頭的連接 將腳踏板及機頭的各連接插頭安插到控制器後面對應的插座上 各插 座名稱如圖 1 2 所示 連接好 請檢查插頭是否插牢 1 ...

Страница 4: ...編碼器插座 操作面 板插座 翻 台開關插座 自動電磁鐵插座 抬壓腳電磁鐵插座 機頭燈插座 黑色 外置 同步器插座 使用正常的力量插不進去時 請檢查插頭與插座是否匹 配 插入方向或針的方向是 否正確 照明燈介面和抬壓腳電 磁鐵介面都是 1 2 的介面 機頭照明燈介面使用黑色介面 請注意區分 外置同步 器插座 電機電源插座 腳踏板插座 電機編碼器插座 操作面板插座 翻台開關插座 自動電磁鐵插座 抬壓腳電磁 鐵插座 機頭燈插座 圖 1 2 AS 系列控制 箱插座背板 2 ...

Страница 5: ... 接地線等接線時不要被其它物體 壓到或過度扭曲 以確保使 用安全 1 4 安裝與調整 A 一體式直驅電機 請參閱各機頭廠家安裝說明書 圖1 3 控制器安裝 示意圖 B 外掛式皮帶電機 請注意調整電機與皮帶安裝位置 1 電機的皮帶輪與縫紉機皮帶輪必須絕對平行 2 電纜線穿過台板下後必須加以固定 防止被皮帶摩擦 3 皮帶鬆緊度調整 可將電機腳座上的固定螺栓略微調松後 調整電機與機頭皮帶輪鍵的 適當間距 再鎖緊固定 圖1 4 電機安裝 示意圖 C 外掛控制箱的安裝 在台板右側面留出足夠空間 將控制箱鎖緊於台 板右下方 D 腳踏板 速控器 的安裝 請保持吊杆成直線 將腳踏板支架鎖 緊于台板下方 並根據需要 適當調整吊杆螺絲 改變腳踏板角度 使踏板前踩與後踩行程適合於 操作習慣 3 ...

Страница 6: ...參數 前 後固縫設置 以及抬 壓腳 停針位 剪線 慢速起縫等液晶字 元 各面板所含功能按鍵及液晶顯示功能符號根據型號區別而略有增減 但工作模式與使用方式均大致相同 1 H 43 操作面板 外觀 圖 2 1 操作面板 H 43 外觀介 面 圖 2 2 H 43 操作面板液晶顯示幕圖 示 表 2 1 H 43 操作面板液晶功能圖示顯示說明 索引 圖示 描述 索引 圖示 描述 自動剪線功能 中間停針上停針 軟啟動功能 自由縫 前加固縫 W 縫 後加固縫 多段縫 縫紉段數標記 多段縫觸發功能 計數 參數值顯示 自動測試 剪線後抬壓腳 夾線功能 中間停針抬壓腳 四段縫 中間停針下停針 4 ...

Страница 7: ... 圖 2 3 操作面板 H 70 外觀介面 圖 2 4 H 70 操作面板液晶顯示幕圖 示 表 2 2 H 70 操作面板液晶功能圖示顯示說明 索引 圖示 描述 索引 圖示 描述 自動剪線功能 W 縫 軟啟動功能 多段縫 前加固縫 多段縫觸發功能 後加固縫 自動測試 縫紉段數標記 夾線功能 計數 參數值顯示 四段縫 剪線後抬壓腳 計針標記 中間停針抬壓腳 計件標記 中間停針下停針 計數顯示 中間停針上停針 速度標記 自由縫 5 ...

Страница 8: ...固縫 後雙固縫 後四固縫 之間迴圈選擇 對應液晶屏圖示點亮 同時顯 示 即為後固縫介面 選擇對應的 鍵和 鍵可增減設置 C D 段的針數 默認針數範圍 1 F 對應 1 15 針 4 自由縫 鍵 按下該鍵 系統即進入自由縫工作模式 對應液晶屏圖示 被點亮 踩下踏板即可開始縫紉 5 W 縫鍵 按下該鍵 系統即進入 W 縫工作模式 對應液晶屏圖示 被點亮 同時顯示 即為 W 縫 介面 選擇對應的 鍵和 鍵可增減設置 A B D 段的針數 針數範圍 1 F 對應 1 15 針 6 多段縫 鍵 亦稱為定長縫 按下該鍵 系統即進入多段縫工作模式 對應液晶屏圖示 被點亮 同時顯示 即為多段縫介面 圖中 為總段數 可用 鍵和 鍵增減調整 默認最大 24 段 為當前設置段 為當前段的縫製針數 這些數位均可通過對應的 鍵和 鍵增減調整 7 四段縫 鍵 按下該鍵 系統即進入四段縫工作模式 對應液晶屏圖示 被點...

Страница 9: ...能 13 抬壓腳 鍵 每按動一次 系統抬壓腳模式將在不自動抬壓腳 剪線後自動抬壓腳 縫紉中停車自動抬 壓腳 剪線後和停車時都自動抬壓腳四種模式之間迴圈選擇 對應液晶屏圖示同時點亮 14 多段縫 觸發鍵 在多段縫模式下 按下該鍵 液晶屏圖示 點亮 表明選擇觸發模式有效 此時點動腳踏板一 次即可完成當前段的設定針數縫製 再按一下該圖示熄滅 表明多段縫下觸發功能關閉 15 機頭燈 鍵 H 43 與 H 70 面板支援外接機頭燈調光功能 依次按下該鍵 可獲得關閉和從暗到明四級調光效 果 16 自訂 功能鍵 自訂擴展功能按鍵 並根據情況可擴展為與其它按鍵同時按下實現組合功能 17 速度增 減鍵 可快速調整系統的最高轉速 在多段縫模式下 亦為總段數的調整按鍵 此外 在參數設置時 可作為對應參數號的調整按鍵 18 參數增 減鍵 調整對應數值的增加鍵與減小鍵 19 切換鍵 快捷切換操作 目前保留 暫未使用...

Страница 10: ...速度 1 0 1 200 5000 3500 自由縫最高速 全域最高限速 1 02 200 5000 3000 定長縫最高速 1 0 3 200 5000 3000 手動倒縫最高限速 1 04 100 800 200 補針速度 1 05 100 500 250 剪線速度 1 06 0 1 0 慢速啟動模式 0 僅剪線後有慢速啟動 1 剪線後 中間停止都有慢速啟動 1 0 7 1 9 2 慢速起縫針數 1 08 100 800 200 慢速起縫速度 1 09 1 20 20 加速靈敏度 對於直驅機頭可設置為較大的值 對於皮帶傳動不要設 置太大 否則振動 雜訊較大 此參數不影響電機出力 1 0 A 1 20 20 減速靈敏度 對於直驅機頭可設置為較大的值 對於皮帶傳動不要設 置太大 否則振動 雜訊較大 此參數不影響電機出力 1 0 B 200 1200 800 中速數值 RPM 輪帶比速度 1...

Страница 11: ... 設定 ms 1 1 A 10 359 170 針跡補償參考角度 倒縫電磁鐵最佳吸合角度 1 1 B 0 4 0 前後加固模式類型 CD 與 AB 類似 0 B AB ABAB 無 1 B 無 2 B AB 無 3 AB 無 4 AB ABAB 無 1 1C 0000 9999 0 分別對應 A B C D 針數的十位 同時與前後固縫介面下所設 A B C D 個位數位共同組成兩位元數針數 每段針數範圍 1 99 針 1 1 D 0000 9999 0 分別對應 E F G H 針數的十位 同時與四段縫介面下所設 E F G H 個 位元數位共同組成兩位元數針數 每段針數範圍 1 99 針 1 20 0 1 2 3 0 前加固工作模式 0 輕觸踏板 即自動執行起始回縫 1 受踏板控制 可任意停止 2 針停上定位後 受 119 號參數 CT 時間控制動作 3 針停下定位後 受 119 號參數...

Страница 12: ...9 0 後固縫之後插入的針數 最後一個 D 段增加針數 1 28 0 3 0 中間定長回縫次數 1 29 0 99 4 中間固縫的針數 1 2 A 0 99 0 W 縫首段縮減或增加針數 範圍 0 99 默認 0 1 2 B 0 99 0 W 縫末段縮減或增加針數 範圍 0 99 默認 0 1 2C 0 1 0 W 縫首段增補或縮減模式 0 縮減 1 增補 默認 0 1 2D 0 1 0 W 縫末段增補或縮減模式 0 縮減 1 增補 默認 0 1 2E 0 1 0 定針縫段間計數開閉 0 計針數 1 不計針數 範圍 0 1 默認 0 轉 手輪計針數 1 3 0 0 1 2 3 2 腳踏板曲線模式 0 自動線性斜率 根據最高速自動計算 1 兩段斜率 2 冪次曲線 3 S 型曲線 踏板參 數 1 3 1 200 4000 3000 兩段斜率 中段速度 RPM 兩段斜率的轉捩點速度 1 3 2 ...

Страница 13: ...800 0 剪線後抬壓腳延遲時間 撥線 1 3 F 0 1 2 3 4 0 全後踏操作模式選擇 保留 0 全後踏有切線及抬壓腳 1 全後踏只有提針功能 2 全後踏無抬壓腳功能 3 全後踏抬壓腳及提針 4 全後踏抬壓腳並走慢速 1 40 0 1 1 上電自動找上針位 0 不找 1 找 習慣 設定 1 4 1 0 1 1 自動加固功能選擇 無自動加固功能的機頭 最好禁止 0 禁止固縫 1 允許固縫 1 42 0 1 0 手按回縫時功能模式選擇 0 Juki 模式 在縫紉中途或中途停止時均有動作 1 Brother 模式 僅在縫紉中途有動作 1 4 3 0 1 2 3 0 特殊運行模式 0 操作工選擇 正常 1 簡易縫模式 2 測電機初始角 不再需要取下皮帶 3 計算傳動比模式 需要有停針感測器 且不能取下皮帶 1 44 0 31 0 電機低速加力功能開關 0 正常功能 1 31 低速加力過厚能...

Страница 14: ...須由重定按鈕設定 或面板上的P鍵來啟動重新計數 4 依針數遞減計數 計數滿後 馬達自動停止 須由重定按鈕設定 或面板上的P鍵來啟動重新計數 5 依針數遞增計數 計數滿後 發出報警 剪線後馬達鎖住 6 依針數遞減計數 計數滿後 發出報警 剪線後馬達鎖住 1 5 3 1 100 1 計件數功能比例值設定 1 54 1 9999 1 計件數上限設定值 1 55 0 4 0 計件數模式選擇 0 不計數 1 計件數遞增計數 計數滿後自動重新計數 2 計件數遞減計數 計數滿後自動重新計數 3 計件數遞增計數 計數滿後 馬達自動停止 須由重定按鈕設定 或面板上的P鍵來啟動重新計數 4 計件數遞減計數 計數滿後 馬達自動停止 須由重定按鈕設定 或面板上的P鍵來啟動重新計數 1 56 0 9999 0 對應1 2 3 4號電磁鐵斬波占空比時間選擇 0以ms為單位 1以 0 1ms為單位 1 5 7 0 99...

Страница 15: ...1 60 0 執行時間復位 1 6 1 0 1 2 參數傳輸 0 無動作 1 下傳參數 2 上傳參數 操作類 不保 存 1 62 1 2 恢復出廠參數 1 6 3 1 2 保存當前參數為用戶自訂機修參數 可恢復 1 64 密碼 1 65 恢復控制器出廠參數 並覆蓋機頭廠家出廠參數或用戶自訂機修參 數 原有參數不可恢復 注 16X 參數操作保存時 必須長時間按住 大約 3 5 秒即可保存 13 ...

Страница 16: ...線結束時機械角度 20 2 0 1 2 3 4 5 6 1 剪線時序選擇 0 203 號參數所設定角度 TS 處進行切線 直至上停針後延時 206 參數所設定時間 T2 為止 1 203號參數所設定角度 TS 處進行切線 直至204號參數所設定 角 度 TE 為止 2 203 號參數所設定角度 TS 處進行切線 延時 206 參數所設定時間 T2 為止 3 下針位元信號後延遲 205 號參數所設定時間 T1 進行切線 延時 206 參數所設定時間 T2 設定時間為止 4 找到上針位元信號後延遲 205號參數所設定時間 T1 進行切線 延時 206參數所設定時間 T2 設定時間為止 大部分應用於繃縫機 5 找到下針位元信號後即開始進行切線動作至上停針止 然後延遲 205 號參數所設定時間 T1 後再作 206 參數所設定的切線時間 T2 大 部分用於一般平車機型 而T1與T2設定值大部分均設...

Страница 17: ...止 1 211 號參數所設定角度 LS 後進行松線動作 直至 212 號參數所 設 定角度 LE 為止 2 211 號參數所設定角度 LS 後進行松線動作 延遲 214 號參數所 設 定時間 L2 為止 3 下針位元信號後延遲 L1 設定時間進行松線動作 延遲 214 號參 數所 設定時間 L2 為止 4 上針位元信號後延遲 L1 設定時間進行松線動作 延遲 214 號參 數所 設定時間 L2 為止 5 下針位元信號後即開始進行松線動作至上停針止 然後延遲 213 號 參 數設定時間 L1 後再作 214 號參數所設定松線時間 L2 6 211 號參數所設定角度 LS 後進行松線動作 至上停針止 然後延 遲 213 號參數設定時間 L1 後再作 214 號參數所設定松線時間 L2 松線 掃線 夾線模 式 2 1 1 5 359 25 松線電磁鐵啟動角度 LS 相對於下針位角度 2 1 2 ...

Страница 18: ...後停止位置 可實現剪線回拉功能 停止模 式 22 1 0 240 0 縫紉前反轉角度 提高過厚料能力 22 2 0 1 0 停針後 D 軸電流鎖定選擇 22 3 1 3000 300 停針後 D 軸電流鎖定時間 ms 22 4 0 1 2 3 0 緊急停車模式 0 關閉緊急停車功能 1 緊急停於任何位置 2 緊急停於上針位 3 緊急停於下針位 22 5 0 999 0 緊急停車前繼續縫紉的針數 根據速度與針數設定不同 實際可能大 於此數量 22 6 0 1 0 緊急停車後再啟動 0 不可再啟動 需重新上電 1 信號撤銷後可再次開始縫紉 22 7 200 360 360 中間停上針位位置調整 22 8 0 1 2 0 針冷卻功能出力設定 0 運行時動作 1 高於 22A 號參數所設定速 度時動作 2 剪線結束後動作 229 號參數所設定時間 22 9 1 2550 2500 針冷卻延遲時間 ...

Страница 19: ...警確認時間 ms 不區分直驅翻台開關和繃縫剪刀保護開 關 統一處理方式 23 3 0 1000 50 安全開關恢復確認時間 ms 23 4 0 1 0 電機轉向 1 反轉 0 正轉 23 5 0 1 2 0 壓腳交互量速度控制功能 0 關閉 1 類比信號 2 開關信號 23 6 0 1023 0 交互量下限 23 7 0 1023 710 交互量上限 23 8 200 800 200 交互量速度控制下限 23 9 200 2500 400 交互量速度控制上限 23 A 0 1 2 3 0 單布邊檢測器工作模式 0 不使用布邊檢測器 1 布邊檢測器工作於人工啟動模式 2 布邊檢測器工作於自動啟動模式 3 布邊檢測器工作於雙切線人工控速模式 23 B 10 3000 50 自動模式啟動確認時間 ms 23 C 0 999 3 啟動後不回應的針數 23 D 0 999 3 雙切線第一次切線的針數...

Страница 20: ...359 57 厚料加力結束角度 24 7 0 2000 0 加油提醒時間 小時 0 關閉此功能 24 8 0 4000 0 加油報警 禁止執行時間 小時 0 關閉此功能 24 9 200 2500 1000 機頭交互量 B2 速度 24 A 200 2500 1500 機頭交互量 B3 速度 24 B 0 1023 800 類比信號輸入 1 開關閾值 24 C 0 1023 800 類比信號輸入 2 開關閾值 25 0 詳見下行 1 1 號輸入功能定義 輸入功 能定義 25 1 1 1 號輸入有效電平 0 1 25 2 0 2 號輸入功能定義 25 3 0 2 號輸入有效電平 0 1 25 4 0 3 號輸入功能定義 25 5 0 3 號輸入有效電平 0 1 25 6 0 4 號輸入功能定義 25 7 0 4 號輸入有效電平 0 1 25 8 0 5 號輸入功能定義 25 9 0 5 號輸...

Страница 21: ... 壓腳交互量抬起 11 密縫 12 加固逆轉懸掛狀態 13 交互量抬起狀態 14 密縫狀態 16 底線計數滿狀態 17 剪線短頭輸出 18 拼縫壓腳輸出 19 雙針左轉針杆吸合 20 雙針右轉針杆吸 合 21 雙針左轉狀態 22 雙針右轉狀態 23 副張力控制輸出吸合 24 副張力控制狀態 2 7 0 1 500 50 1 號電磁鐵全出力時間 ms 電磁鐵 組 1 2 7 1 1 100 1 1 號電磁鐵斬波每週期開通時間 ms 保留 2 7 2 1 100 1 1 號電磁鐵斬波每週期關閉時間 ms 保留 2 7 3 0 600 0 1 號電磁鐵保護時間 100ms 2 7 4 1 500 70 2 號電磁鐵全出力時間 ms 2 7 5 1 100 1 2 號電磁鐵斬波每週期開通時間 ms 保留 2 7 6 1 100 1 2 號電磁鐵斬波每週期關閉時間 ms 保留 2 7 7 0 600...

Страница 22: ...100ms 28 8 1 500 100 7 號電磁鐵全出力時間 ms 28 9 1 100 0 7 號電磁鐵斬波每週期開通時間 ms 保留 28 A 1 100 0 7 號電磁鐵斬波每週期關閉時間 ms 保留 28 B 0 600 0 7 號電磁鐵保護時間 100ms 28 C 1 500 100 8 號電磁鐵全出力時間 ms 28 D 1 100 0 8 號電磁鐵斬波每週期開通時間 ms 保留 28 E 1 100 0 8 號電磁鐵斬波每週期關閉時間 ms 保留 28 F 0 600 0 8 號電磁鐵保護時間 100ms 29 0 詳見下行 7 1 號模擬輸入功能定義 機頭輸 入功能 定義 29 1 1 1 號模擬輸入有效電平 0 1 29 2 0 2 號模擬輸入功能定義 29 3 1 2 號模擬輸入有效電平 0 1 29 4 10 11 號輸入功能定義 29 5 1 11 號輸入有效...

Страница 23: ...入 2 15 提針鎖定 16 拼縫壓腳控制輸入 17 雙針機左轉輸入 18 雙針機右轉輸入 2 A 0 詳見下行 0 9 號機頭輸出功能 機頭輸 出功能 定義 2 A 1 0 10 號機頭輸出功能 2 A 2 0 11 號機頭輸出功能 2 A 3 0 12 號機頭輸出功能 2 A 4 0 13 號機頭輸出功能 2 A 5 0 14 號機頭輸出功能 2 A 6 0 15 號機頭輸出功能 2 A 7 0 16 號機頭輸出功能 2 A0 2 A 7 0 輸出禁止 1 剪線 2 撥線 3 倒縫 4 抬壓腳 5 松線 6 夾線 7 吸風 8 吹風 9 針冷 卻 10 壓腳交互量抬起 11 密縫 12 加固逆轉懸掛狀態 13 交互量抬起狀態 14 密縫狀態 16 底線計數滿狀態 17 剪線短頭輸出 18 拼縫壓腳輸出 19 雙針左轉針杆吸合 20 雙針右轉針杆吸 合 21 雙針左轉狀態 22 雙針右轉...

Страница 24: ...行時間 Hour 0 1 3 霍爾狀態 02 8 機頭交互量電壓採樣值 02 0 母線電壓 02 9 DSP 軟體版本號 02 1 機頭速度 02 A 模擬輸入 1 採樣值 02 2 相電流 02 B 模擬輸入 2 採樣值 02 3 初始角度 02 C 錯誤計數器 02 4 機械角度 02 D QP 超狀態 03 0 0 3 7 歷史故障代碼 3 4 安全報警 報警代碼 代碼含義 解決措施 加油提醒 按 P 鍵可暫時取消報警 請及時加油 計針數報警 表示計針數已達所設上限 按 P 鍵可取消報警並重新計數 計件數報警 表示計件數已達所設上限 按 P 鍵可取消報警並重新計數 緊急停車 再按下緊急停車按鈕 可消除緊急停車狀態 提針鎖定 再按下提針鎖定按鈕 可消除提針鎖定狀態 斷電提醒 請等候 30 秒再重新打開電源開關 翻台開關報警 擺正機頭 確保翻台開關復原 22 ...

Страница 25: ...0 秒後重新接通電源觀察是否能正常工作 重試幾次 若該 故障頻繁出現 請更換控制器並通知廠方 E r r 0 8 電機堵轉 斷開控制器電源 檢查電機電源輸入插頭是否脫落 鬆動 破損 是否有異物 纏繞在機頭上 排除後重啟系統仍不能正常工作 請更換控制器並通知廠方 E r r 0 9 制動回路故障 關閉系統電源 檢查電源板上白色的制動電阻接頭是否鬆動或脫落 將其插緊 後重啟系統 若仍不能正常工作 請更換控制器並通知廠方 E r r 1 0 HMI 通訊故障 檢查控制台與控制器的連線是否脫落 鬆動 斷裂 將其恢復正常後重啟系 統 若仍不能正常工作 請更換控制器並通知廠方 E r r 1 1 機頭停針信號故障 檢查機頭同步信號裝置與控制器的連線是否鬆動 將其恢復正常後重啟系統 若仍不能正常工作 請更換控制器並通知廠方 E r r 1 2 電機初始角度檢測故障 請斷電後再嘗試 2 3 次 若仍報故障...

Страница 26: ... 0 表明此位置為系統當前預設的上停針位置 2 第二步 轉動手輪 讓挑線杆到上停針位置或希望調整到的合 適位置 此時液晶屏顯示調整後的上停針位 如 124 3 P 第三步 先按住 鍵 再按 鍵 使機械偏轉角度歸零 P 上停針位設置完成 最後按 鍵退出 4 2 一鍵恢復機頭廠家參數值 1 如果希望恢復機頭廠家的出廠參數 可按照如下步驟 P 第一步 先按住 鍵 再按 鍵 即進入監控模 式 默認為 024 號監控參數 2 第二步 長按 鍵 3 秒鐘以上 開始一鍵恢復機頭廠 家參數 液晶屏顯示橫杠 表明正在恢復參數 此時控 制器切勿斷電或拔出操作面板插頭 3 待數碼管顯示全 8 表明機頭廠家參數恢復完成 24 ...

Страница 27: ...數的 參考值 調整對應參數 抬壓腳和前踩或後踩的動作位置也隨之改變 如前踩很大距離機 器還沒有運轉 可適當減小 137 參數 不能小於回中位置參數 136 即可提高前踩的靈 敏度 若機器過於靈敏 輕觸踏板機器就開始運行 可適當加大 137 參數 若不容易補針 稍微前踩 速度就迅速提高造成前沖多針 可適當增大 138 參數或減小 137 參數 即增大 腳踏板低速範圍 也可以適當降低初始起縫速度 100 136 踏板初始位置 137 低速起動位置 138 開始加速位置 139 最大速度位置 腳踏板 136 踏板初始位置 135 抬壓腳抬起位置 134 自動剪線位置 4 4 電磁鐵性能調整 圖 4 1 踏板動作各位置參數示意圖 按典型配置 設參數 260 為 1 表明 1 號電磁鐵被設置為剪線電磁鐵 則 1 號電磁 鐵 設置參數 270 273 號即為剪線電磁鐵設置參數 設參數 261 為 3 ...

Страница 28: ...過小 可能會導致電磁鐵吸合狀態下力度不夠 甚至提前釋放 z 電磁鐵吸合無力 吸合狀態的力度如何調整 怎樣增大吸合時候狀態的力度 可增大占空比 適當將斬波開通時間參數 如 275 號 增加 或將關閉時間參數 如 276 號 減小 注 如果開通時間占比調整過大 易使電磁鐵發熱 4 5 前後固縫模式設置 針對固縫模式 通過前固縫按鍵 和後固縫按鍵 系統預設支援 單固縫 雙固縫 四固縫與 無固縫四種模式間切換 前單固縫 後單固縫模式 前雙固縫 後雙固縫模式 前四固縫 後四固縫模式 無前 後固縫 可通過調整 11B 號參數 修改固縫切換模式 若設置為 1 則只在單固縫與關閉固縫間切換 若設置為 2 則在單固縫 雙固縫和關閉固縫間切換 若設置為 3 則在雙固縫與關閉 固縫間切換 若設置為 4 則在雙固縫 四固縫和關閉固縫 間切換 前固縫和後固縫模式均由 11B 號參數指定 26 ...

Страница 29: ... G H 段設 置的個位數字 共同組成總針數 例如 在設置前後固縫針數 時 默認 11C 號參數為 0000 3 若 A 段 C 段設置為 E B 段 D 段設置為 4 則 A 段 C 段實 際 針數為 14 針 B 段 D 段實際針數為 4 針 4 若任意一段的針數需設置超過 15 針 則需調整 11C 號參數 如 將 11C 號參數調整為 2121 5 同時相應 A B C D 段分別設置為 1 6 1 6 則 A 段 C 段實際針 數為 21 針 B 段 D 段實際針數為 16 針 這樣 所述各段針 數 實際可調範圍可擴展為 1 99 針 6 四段縫的 E F G H 各段的設置與前後固縫類似 但十位調整參 數為 11D 號參數 注 調出 11C 號參數的快速鍵為同時按下 加 鍵 11D 號參數的快速鍵為同時按下 加 鍵 27 ...

Страница 30: ...設定的報 警件數為 100 件 3 第三步 再調到 155 號參數 選擇所需計件數模式 通常可設置 P 為 3 即計件數滿後按復位鍵取消報警重新計數 然後按 鍵 保存退出 4 P 第四步 打開計件數監控功能 先按住 鍵 再按 鍵進 入監控模式 5 第五步 將參數號調到 011 即計件數監視功能 這樣每剪完一 次線 計件數就增加 1 6 第六步 當所計件數達到所設上限值 154 號參數 時 例如 100 件時 7 操作面板顯示 ALA 3 提示計件數報警 表明計件數已達到 154 號參數所設報警件數 8 P 第七步 此時可按 鍵取消報警 並重新開始計數 計件報警 件數仍然由 154 號參數確定 28 ...

Страница 31: ... 警針數為 3000 針 3 第三步 再調到 152 號參數 選擇所需計針數模式 通常可設置 P 為 3 即計針數滿後按復位鍵取消報警重新計數 然後按 鍵 保存退出 4 P 第四步 打開計針數監控功能 先按住 鍵 再按 鍵進入 監控模式 5 第五步 將參數號調到 010 即計針數監視功能 這樣每轉一圈 完成一針 計針數就增加 1 6 第六步 當所計針數達到所設上限值 151 號參數 時 例如達 到 3000 針時 7 操作面板顯示 ALA 2 提示計針數報警 表明計針數已達到 151 號參數所設報警針數 8 P 第七步 此時可按 鍵取消報警 並重新開始計數 計針報警 件數仍然由 152 號參數確定 29 ...

Страница 32: ...再按下 鍵進入技術員模式 2 第二步 選擇所需計針數模式 通常可設置為 3 即計針數滿後 按復位鍵取消報警重新計數 3 第三步 再選擇所需計件數模式 調到 155 號參數 亦可設置為 P 3 即計針數滿後按復位鍵取消報警重新計數 然後按 鍵保 存退出 4 若開啟了計針數功能或計件數功能 操作面板將對應顯示計針數 標識或計件數標識 當計針數功能與計件數功能均開啟時 預設 顯示計針數值 5 此時按計數切換鍵 可在顯示計針數與計件數功能間切換 6 系統通常預設開啟計數設定值快捷修改的功能 可調整 158 號參 數 修改為 1 則關閉此功能 默認為 0 開啟此功能 7 此時 顯示計針數時 按計數按鍵區域內 鍵 可對計 針數設定值加減 30 ...

Страница 33: ...8 顯示計件數時 按計數按鍵區域內 鍵 可對計件數當 前值加減 9 按計數復位鍵 可對當前顯示的計數值清零 31 ...

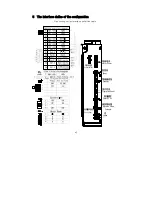
Страница 34: ...5 介面定義配置圖 平縫系列介面配置表 同步裝置 Synchronizer 電機電源 Motor Power 腳踏板 Pedal 電機編碼器 Encoder 抬壓腳電磁鐵 Foot Lifter 操作面板 OperationPanel 翻抬開關 Safety SW 機頭電磁鐵 MachineHead Sclenoid 燈 Lamp 32 ...

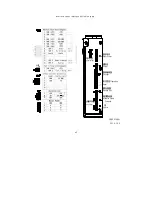
Страница 35: ...繃縫系列介面配置表 同步裝置 Synchronizer 電機電源 Motor Power 腳踏板 Pedal 電機編碼器 Encoder 抬壓腳電磁鐵 Foot Lifter 操作面板 OperationPanel 翻抬開關 Safety SW 機頭電磁鐵 MachineHead Sclenoid 燈 Lamp 386P0146A 2014 1 9 33 ...

Страница 36: ...30 4 Special function operating instructions 31 4 1 Upper stop position adjust 31 4 2 A key recovery machine manufacturers parameter value 32 4 3 Pedal sensitivity adjustment 32 4 4 Electromagnet performance adjustment 34 4 5 Start end back tacking sewing mode set 35 4 6 Start end back tacking sewing and Four segment sewing is set long needle 36 4 7 H 43 operating panel piece number function 37 4 ...

Страница 37: ...ffective way to earth All parts for the repair provided by the Company or approved before use Performing any maintenance action you must turn off the power and unplug the power cord There are dangerous high voltage control box you must turn the power off after one minute before opening the control box This manual marked with the symbol of the Department of Safety Precautions must be aware of and s...

Страница 38: ...cket The use of the normal force are not inserted into the plug and socket please check whether the matching direction or needle insertion direction is correct Lighting interface and presser foot lifting electromagnet interface is a 1 2 interface head lamp interface using black interface please pay attention to the distinction between Synchronizer Motor Power pedal Encoder Operation panel Safety S...

Страница 39: ...ressure to distort in order to ensure the safe use 1 4 Installation and adjustment A The integrated direct drive motor please refer to the various machine head manufacturers installation instructions Fig 1 3 Direct drive installation diagram controller B Plug in type belt motor please pay attention to adjust the motor with the belt installation position 1 The belt pulley and the sewing machine bel...

Страница 40: ...struction According to the different configuration and demand AS series controller provides many kinds of operation panel for customers to use According to the operating condition of the system the LCD module operation panel will display the sewing patterns various parameters front back fixed seam to set the current and the presser foot needle position line cutting slow up the joint character LCD ...

Страница 41: ...ree sewing start back tacking W seam End back tacking Multi seam Sewing segments index Trigger function Numeric character display pin number parameter Automatic test Foot lifter after trimming Clamp function Middle stop foot lifter Four Intermediate stops down stop position 2 H 70 Operation panel appearance Fig 2 3 H 70 appearance Fig 2 4 H 70 LCD screen icon 5 ...

Страница 42: ...dle and piece number of base line 2 2 The operation panel keys of description No Appearance Name Description 1 Function key The key is parameters confirm key and back to the previous menu until the operator sewing mode state In addition work with other key to set a higher level of the parameter 2 Start back tacking key It is called start back tacking function selection keys every effective press t...

Страница 43: ...into w sewing mode LCD icon is lit shown is w sewing interface Select the corresponding key and the key can set needle A B D default range 1 F corresponds to the 1 15 pin 6 Multi segment sewing mode key It is called constant sewing you press the key the system enters to the multi segment sewing mode LCD icon is lit shown is multi segment sewing interface is total segment use key and the key to adj...

Страница 44: ...Note the H 43 panel without the key the key combination to achieve the function 11 Stitch compensation key In the free sewing midway stop or multi segment sewing section stop press the key can realize stitch compensate function One shot the button to fill half needle press a long time to fill a needle keep the continuous stitch compensate 12 Trimming key Press this key LCD icon is lit indicate tha...

Страница 45: ...the situation can work with other key combination function 17 Speed increase and decrease key The highest speed of system can be fast adjustment In the multi segment sewing mode also as the total segments of the adjust button In addition the parameter setting can be used as keys corresponding to the adjustment parameter 18 Parametric increase and decrease key Adjust the parameter values increase a...

Страница 46: ... and key select the parameter and change the corresponding parameter 5 Press key exit parameter setting mode return to sewing mode NO Range Default Description Comment 1 00 100 800 200 Start sewing speed Speed 1 0 1 200 5000 3500 Maximum sewing speed 1 02 200 5000 3000 Maximum constant sewing speed 1 0 3 200 5000 3000 Maximum manual back tacking speed 1 04 100 800 200 Stitch compensation speed 1 0...

Страница 47: ...1 1 0 200 2200 1800 Start back tacking speed Back tacking Para 1 1 1 200 2200 1800 End back tacking speed 1 1 2 200 2200 1800 W type sewing speed 1 1 3 1 70 24 Start back tacking No 1 stitch compensation profile 1 1 4 1 70 20 Start back tacking No 2 stitch compensation profile 1 1 5 1 70 24 End back tacking No 1 stitch compensation profile 1 1 6 1 70 20 End back tacking No 2 stitch compensation pr...

Страница 48: ... stop down position 119 parameter CT time control Back tacking Mode 1 2 1 0 1 2 0 Start back tacking after operation mode selection 0 start back tacking after continue sewing 1 start back tacking after automatic stop 2 start back tacking after automatic trimming 1 22 0 1 0 constant sewing after operation mode selection 0 end back tacking 1 standby fill needle 1 2 3 0 1 2 3 0 End back tacking mode ...

Страница 49: ...uction mode 0 reductions 1 supplement The default is 0 1 2D 0 1 0 The terminal section of W sewing addition or reduction mode 0 reductions 1 supplement The default is 0 1 2E 0 1 0 constant sewing intersegment count on or off 0 gauge needles 1 without needles the range of 0 1 the default 0 hand wheel gauge needle number 1 3 0 0 1 2 3 2 Pedal speed control profile mode 0 Auto linear ramp auto calcul...

Страница 50: ...g function selection 0 without 1 with 1 3 D 0 1 1 Trimming position foot lifting function selection 0 without 1 with 13E 1 800 0 Trimming after foot lifting delay time clamp 1 3 F 0 1 2 3 4 0 The back pedal operation mode selection Reserved 0 after a tangent and presser foot 1 after only needle lifting function 2 after all no presser foot function 3 after stepping presser foot and needle 4 after s...

Страница 51: ...d on off 0 Normal functions 1 31 low speed torque increase level 1 45 0 1 1 Retain 1 46 1 800 100 Instruction execution time of half stitch compensation 1 4 7 1 800 150 Instruction execution time of one stitch compensation 1 48 0 1 2 0 Fill needle mode 0 the time control 1 fill half needle 2 fill a needle 1 49 0 The presser foot lowering speed slowed down slow release delay coefficient bigger down...

Страница 52: ...cally stop shall be determined by the P key to reset button set or panel to start counting again 5 according to the number of needle increment count count full alarm shear line motor lock Count Mode 1 5 3 1 100 1 Cunting piece proportion set up 1 54 1 9999 1 Counting piece value set up 1 55 0 4 0 Trimming counting mode selection 0 no counting 1 Counting up according to stitch number after reaching...

Страница 53: ...er and piece number 0 adjustable 1 non adjustable 1 60 0 Running time reset Operation never save 1 6 1 0 1 2 Para transmission method 0 no action 1 Para Download from operation panel to controller 2 Para Upload from controller to operation panel 1 62 1 2 Recover to default para 1 6 3 1 2 Save current para As User custom para recoverable 1 64 Password 1 65 Recovery controller factory parameters and...

Страница 54: ...rn to sewing mode NO Range Default Description Comment 20 0 0 1 2 0 Trimming motor operation mode selection 0 flat sewing machine 1 interlock machines ordinary flat seaming shearing line stop to the needle position after the trimming 2 The over lock type manual trimming Trimming Mode 20 1 0 359 0 Mech Angle when trimming finished 20 2 0 1 2 3 4 5 6 1 Trimming time sequence selection 0 The paramete...

Страница 55: ... used for car models while T1 and T2 setting value most are set to 0 6 203 parameters that are set at TS of the tangent Toshiba first stop pin stop Tangent time delay T2 and205 parameters of the set time T1 after 20 3 5 359 10 Trimming start angle TS relate to down needle stop position angle 20 4 10 359 120 Trimming finish angle TE relate to down needle stop position angle the value should be bigg...

Страница 56: ...ose line first stop pin stop Then the delay parameter 213 set time L1 after the 214parameter set loose line time L2 6 211 parameter set point of LS after loose line first stop pin stop Then the delay parameter 213 set time L1 after the 214 Thread slack Thread sweeping String nipping Mode 2 1 1 5 359 25 Thread slack electromagnet start angle LS relate to down needle stop position angle 2 1 2 10 359...

Страница 57: ...verse angle before sewing start enhance the ability over thick material 22 2 0 1 0 D axis current lock selection after stop 22 3 1 3000 300 D axis current lock duration after stop ms 22 4 0 1 2 3 0 Emergency Stop Mode 0 Turn off the emergency stop function 1 Emergency stop at any position 2 Emergency stop at upper needle stop position 3 Emergency stop at lower needle stop position 22 5 0 999 0 Con...

Страница 58: ...essure sewing alternating quantity association 22 D 0 359 0 Target angle angle angle of complement needle needle 22 E 0 1 0 AS 61 series double needle machine automatic angleenergy saving mode switch 0 off 1 on 23 0 0 1 0 Foot lifting control mode 0 Push button jog switch 1 Valid when button is pushed Mode selection 23 1 0 1 0 Auto test mode selection 0 With certain stitch number 1 With certain ti...

Страница 59: ...esponse after start 23 D 0 999 3 A double tangent first tangent needles 23 E 0 999 3 Continue stitch No after signal invalid according to different speed and stitch No the actual value might be bigger 23 F 0 1 0 Air tight joint mode of auto back tacking 0 Hold current air tight joint condition when auto back tacking 1 Forced close air tight joint when auto back tacking 24 0 0 9999 1000 Motor machi...

Страница 60: ...finition 25 3 0 No 2 active input level 0 1 25 4 0 No 3 input definition 25 5 0 No 3 active input level 0 1 25 6 0 No 4 input definition 25 7 0 No 4 active input level 0 1 25 8 0 No 5 input definition 25 9 0 No 5 active input level 0 1 25 A 0 No 6 input definition 25 B 0 No 6 active input level 0 1 25 0 25 B 0 Disable 1 Manual back tacking 2 Safety switch 3 Emergency stop 4 Material side detection...

Страница 61: ...ut 19 Double needle turn left needle bar actuation 20 Double needle turn right needle bar actuation 21 Double needle turn left state 22 Double needle turn right state 23 Deputy tension control output 24 Deputy tension control state 2 7 0 1 500 50 No 1 electromagnet fully output time ms No 1 Electrom agnet 2 7 1 1 100 1 No 1 electromagnet chopping on time ms Reserved 2 7 2 1 100 1 No 1 electromagne...

Страница 62: ...tromagnet protection time 100ms 28 8 1 500 100 No 7 electromagnet fully output time ms 28 9 1 100 0 No 7 electromagnet chopping on time ms Reserved 28 A 1 100 0 No 7 electromagnet chopping off time ms Reserved 28 B 0 600 0 No 7 electromagnet protection time 100ms 28 C 1 500 100 No 8 electromagnet fully output time ms 28 D 1 100 0 No 8 electromagnet chopping on time ms Reserved 28 E 1 100 0 No 8 el...

Страница 63: ...tromagnet output definition Machine Output Definition 2 A 1 0 No 10 electromagnet output definition 2 A 2 0 No 11 electromagnet output definition 2 A 3 0 No 12 electromagnet output definition 2 A 4 0 No 13 electromagnet output definition 2 A 5 0 No 14 electromagnet output definition 2 A 6 0 No 15electromagnet output definition 2 A 7 0 No 16 electromagnet output definition 2 A 0 2 A 7 0 Output disa...

Страница 64: ...ription 0 1 0 Count needle number 02 5 Pedal voltage sampling value 0 1 1 Count piece number 02 6 Head drive than the actual value 0 1 2 Machine head actul speed 02 7 Motor total running time Hour 0 1 3 Holzer state 02 8 The interaction of the voltage sampling value 02 0 busbar voltage 02 9 DSP software version number 02 1 Mashine speed 02 A Analog 1 sampling value 02 2 Phase currunt 02 B Analog i...

Страница 65: ...ce number alarm Said piece number has reached the limit you can press the P key to cancel the alarm and re count Emergency stop Then press the emergency stop button can eliminate the emergency stop status Lift needle locking Then press the needle lifting locking button can eliminate the needle lifting locking state Power off to remind Please wait for 30 seconds and then re open the power switch Tu...

Страница 66: ...t checking circuit failure Turn off the system power restart after 30 seconds to see if it works well If not try several more times If such failure happens frequently seek technical support E r r 0 8 locked motor roller Disconnect the controller power check if the motor input plug is off loose or damaged or if there is something twined on the machine head After checking and correction if the syste...

Страница 67: ...ions 4 1 Upper stop position adjust 1 The control system in the recovery after the factory according to the need to re set the needle position P The first step first press key then press key enter into monitor mode The default is 024 monitoring parameters LCD screen displays the current point of view such as 0 shows that this position is the system default on the needle stop position 2 The second ...

Страница 68: ...eters restore completed 4 3 Pedal sensitivity adjustment Pedal movement by the initial position of the parameter 136 began slowly forward step to the parameter 137 began to low speed sewing before continuing on to the parameter 138 began to accelerate and then on to the deep parameter 139 reach maximum speed In the period of maintenance of sewing speed stepless speed regulation process between the...

Страница 69: ...distance machine is not running may be appropriate to reduce the 137 parameters not less than to the location parameters in 136 can improve the sensitivity of feet if the machine is too sensitive touch the pedal machines began to work it may be appropriate to increase the 137 parameters if it is not easy to fill needle a little feet speed quickly improve the cause forward multi needle may be appro...

Страница 70: ...rease the electromagnet full output time such as increase of parameter 270 which increases the shear line electromagnet full output time so as to improve the shear line pull speed increased shear line If the electromagnet voice is too large may be appropriate to reduce the output time electromagnet easily fever Can reduce the duty ratio the appropriate chopper opening time parameters such as 271 o...

Страница 71: ...ck tacking sewing mode set four start end back tacking sewing mode set None start end back tacking sewing mode set By adjusting the 11B parameters modified back tacking sewing mode If set to 1 only in the single fixed seam and closed seam sealing switch if set to 2 then in the single fixed seam double seam sealing and closing fixed seam switch if set to 3 the double seam sealing and closing fixed ...

Страница 72: ...ng of before and after the solid needle number the default 11C parameters 0000 3 If A C segment set is E B segment D segment set is 4 A C segment the actual needle is 14 B D segment the actual needle is 4 4 The number of needle if any segment of the need to set more than 15 needles then adjust the 11C parameters If the 11C parameter is adjusted to 2121 5 At the same time the corresponding A B C D ...

Страница 73: ...rompted to enter the password technician P parameters then press key to enter the technician mode 2 The second step adjusted to 154 parameters input the piece number for example the set alarm number for 100 3 The third step select the required piece number mode transferred to the 155 parameters can be set to 3 including the number of needle after press the reset key to cancel the alarm P to count ...

Страница 74: ...show that the needle number has reached 154 the number of needle set alarm 8 P The seventh step press key to cancel the alarm and re start counting meter needle alarm number still is determined by 154 parameters 4 8 H 43 operating panel count needle number function P The first step press key then press key the LCD screen will be prompted to enter the password technician P parameters then press key...

Страница 75: ...h step adjusted the parameter number to 010 including the number of needle monitoring function so that each turn finished stitch stitch count is increased by 1 The sixth step when the needle reached the upper limit parameter 151 for example when the needle reached to 3000 Operation panel display ALA 2 suggesting that the needle number alarm show that the needle number has reached 151 the number of...

Страница 76: ...to 3 including the number of needle after press the reset key to cancel the alarm P to count then press key save and exit 4 If the open count needle number function or piece number function operation panel will correspond to display count needle number marking or piece number marking When the count needle number and piece number function are open in the all the default display count needle number ...

Страница 77: ... the default is 0 open this function 7 At this time display the count needle number according to the counting key area press keys the count needle number of the set value addition and subtraction 8 Display piece number according to the counting key area press keys the piece number of the current value addition and subtraction 9 Press the reset key of count the count value can be cleared for the cu...

Страница 78: ...ne of the configuration Flat sewing series interface definition table 同步裝置 Synchronizer 電機電源 Motor Power 腳踏板 Pedal 電機編碼器 Encoder 操作面板 Operation Panel 翻抬開關 Safety SW 抬壓腳電磁鐵 Foot Lifter 機頭電磁鐵 Machine Head Sclenoid 燈 Lamp 42 ...

Страница 79: ...ock series interface definition table 同步裝置 Synchronizer 電機電源 Motor Power 腳踏板 Pedal 電機編碼器 Encoder 操作面板Operation Panel 翻抬開關 Safety SW 抬壓腳電磁鐵 Foot Lifter 機頭電磁鐵 Machine Head Sclenoid 燈 Lamp 386P0146A 2014 1 20 43 ...

Страница 80: ...更新 本產品使用說明書中與零件圖之產品及外觀的修改恕不事先通知 The specification and or the equipment described in the instruction book and parts list are subject to change because of modification with out previous notice C007K VC008 SEP 2020 ...

Отзывы: