


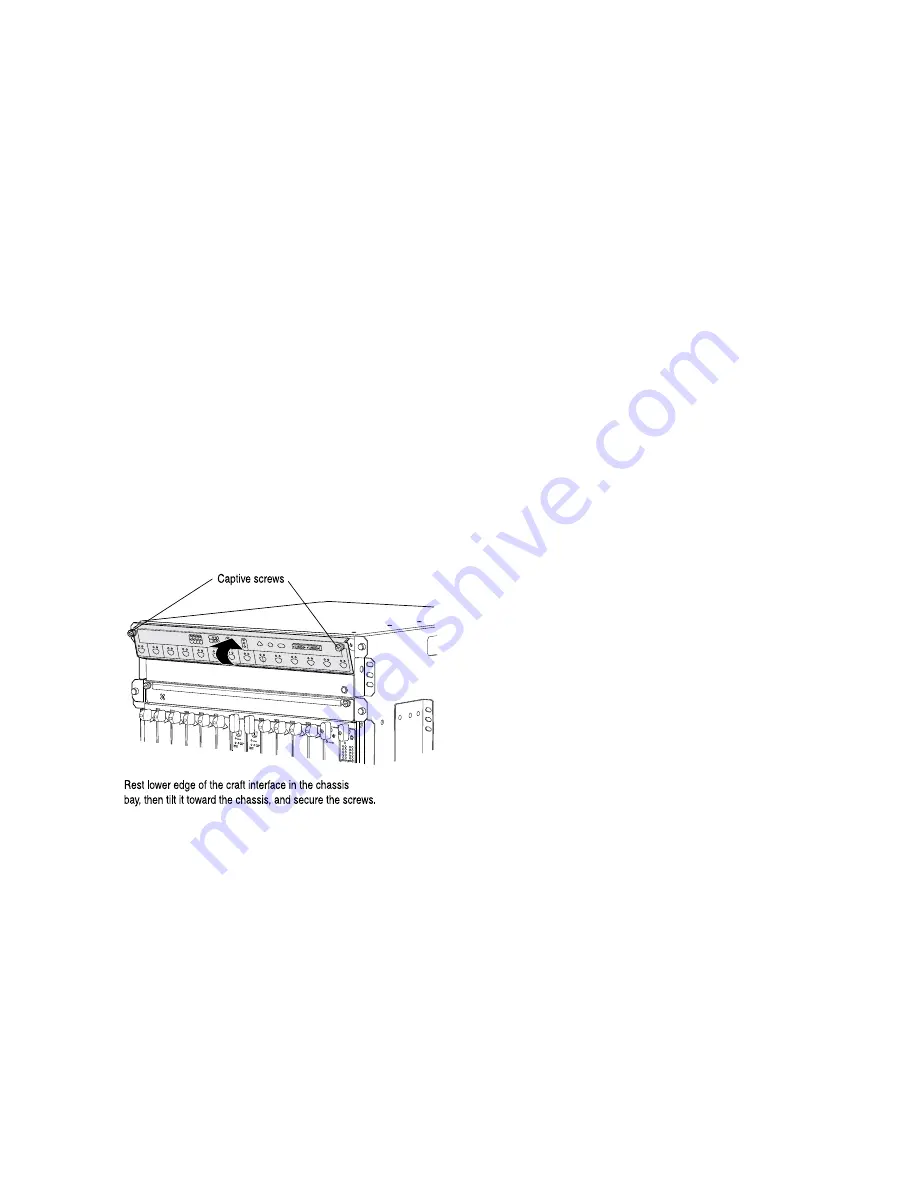
To install the craft interface (see
):
1. Attach an ESD grounding strap to your bare wrist, and connect the strap to one of the ESD points on
the chassis.
2. Grasp the craft interface with one hand and hold the bottom edge of the craft interface with the other
hand to support its weight.
3. Orient the ribbon cable so that it plugs into the connector socket. The connector is keyed and can be
inserted only one way.
4. Align the bottom of the craft interface with the sheet metal above the card cage and press it into place.
5. Using the Phillips (+) number 2 screwdriver tighten the screws on the left and right corners of the craft
interface faceplate.
6. Reattach any external devices connected to the craft interface.
Figure 112: Installing the Craft Interface
1
0
1
0
1
0
1
0
1
0
1
1
0
0
1
0
1
0
1
0
g004040
OK
0
FAIL
ONLINE
OK
1
FAIL
ONLINE
OK
2
FAIL
ONLINE
OK
3
FAIL
ONLINE
OK
4
FAIL
ONLINE
OK
5
FAIL
ONLINE
OK
0
FAIL
ONLINE
MASTER
ONLINE
OFFLINE
RE0
FAN
PEM
1
0
0 1 2 3
RE1
OK
1
FAIL
ONLINE
OK
7
FAIL
ONLINE
OK
8
FAIL
ONLINE
OK
9
FAIL
ONLINE
OK
10
FAIL
ONLINE
OK
11
FAIL
ONLINE
OK
2 6
FAIL
ONLINE
ACO/LT
YELL
OW ALAR
M
RED ALAR
M
NC
NO
C
NC
NO
C
Connecting the Alarm Relay Wires to the SRX5800 Services Gateway Craft Interface
Before you begin connecting the alarm relay wires to the services gateway and an alarm-reporting device
:
•
Ensure you understand how to prevent electrostatic discharge (ESD) damage. See
Electrostatic Discharge Damage” on page 505
.
Ensure that you have the following available:
•
ESD grounding strap
266
Содержание SRX 5800
Страница 1: ...SRX5800 Services Gateway Hardware Guide Published 2020 02 10 ...
Страница 23: ......
Страница 30: ...Figure 2 Rear View of a Fully Configured AC Powered Services Gateway Chassis 31 ...
Страница 111: ...LEDs 112 ...
Страница 121: ...Port and Interface Numbering 122 ...
Страница 127: ...Port and Interface Numbering 128 ...
Страница 161: ......
Страница 179: ... One SRX5K MPC IOC2 Modular Port Concentrator with two Modular Interface Cards MICs 180 ...
Страница 180: ... One SRX5K 40GE SFP I O card IOC 181 ...
Страница 205: ......
Страница 261: ......
Страница 324: ...c Upload the configuration to RE2 from the USB device 325 ...
Страница 365: ...Figure 143 Installing an SPC 366 ...
Страница 367: ...368 ...
Страница 422: ...5 CHAPTER Troubleshooting Hardware Troubleshooting the SRX5800 425 ...
Страница 423: ......
Страница 457: ......
Страница 473: ...475 ...
Страница 476: ...Restricted Access Area Warning 478 ...
Страница 483: ...485 ...
Страница 496: ...Jewelry Removal Warning 498 ...
Страница 499: ...Operating Temperature Warning 501 ...
Страница 509: ...DC Power Disconnection Warning 511 ...
Страница 513: ...DC Power Wiring Sequence Warning 515 ...
Страница 516: ...DC Power Wiring Terminations Warning 518 ...
Страница 519: ...DC Power Disconnection Warning 521 ...
Страница 523: ...DC Power Wiring Sequence Warning 525 ...
Страница 526: ...DC Power Wiring Terminations Warning 528 ...