


– 40 –
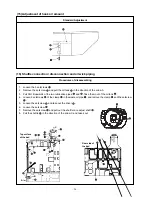
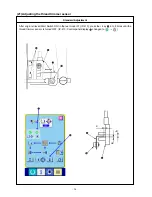
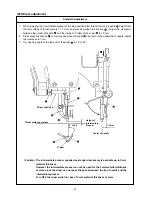
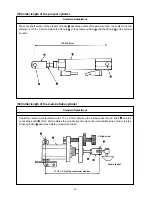
(25) AT unit connection / disconnection
1. Remove the setscrew
of the AT link unit (front)
and take out the second thread tension
. ((24) Refer
to “Second thread tension connection / disconnection.”)
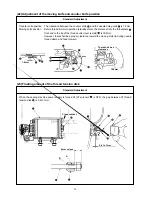
2. Draw out the cotter pin
from the pin block
(H type) or
(S type) of the AT link unit (rear)
. Be careful
not to drop the washer
at that time.
3. Lift the AT joint block
of the AT unit upward to remove the block from the pin block
(H type ) or
(S
type) of the AT link unit (rear)
.
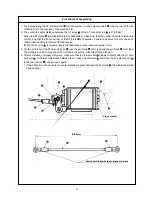
4. Draw out the AT link unit (front)
from the plane side (in the direction of the arrow
E
) and remove it.
5. Remove the 2 setscrews
and take out the AT solenoid unit
.
6. For reassembly, follow the steps of 5. to 1. above.
E
Procedures of disassembling
F
Close contact
Содержание AMS-221EHL
Страница 185: ... 181 A JUKI Grease A B JUKI Grease B C Grease A A A A A A A B C C B B B B o MAIN SHAFT NEEDLE BAR COMPONENTS ...
Страница 190: ... 186 o X Y COMPONENTS 1 E C C C C C Grease E Three Bond 3060G Locktight 241 ...
Страница 191: ... 187 o X Y COMPONENTS 2 D D C C C D C C D C Grease D Grease D Locktight 241 ...
Страница 192: ... 188 C Grease D Grease D D C D C C D C D D C C D D D D D C D C o CLOTH FEED MECHANISM COMPONENTS D ...
Страница 231: ... 7 MAIN PANEL board circuit diagram 227 PANEL BOARD MAIN BOARD ...