Jolimark bp-900kll Скачать руководство пользователя страница 48

BP-900KII User's Manual


- 42 - 


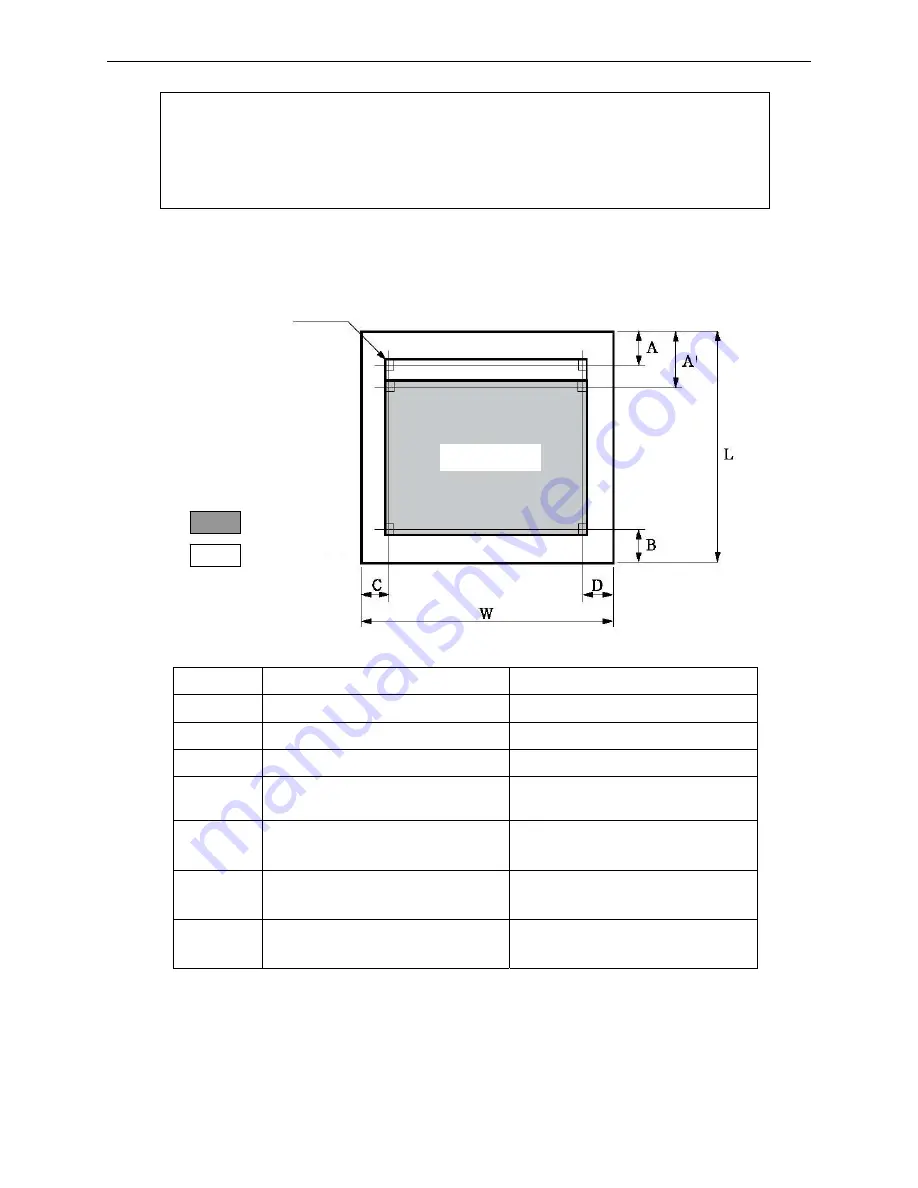
Cut Sheet Dimension and Printable area 

 Single-ply paper


Mark


Name


Specification value


W


Paper width


60 ~ 245 mm


L


Paper length


67 ~ 558 mm

 (Note 1) 


A


Home position (top margin)


2 mm


A’


Top printing unguaranteed area 
(top margin)


2 mm


B


Bottom printing unguaranteed area 
(bottom margin)


6 mm


C


Left printing unguaranteed area 
(left margin)


 2 mm


D


Right printing unguaranteed area 
(right margin)


 2 mm


Note: 1. This thickness is added by multi single-ply papers, and it is only achieved 

when just printing on the upper paper. (No need to copy) 

2. Refer to the requirement of the multi-ply paper (NCR paper), the mount 

paper can be thicker than other plies, but we can’t guarantee the printing 
effect as it is influenced by paper difference.


First character 

(10 CPI) 

Printable area 

Print area is not included 
in print specification. 

: Printable area 

: Print area 

Содержание bp-900kll

Страница 1: ...User s Manual BP 900KII Printer...

Страница 2: ...ry XIN HUI LTD EPSON and ESC PK2 are the registered trademarks of Seiko Epson Corporation IBM and IBM 2391 are the registered trademarks of International Business Machines Corporation OKI and OKI 5530...

Страница 3: ...nough area for paper feeding 7 Avoid using the same AC outlet with other electrical appliances which are high power or easy cause voltage fluctuation 8 This product should never be placed near the app...

Страница 4: ...ormally when the operating instructions are followed E If the product has been dropped or the cabinet has been damaged F If the product exhibits a distinct change in performance it indicates a need fo...

Страница 5: ...r Cable 11 2 7 Installing the Driver 12 2 8 Ethernet Settings 14 2 8 1 Connecting Printer 14 2 8 2 Setting IP Address 14 2 8 3 Installing Printer Network Driver 16 Chapter 3 Paper Process 23 3 1 Feedi...

Страница 6: ...anel 39 5 4 Contact Your Technical Service Center 39 Chapter 6 Paper Specification 40 6 1 Paper Specification and Printable Area 40 6 1 1 The Notice Relates to Paper 40 6 1 2 Useable Paper Types and G...

Страница 7: ...chanism which solve the problem of paper jam Innovative flat push mechanism which makes paper not skew and deforming so that when it printing some special files such as passbook certificate 1 n invoic...

Страница 8: ...39 Code 128 B Code 128 C and NW 7 z Electronic menu The printer menu parameter can be set and saved back into the memorizer of the printer z Contain Bank system used character set It supports bank sy...

Страница 9: ...packing box take out the printer 2 Open the upper cover and remove the protective materials in the printer 3 Note that it is a good idea to keep the original box and all the packing materials just in...

Страница 10: ...ondition do not plug them in the same electrical outlet 3 Do not use in locations subject to high humidity or dust levels Or else it may damage the operation components or lead to circuit malfunction...

Страница 11: ...Open the upper cover hold the upper frame with your right hand and the left hand hold the upper frame lever push the upper frame lever towards the back of printer and lift up the upper frame until th...

Страница 12: ...nt of printer to make the frame pole out of the lever slot and then press the upper frame at the position which has a labe PUSH press the upper frame down until it lock in place Figure 2 7 2 Fix the f...

Страница 13: ...suddenly starts to work 2 Hold the upper frame with your right hand and the left hand hold the upper frame lever push the upper frame lever towards the back of printer and lift up the upper frame slig...

Страница 14: ...and then lock the upper buckle into the mounting slot as arrow show n make sure it is fix tightly Note If you meet resistance when pushing the cartridge please turn the ribbon knob and then push it to...

Страница 15: ...ead if the printer has just been recently used as the print head may be hot 2 When closing the upper cover please don t let it fall down freely you should hold the upper cover and close it slowly or i...

Страница 16: ...on either side of the connector As shown in Figure 2 15 2 Plug the other end of the cable into the computer s parallel interface then tighten the screws on either side of the connector 2 5 2 Connectin...

Страница 17: ...nter s power is turned off 2 Make sure the voltage required by the printer matches that of your electrical outlet 3 If the power cable is not attached to the printer connect it to the power supply inl...

Страница 18: ...ath as follow CD ROM Drivers WIN2000 XP Vista Win7 click Next then click OK to return to the window of Install Printer Software click Next 6 Follow the guide click Next gradually till the installation...

Страница 19: ...w of Printer test page completed pops up click Yes 6 The printer driver process is installed successfully 2 The installing steps with an USB cable Note 1 As the system of Windows 98 ME doesn t have in...

Страница 20: ...ork printing function needs the operation system of Windows2000 or above 2 8 1 Connecting Printer Power on the printer connect with the Ethernet cable which has been connected to LAN and look into the...

Страница 21: ...e left side of which is the model and description and the right are the IP address and MAC address What s more the assign mode dynamic static is noted behind the IP address 1 Correlative description f...

Страница 22: ...in the network fill 255 255 255 255 in the Default gateway IP address and Subnet Mask should obey the assigning rules of local LAN Ethernet please enquire the administrator of networks which the print...

Страница 23: ...efully Such as select Local or Network Printer then click next 3 A window of Select the Printer port pops up select a port you want your printer to use For example select Create a new port select Stan...

Страница 24: ...itional Port Information Required pops up select Custom in the Device Type then click Settings 7 A window of Port Settings pops up Affirm that Port name and Printer name or IP address are correct Prot...

Страница 25: ...in7 click open then click OK then return to the window install printer software click next 12 Follow the direct click next gradually till the installation is finish At this time printer network driver...

Страница 26: ...the IP address reported by the Setting printer s IP address in the Printer name or IP address column Take IP address 192 168 0 240 for example Port name is created automatically after finishing filli...

Страница 27: ...anual 21 8 A window of Port Settings pops up Affirm that Port name and Printer name or IP address are correct Protocol is RAW and Port Number is 9100 click OK 9 Return to Additional Port Information R...

Страница 28: ...ng the Add Standard TCP IP Printer Port Wizard pops up click Finish 11 Return to Printer Ports click Close 12 Return to Properties make sure the network port is selected click Apply and then click Clo...

Страница 29: ...e setting reference Copy paper Include original pattern Paper thickness mm Copy mode setting through the control panel 1 4 0 06 0 242 Normal mode 5 7 0 3 0 45 Copy mode Note 1 The setting way of Copy...

Страница 30: ...LCD display is continuous paper If it shows cut sheet in Online mode press LF FF button and High speed button at the same time for 3 seconds paper type will switch to continuous paper mode 3 Pull the...

Страница 31: ...nline button switch between Online and Offline modes Load Eject When there is paper in the printer and it is in offline mode press this button to eject paper In online mode press this button for about...

Страница 32: ...t would give priority to the relative warning information 4 4 Use the Menu Setup System 4 4 1 Change the Current Setting of Printer The menu of BP 900KII is containing main menu and sub menu and displ...

Страница 33: ...OAD PAPER 6 FONT 27 SKEW CORRECT 7 COMPRESS 28 COVER OPEN 8 AUTO COMP 29 EJECT 9 PITCH SYSTEM SETUP 30 EDGE DETECT 10 CN PITCH 31 BAUD RATE 11 LINE SPACE 32 PARITY 12 FORM 33 DATA BIT 13 PAGE SKIP 34...

Страница 34: ...ain menu then press HIGH SPEED button again to exit the menu setup mode and the new settings would take effect at the same time As shown below 4 4 2 Printing the Current Setting Report If you need to...

Страница 35: ...PSON CHAR MODE ASCII FONT ROMAN COMPRESS AUTO COMP OFF PITCH CPI CN PITCH CPI LINE SPACE LPI FORM A PAGE SKIP OFF TEXT DIR BI DIR GRAPH DIR BI DIR LEFT MARGIN INCH HORZ ADJ INCH SLASH ZERO OFF CHAR SE...

Страница 36: ...data with page length instruction printer would give priority to print data instruction PAGE SKIP After selecting this function on printer would leave one inch 25 4mm margin at the perforation of the...

Страница 37: ...rinter serial data transfer as software control XON XOFF or hardware control DTR HEAD PIN Select the broken pin Printer would automatically replace it with other pin to print PIN SWITCH After selectin...

Страница 38: ...the parameter setting right after it receives the setting parameter command It doesn t need to restart the printer 9 After finish setting click OK to exit Property 4 4 5 Restoring Factory Printer Set...

Страница 39: ...the printer to enter the Hex printing mode After enter the Hex printing mode the printer would print out the data in hex which send from the computer Use the Hex printing mode we can check the trouble...

Страница 40: ...n Press to move the odd line to the right original parameter values increase LOAD EJECT button Press to move the odd line to the left original parameter values decrease High speed button Enter into th...

Страница 41: ...h guarantees the carriage can run smoothly But the oil is easy to absorb dust please clean it with soft cloth first and then add appropriate high quality bearing lube NYE180 lube of NYE Company is rec...

Страница 42: ...ode if yes switch the printer into online mode 2 Check whether the printer cable is connecting tightly 3 Check whether the printer is set to offline in the driver 4 Check whether the driver port is co...

Страница 43: ...bon cartridge is installed correctly 2 Check the pin state with the PIN test please refer to the PIN TEST chapter for detail information If any print pin abnormity is occurs please contact the dealer...

Страница 44: ...nlock the upper frame by the frame lever and push it at the position which has the label PUSH and lock the upper frame with the lower frame again then close the upper cover At last restart the printer...

Страница 45: ...r is not closed correctly Please check if the upper cover had been closed Power LED on online LED blink at the same time the print head does not move Because the printer has working for a long time an...

Страница 46: ...eing cut brokenly or has hole Paper with metal such as pins clips and staples Paper with paste outside or which is uneven or flake off Rough paper Continuous paper has crease besides the cross perfora...

Страница 47: ...tion of cut sheet is shown in the following table Single ply paper White paper Copy paper Paper Multi ply paper NCR paper Copy capability Max 7 copies Original 6 copies paper weight bases on 40g m2 st...

Страница 48: ...aranteed area left margin 2 mm D Right printing unguaranteed area right margin 2 mm Note 1 This thickness is added by multi single ply papers and it is only achieved when just printing on the upper pa...

Страница 49: ...Paper less than 52 g m2 is worse in rigidity so it is not in the guarantee list 2 Please use the paper with no crease or bend 3 Do not print beyond the printable area or it may cause print head break...

Страница 50: ...accord with the specification are shown as follows Pages 2 plies 3 plies 4 plies 5 plies 6 plies 7 plies Page 1 40 64 g m2 40 50 g m2 40 g m2 40 g m2 40 g m2 40 g m2 Page 2 40 80 g m2 40 50 g m2 40 g...

Страница 51: ...gth has been changed even though after amending Please amend the fold of the corner for less than 2 mm Bend and curliness cut sheet continuous paper The paper can be used when the bend of the whole pa...

Страница 52: ...Original 6 copies paper weight bases on 40g m2 standard Single ply paper 52 128 g m 2 Weight Multi ply paper each sheet 40 64 g m2 Note See details in the multi ply paper NCR paper requirement table...

Страница 53: ...tween nearby tractor hole centers in the same side Accumulative error of distance between tractor hole centers Below 0 3 The accumulative error along the central line of any two tractor holes which ar...

Страница 54: ...prohibited to use the multi ply paper which is fixed through metal staple Point Pulp Point pulp should be in both ends it is not allow pointing pulp only in one end The point pulp position should be t...

Страница 55: ...rping Note Use the paper which is not accordance with the paper binding requirement and the specification shown below paper feeding precision may be affected and the printing performance can not be gu...

Страница 56: ...m2 Page 5 40 80 g m2 40 g m2 40 g m2 Page 6 40 80 g m2 40 g m2 Page 7 40 g m2 The protuberance of transverse perforation When the fanfold transverse perforation sticks up it may cause print quality de...

Страница 57: ...ples so please do not use them The crease crimp fold and upturning of the paper top and bottom Please do not use the paper which is crease puckered crimp and upturning in the top and bottom Or it may...

Страница 58: ...ure shown please not use it 6 1 5 Postcard The printer supports the postcards which the specifications are shown below Print size and the printable area No Length mm Width mm 1 165 102 2 148 100 Size...

Страница 59: ...BP 900KII User s Manual 53 Postcard print direction and printable area transverse Postcard Stamp...

Страница 60: ...BP 900KII User s Manual 54 Postcard print direction and printable area vertical Stamp...

Страница 61: ...the passbook should not stick up over 0 5mm or it may cause printing faint Size Min Max L1 Passbook width 100 mm 245 mm L2 Passbook length 75 mm 355 mm L3 Left and right margins 3 mm L4 Top margin 3...

Страница 62: ...ble Area Size Min Max L1 Passbook width 100 mm 245 mm L2 Passbook length 75 mm 355 mm L3 Left and right margins 3 mm L4 Top margin 3 mm L5 Centre binding margin 5 mm L6 Bottom margin 6 mm Paper weight...

Страница 63: ...ken line is not less than 5mm Envelope type Code name Length mm Width mm Support B6 176 125 Yes DL 220 110 Yes ZL 230 120 Yes C5 229 162 Yes Note 1 Sample 1 Envelope C4 324 229 No C6 162 114 Yes Note...

Страница 64: ...BP 900KII User s Manual 58 Sample 1 Envelope Rear view Sample 1 Envelope print direction and printable area 10 15 B6 DL ZL Envelope 15 20 C5 C4 Envelope Stamp...

Страница 65: ...BP 900KII User s Manual 59 Sample 2 Envelope Front view Sample 2 Envelope Rear view Stamp...

Страница 66: ...re the distance from the bottom sunken line to the printing area is not less than 5mm Do not use following envelopes Envelopes which with contents in it Envelopes with holes and which both sides are c...

Страница 67: ...kness and inner paper quality such as thickness In addition do not use the paper which is not even to avoid paper dirt or printing slant 6 1 9 Label It does not guarantee the printing with labels 6 1...

Страница 68: ...253 ARAB NLS ARAB EXT WIN LAT1 WIN LAT2 ISL LTN1 ISO LTN2 TUR8859 9 ISO LTN9 KBL LATIN 7 FARSI Fonts ASCII Draft Roman Sans Serif Courier Prestige Script OCR A OCR B Orator Note In high speed mode or...

Страница 69: ...ickness of transverse passbook certificate 2 5 mm Passbook thickness Thickness of vertical passbook 2 2 mm Open up thickness difference of right and left sides 1 5 mm Length 75 355 mm Paper specificat...

Страница 70: ...in this user s manual A 2 Parallel Interface Signal level Input High level 2 to 5V Low level 0 to 0 8V Output High level 2 4 to 5V Low level 0 to 0 4V Connector Pin Assignments Signal Pin No Return Li...

Страница 71: ...utput mode 7 bit or 8 bit serial interface Data input code ASCII JIS 7 bit or 8 bit International character code CG Dot matrix graphic code based on graphic symbol code 8 bit Data buffer 132K bytes mo...

Страница 72: ...e T can be connected to 10 100M Figure A 5 Serial interface connector pin number Figure A 7 Ethernet interface Figure A 6 Printer and host 9 PIN RS232C connect figure Host 9 PIN DB 9S hole Printer 9PI...

Страница 73: ...al print position 16 ESC Set Relative Horizontal print position 17 ESC U Define Unit 18 ESC V Set Absolute Vertical Print Position 19 ESC v Set Relative Vertical Print Position 20 ESC J n 180 Line Fee...

Страница 74: ...alf size mode for Chinese character 49 FS r Select demisemi size mode for Chinese character 50 FS Select Chinese character print mode 51 FS v Select Cancel form connect line 52 FS k Select Chinese fon...

Страница 75: ...Print Data as Characters 89 ESC S n Select Superscript Subscript Mode Font enhancement 90 ESC T Cancel Superscript Subscript Mode 91 ESC C Set Form Length in Lines 92 ESC C NUL Set Form Length in Inch...

Страница 76: ......

Отзывы: