background image


JBE-P2L1 Panel Manual V1.2 EN


Page 14 

Release Date: January 5, 2021


Rev 01 


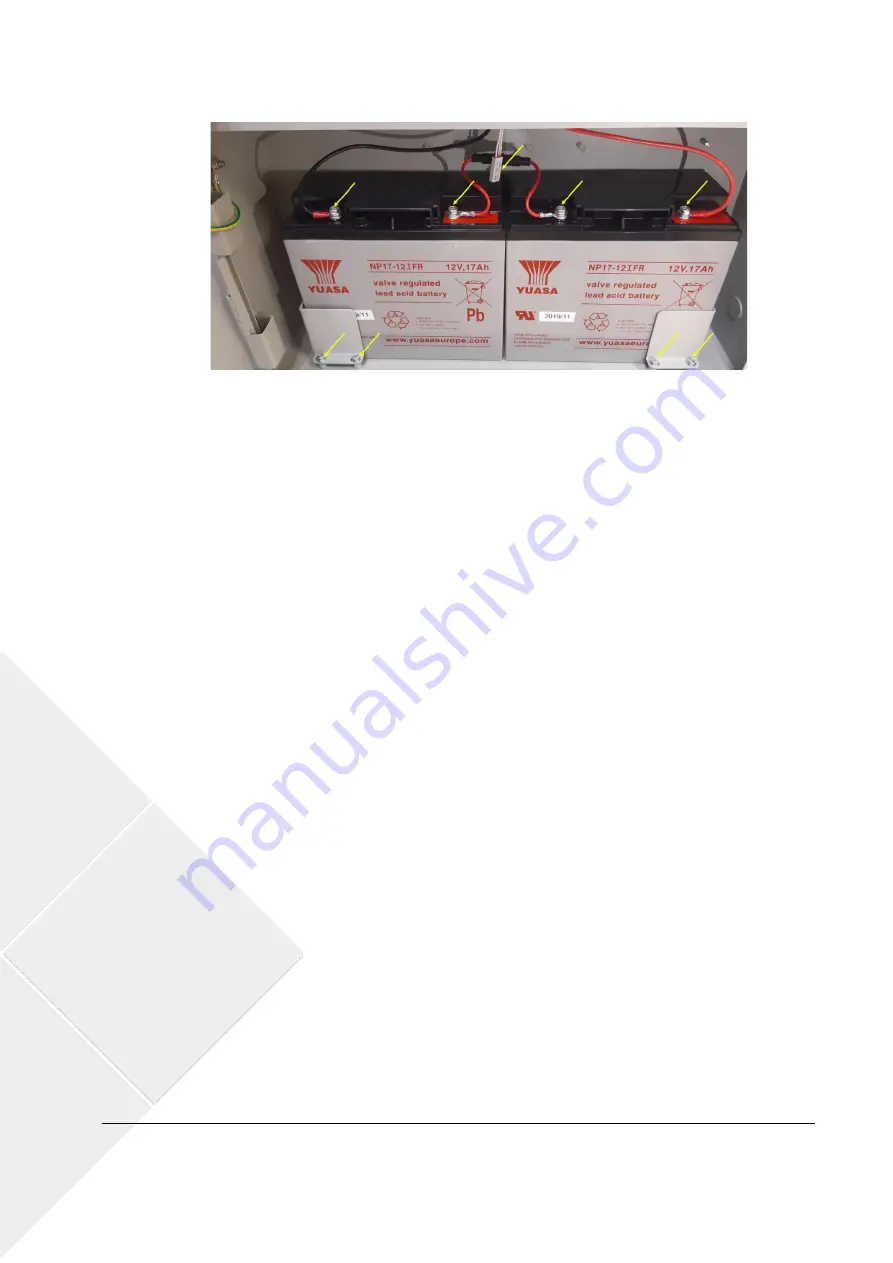
Figure 9: Battery Connection Location for 17 Ah 

4.3 

Commissioning using the Wizard 

The Draco fire panel features a commissioning wizard. This wizard will guide the installer step-by-step to 
achieve a functional basic configuration. More sophisticated configurations can be achieved by exercising 
the  configuration  options  described  in  section  5.6.  The  commissioning  operations  are  restricted  to  user 
access level 3 and shall be conducted by trained operators only.  


Before starting a commissioning, verify that the steps described in section 

Error! Reference source not 

found.

 have been completed. That is, that the fire panel is safely wall-mounted, connected to all field wiring 

and energized. 
 

4.3.1  Initiating the wizard 

In order to initiate the commissioning process: 
 

1. 

Push the home button 

2. 

Push  F5  “Install”.  The  system  will  prompt  for  the  level  3  password  (the  default  password  to 
access this level is 

1111111111

). 

3. 

Select the first option in the menu (1.Wizard). 

4. 

Select the first option in the menu (1.Install). 
 

The wizard will guide the user through the following steps: 

4.3.2  Auto-registration of loop devices 

This routine will scan the detection loops and will identify all addresses connected, in a process that can take 
2 minutes. 


Verify that all the devices planned in the installation have been detected. 
 

Note:  All  field  devices  must  have  been  previously  programmed  with  the  JBE-AT1  Address 
Programmer. Once programmed, you can start the registration / reading process described above 
from the control panel. 


4.3.3  Assign devices to zones 

After auto-registration, all devices will have been assigned to zone 1. Use this menu to select the desired 
detection zone for each initiating device (see 4.5.1.3). 


Содержание JBE-P2L1

Страница 1: ...Release Date January 5 2021 Version 1 2 Installation Operation Manual JBE P2L1 Draco Fire Control Panel ...

Страница 2: ...ndicating equipment for fire detection and fire alarm systems EN 54 4 UNE 23007 4 Power supply equipment for fire detection and fire alarm systems EN 61000 6 3 Electromagnetic compatibility Emissions EN 50130 4 Electromagnetic compatibility Immunity EN 62368 1 Safety requirements RoHS Directive 2011 65 EU Note regarding 2012 19 EU WEEE directive This product cannot be disposed of as unsorted munic...

Страница 3: ...ION CHECKS 6 4 1 1 Selection of the location of installation 6 4 1 2 Mechanical dimensions and wall area 6 4 1 3 Planning wire topology to meet EN 54 2 requirements on integrity of transmission paths 7 4 2 PHYSICAL MOUNTING INSTRUCTIONS 7 4 2 1 Panel assembly 7 4 2 2 Assembly of JBE P2L1 EXLP Draco 2nd Loop Card 7 4 2 3 Assembly of JBE PRT Draco Printer 8 4 2 4 Assembly of JBE BAT Draco battery bo...

Страница 4: ...8 Product serial numbers 24 5 4 2 9 View system composition and date of last configuration 25 5 4 2 10 Maintenance Company details 25 5 5 OPERATIONS AVAILABLE TO USERS WITH ACCESS LEVEL 2 AND ABOVE 25 5 5 1 Reset 26 5 5 2 Activate Delays 26 5 5 3 Operate menu 26 5 5 3 1 Test zone 26 5 5 3 2 Test output group 26 5 5 3 3 Keyboard test 27 5 5 3 4 Indicators test 27 5 5 3 5 Disable zone 27 5 5 3 6 Dis...

Страница 5: ...ming 36 5 6 2 7 Clear 40 5 6 2 8 System configuration 40 5 6 3 Online Configuration Tool 40 5 6 4 USB configuracion upgrade 41 5 6 4 1 Save event log to USB data 41 5 6 4 2 Save all configuration to USB 41 5 6 4 3 Load configuration from USB 41 5 6 4 4 USB firmware update 41 6 OPERATION IN CASE OF ALARM 42 6 1 PANEL S AUDIBLE ALARM INDICATION 42 6 2 PANEL S VISUAL ALARM INDICATIONS 42 6 3 THE ALAR...

Страница 6: ...on to its mandatory requirements it also provides the following optional features with the requirements of EN 54 Embedded EN 54 4 Power supply with battery charger The built in power supply in the Draco control panel allows it to operate even in the event of a power outage The panel is compatible with standard 7 12 and 17 Ah capacity sealed lead acid batteries Please note that to house 17 Ah batte...

Страница 7: ...ding EN 54 2 requirements regarding programming supervision and indication The remaining 398 groups are freely programmable Dependency on more than one alarm signal type C coincidence detection Thanks to the advanced programming menu the activation of outputs can be linked to the reception of more than one alarm In this configuration the panel indicates alarm normally but the activation of outputs...

Страница 8: ... allows presenting to the user all the ongoing events in real time Users can select their preferred language from the user interface Integrated events printer optional The optional printer module optional allows printing selected events in real time or during inspection interventions Installation wizard A step by step wizard will support the installer for a quick and simple commissioning All site ...

Страница 9: ...ix of detectors MCP IO sounders 200 per Class A loop max 2x200 Detection loop voltage JBE pulsed protocol 20 to 30 Vpp Detection loop available current 200 mA DC outputs to field devices 2 x 2 A 24 Vdc Field cable access to panel cabinet Ø20 mm knockouts 18x Alarm Fault relay outputs Connection type Normally Open voltage free relay Electrical contact ratings 2A 30 VDC 3 2 Power supply Table 2 Powe...

Страница 10: ...co external battery box JBE BAT Draco 2nd Loop expansion card JBE P2L1 EXLP Draco printer box assembly JBE PRT 3 5 Panel s optional modules The panel can receive the following optional components 3 5 1 Second loop card JBE P2L1 EXLP The second loop card JBE P2L1 EXLP can be added to the main loop card to expand the panel into a two 2 loop panel The second loop has the same capabilities as the firs...

Страница 11: ...and in good condition to start the installation The installation must comply with all applicable national and local regulations 4 1 1 Selection of the location of installation The panel should be installed in a clean and dry area which is easily accessible to emergency responders and maintenance personnel This product is designed for indoor use The table below describes the safe environmental cons...

Страница 12: ...e than 32 devices shall be installed in a redundant loop class A wiring topology with the addition of compatible JBE isolators installed at least every 32 initiating devices Installations with less devices 32 per detection circuit can be installed in non redundant stubs class B Note that each loop of the Draco fire panel can drive up to 2 stubs 4 2 Physical mounting instructions 4 2 1 Panel assemb...

Страница 13: ...abinet or under a panel which already has a JBE PRT module assembled In both cases the installation procedure is the same 1 While the panel is unpowered open the fire panel s cabinet using the provided key 2 Remove the knockout in the center of panel cabinet s base 3 Place the Draco battery box below the main panel s cabinet or below the printer module if it has been installed and use the 2 provid...

Страница 14: ...around the panel in the d esired area and measure the location of the centering hole on the wall Figure 1 Mounting Holes 3 Use the appropriate mounting hardware to secure one screw into the wall at the height of the user s eyes Leave the screw protruding approximately 5 mm from the wall as illustrated in Figure 3 This screw will bear the weight of the panel while leveling it to mark the hole posit...

Страница 15: ...e knockouts to run separately the mains power detection loops and 24 V field wiring Remove them carefully and install a M20 wire gland in the openings 5 Hang again the panel from the screw on the wall Install the load bearing screws 4 2 6 Electric wire connections The door of the fire panel protects ordinary users from electric risks The door of the fire panel must be kept closed locked and with t...

Страница 16: ...ectors a Loop 1 side A Connect to position L1a and b Loop 1 side B Connect to position L1b and c Field 24V DC 1 Connect to position 24Va and d Loop 2 side A Connect to position L2a and e Loop 2 side B Connect to position L2b and f Field 24V DC 2 Connect to position 24Vb and g Fire alarm signal Connect to position Fire normally open relay contact h Fault signal Connect to position Fault normally op...

Страница 17: ...or not a System with primary cabinet only 6 3 mm Faston tab terminals 2x Yuasa NP7 12LFR 7 Ah of C20 capacity 2x Yuasa NP12 12FR 12 Ah of C20 capacity b System with optional battery box Ø5 mm ring terminals 2x Yuasa NP17 12IFR 17 Ah of C20 capacity Use always new batteries in configurations of two 2 identical capacities to provide adequate power for standby use Do not mix different battery capacit...

Страница 18: ...e 7 Battery Holder Brackets 2 Insert the batteries as shown in the pictures below Figure 8 Battery Connection Locations for 7 12 Ah 3 Insert again the battery holder brackets Tighten screws thoroughly 4 Connect the battery cable terminals 5 Verify the temperature sensor is placed near the batteries to provide adequate temperature feedback to the charging circuit ...

Страница 19: ... wizard In order to initiate the commissioning process 1 Push the home button 2 Push F5 Install The system will prompt for the level 3 password the default password to access this level is 1111111111 3 Select the first option in the menu 1 Wizard 4 Select the first option in the menu 1 Install The wizard will guide the user through the following steps 4 3 2 Auto registration of loop devices This r...

Страница 20: ...s to activation groups After auto registration all output devices will have been assigned to output group 003 Assign outputs to group 001 EN 54 Sounders group 002 EN 54 Fire routing or to groups 003 to 400 freely programmable Note that in a default configuration output group 003 does not have an activation rule configured Therefore alarms will not be triggered unless the rule is programmed from th...

Страница 21: ...rate the panel 5 2 Visual indications The Draco fire control panel provides eleven 11 system status LED indicators and a keypad consisting of a total of thirty one 31 soft function keys All user input is managed through the function alpha numeric keypad or control keys on the front of the Draco panel 5 2 1 LED indicators The following figure and table detail the information on the definitions of t...

Страница 22: ...vation Blinking The system is under delayed activation state SND and or FR outputs will activate automatically after the delay time has expired Fault Yellow Steady ON The system is in fault functional condition System fault Yellow Steady ON The CIE has detected a major malfunction in one of its subsystems Disable condition Yellow Steady ON There are disabled elements in the system Test condition Y...

Страница 23: ... figure 1 System status area This area provides a A cumulative summary of events present in the system for the Alarm Fault Disabled and Test categories b Status of the battery c Sensitivity profile selected for the day night mode period d Date and time of the system 2 Contextual function area this area will change in each situation indicating the functionality of the F1 F6 keys adapted to the cont...

Страница 24: ...1 Rev 01 5 2 3 Control Keys The Draco panel features soft buttons and alphanumeric keys which allow users to navigate the system directly from the keypad even when they are wearing work gloves Figure 12 Control keys and alphanumeric keyboard Figure 13 Function Keys ...

Страница 25: ...s of the system Home Menu Present the main menu Cancel Cancel user entry and return to menu screen OK enter OK confirms the selected functions Alphanumeric keypad Alphanumeric keypad for a convenient entry of text numbers and special characters F1 F6 Function keys Flexible function keys Their function in each screen is defined in the bottom ribbon of the LCD screen Navigation keypad Menu navigatio...

Страница 26: ...These functions can be exercised without a password 5 4 1 Silencing the buzzer To silence re activate the buzzer from the panel in situations as alarm fault or test the user can press the buzzer silence acknowledge key to silence the buzzer To re activate the buzzer press the same key again to re activate the buzzer Users can review all previous and ongoing event information from the View menu by ...

Страница 27: ...iptions 8 Product serial numbers 9 View system composition and date of last configuration 0 Maintenance Company details Once the user is in View menu the following sub menus can be accessed by pressing the corresponding number in the keypad on the panel 5 4 2 1 View event log Press 1 to access this submenu the following options will be displayed 1 All events 2 Alarms 3 Faults 4 Operator actions 5 ...

Страница 28: ...age press F6 to exit the current interface Operator actions Press 4 to enter the sub menu operator actions All of the Operator Actions are displayed chronologically from newest to oldest F1 stands for the number of the output group press F2 to return to the first page press F3 to print out the event log press F4 to return to the previous page press F5 scroll down to the next page press F6 to exit ...

Страница 29: ... the numeric keypad to access detailed information data in a specific zone and press F6 to get out In single zone mode F1 will delete the selected zone F2 or F3 will change the zone number F5 confirms the numeric entry F6 exits the submenu and F4 allows selection of a batch In batch mode press F1 to jump to the first page press F4 to go up the page in the list and to go down to the next page press...

Страница 30: ... 0 to access this menu and see the data of the company that performs the maintenance in the format shown below Company Phone Project name Contact person E mail 5 5 Operations available to users with access Level 2 and above This chapter describes the panel functionalities that can be used by an operator with level 2 user access This level of access is normally assigned to users qualified in the us...

Страница 31: ...ware versions of the control panel from this menu The sub menu choices from the Operate menu is as follows 1 Test zone 2 Test output group 3 Keyboard test 4 Indicators test 5 Disable zone 6 Disable output group 7 Disable device 8 Set time and date 5 5 3 1 Test zone This menu allows setting zones in and out of the test functional condition After entering user access level 2 password use the directi...

Страница 32: ...led LED and in the main screen Device faults and alarms will not be processed from disabled zones 5 5 3 6 Disable output group This menu allows disabling a specific output group Disabling an output group implies it will not activate upon reception of alarms and that faults form the associated output devices will not be ignored To disable a group use 1 in the user interface Groups can be re enabled...

Страница 33: ...l report 5 Field device raw data report 6 Field device state signal value 7 View advanced programming 8 View addresses linked to a zone 9 View addresses used in a loop 5 5 4 1 Print event log The Print Event Log menu allows the operator to send selected information to the printer It will be necessary to have the JBE PRT printer installed in order to execute this option After accessing the menu you...

Страница 34: ...en no device provides the answer current and CurValue mA which stands for the answer current from the designated device s The answer current is how the device provide the status normal trouble alarm By pressing F2 or F3 the user can change the address of the device to consult 5 5 4 7 View advanced programming After entering the advanced programming menu user can view the actions logic that are cur...

Страница 35: ...ne 5 Set loop class A or B 6 Assign device to activation group 7 Enter maintenance company details 8 View analog value curve of detector 9 Configure Day night mode 0 Setup printer 5 6 1 1 Registro o borrado manual de dispositivos de lazo User can manually enter the loop number address and device type shown below to register or delete the device Device types are classified into 8 categories so that...

Страница 36: ...link sounders by zone and link unlink fire routing by zone users can choose whether to activate or not the group depending on if there s been an alarm event triggered either by manual call point or detector 5 6 1 5 Set loop class A or B This menu will allow selecting between Class A or B wiring The Draco fire panel supports up to 2 loops in looped Class A configuration When a loop is configured in...

Страница 37: ...JBE P2L1 Panel Manual V1 2 EN Page 32 Release Date January 5 2021 Rev 01 Class A is the most robust wiring topology and thus the recommended topology for all installations Figure 14 Topology Classes ...

Страница 38: ...actice confirming that the selection of detector type and location is robust to nuisance alarms By pressing F2 or F3 the user can change the device on demand Pressing F4 you can select Table or Graph 5 6 1 9 Configure Day Night mode Draco allows configuring a schedule to adjust the fire panel s settings following the changes of activity in the building In particular the following tasks can be sche...

Страница 39: ...ime when the building is unoccupied and the Special profile is used for singular activities such as cleaning maintenance However these profiles are fully configurable as it can be shown below Figure 15 Day Night Mode Push F3 to configure the desired sensitivity level of each detector for each profile Refer to the detector s datasheet to understand the details of each sensitivity level Figure 16 De...

Страница 40: ...nd function keys The sub menu choices from the Install menu is as follows 1 Wizard 2 Auto Registration 3 Set Password 4 Set language 5 Set special operation mode 6 Enter advanced programming 7 Clear 8 System configuration 5 6 2 1 Wizard From the sub menu wizard user can operate tasks such as install wizard or maintain wizard After entering the sub menu install wizard user can operate the tasks ava...

Страница 41: ...s which will be triggered when the criteria described in Inputs is fulfilled All actions programmed in the advanced programming are evaluated simultaneously and in parallel to the standard programming of the panel When a given output group has been configured to be triggered by multiple actions these are aggregated with an OR function That is if the criteria is fulfilled to trigger one of the acti...

Страница 42: ... input condition was fulfilled and the activation of the input Note that these delays are fix and are not activated deactivated by the delays on off button Select from 000 to 600 seconds of delay Selecting 000 means immediate activation Hold Populate this field if you want outputs to be active for just a brief period of time up to 63 seconds Select for how many seconds do you want the output to ac...

Страница 43: ...put programs triggered Where the input scenarios are coded as S Zone alarm type quantity and the programmed outputs programmed are coded as P group number delay hold OR aggregations of inputs are coded with the addition sign AND aggregations of inputs are coded with the product x sign That is Scenarios S x y z are considered to return 1 if they are met and 0 otherwise All output groups at the righ...

Страница 44: ...n this section In type C coincidence detection the panel enters into alarm functional condition at the reception of a first alarm However it does not activate its outputs until a pre defined confirmatory signal is received To program a type C coincidence detection define an action for each of the SND and FR output groups which requires two or more alarms to be processed prior to output activation ...

Страница 45: ...8 System configuration From this sub menu users can configurate the system by operating on either loop card loop LED panel or power card 5 6 3 Online Configuration Tool All JBE P2L1 Draco panel configurations can be done thanks to its intuitive user interface However you can also create edit or store your own configuration by registering on our Web site Loading or downloading settings to and from ...

Страница 46: ... update 5 6 4 1 Save event log to USB data This option allows you to save into the USB the log of events generated in the panel The events can be filtered by the following types 1 All events 2 Alarms 3 Faults 4 Operator actions 5 I O log 5 6 4 2 Save all configuration to USB This option allows you to save the panel configuration into the USB 5 6 4 3 Load configuration from USB This option allows y...

Страница 47: ...reen The alarm screen will always indicate the first zone which entered into alarm at the top field If additional zones enter into alarm these will be shown the window below The zones in alarm will appear sorted from the most recent event top to the oldest one bottom Therefore the top field will always show the oldest zone alarm event and the field below will show the zone which entered into alarm...

Страница 48: ...Sounders ON or Fire routing ON LED indicating that these outputs will activate after the pre programmed delay has expired The output activation delay can be cancelled delay override by pushing the delays ON OFF button delays ON OFF orl button sounders ON OFF No password is required to perform this action Note that delayed activation can also be replaced by an alarm that does not have a programmed ...

Страница 49: ...lt relay output Present the fault screen in the LCD with a description of the fault Increment the fault counter in the LCD To silence the panel buzzer press the key 7 1 Indication of common faults Each loop device has a unique address composed by the loop number and loop address Installers can also assign a text description to each loop device i e MCP in the kitchenette In case a fault is processe...

Страница 50: ... if any of the system s buses has an unintended contact with the building s electrical earth Earth fault indications suggest a wiring defect These shall be investigated and amended as soon as possible by professionals 7 4 Indication of system faults When a malfunction is detected in one of the panel s core subsystems it will be additionally indicated by activating the System fault LED see section ...

Страница 51: ...tion 5 5 4 users with access level 2 can get detailed information of the system configuration and diagnostics from field devices 8 2 Battery Maintenance The panel systematically monitors the charge level and the internal resistance of the attached batteries During periodic site inspections maintenance personnel shall review the event log to verify there are no battery related faults Visually inspe...

Страница 52: ...d in a loop 9 View address descriptions 0 View system composition and date of last configuration 9 2 Operate Report menus User access level 2 Table 12 Menus accessible to user Access Level 2 User access level 2 L1 password and above Menu level 1 Menu level 2 Operate menu 1 Test zone 2 Test output group 3 Keyboard test 4 Indicators test 5 Disable zone 6 Disable output group 7 Disable device 8 Set T...

Страница 53: ...elay by zone 4 Link unlink sounders by zone 5 Link unlink fire routing by zone 5 Set loop class A or B 6 Assign device to activation group 7 Enter maintenance company details 8 View analog value curve of a detector 9 Configure Day Night mode 0 Set Printer Install menu 1 Wizard 1 Install wizard 2 Maintenance wizard 2 Auto Registration 3 Set password 1 Operator password 2 Installer password 4 Set la...

Страница 54: ...ckets 13 Figure 8 Battery Connection Locations for 7 12 Ah 13 Figure 9 Battery Connection Location for 17 Ah 14 Figure 10 LED Indicators 16 Figure 11 Quiescent screen 18 Figure 12 Control keys and alphanumeric keyboard 19 Figure 13 Function Keys 19 Figure 14 Topology Classes 32 Figure 15 Day Night Mode 34 Figure 16 Detector Sensitivity Selection 34 Figure 17 Example Input Action 37 Figure 18 Examp...

Страница 55: ...JBE P2L1 Panel Manual V1 2 EN Page 50 Release Date January 5 2021 Rev 01 Blank page ...

Страница 56: ... Manual V1 2 EN Release Date January 5 2021 Rev 01 Download the latest version of the document by following the link in the QR code Jade Bird Fire Alarm International Europe S L C Tarragona 157 08014 Barcelona Spain ...

Отзывы: