STEP 1:
Set two duckbill anchors across the pond from
one another so that the center of a straight line between
the two anchors is the approximate location that the
SolarBee/GridBee will be placed.
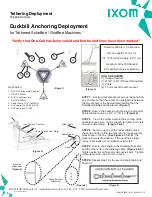
(Figure 1)
STEP 2:
Drive in the duckbill anchors into the ground at
desired location using a 5/8” or 7/8” rod.
(Figure 2)
STEP 3:
Tie off the tether cable to the eye loop of the
duckbill anchor. Use 10 mm wrench to tighten both nuts
on each cable clamp.
(Figure 3 & 6)
STEP 4:
Secure one end of the tether cable across
the pond and tie it off to the other anchor leaving some
slack/droop in the line.
(See Figures 1, 3 & 6)
The
slack is for water fluctuation. If the pond has a large
range of fluctuation, more slack should be left.
STEP 5:
Secure short chain to the SolarBee float arm
and the other end to the tethering cable.
(Figure 4 & 5)
Tighten quick link on float arm side using pliers. Tighten
cable clamp side using 10 mm wrench.
STEP 6:
Repeat step 5 for the second short chain and
float arm.
Rated for 3000 lb (13.3 kN) load.
Set at a depth of 3 ft (1m).
1/4” (6.35mm) SS Cable, 42” (1m) L
Aluminum Alloy 356 Duckbill
2 Duckbill anchors per Machine
*Verify that One-Call has been called and that buried lines have been marked.*
TOOLS REQUIRED:
(1) Sledge Hammer
(1) Ø 5/8” or Ø 7/8” Steel Driving Rod
(1) Pliers
(2) 10 mm wrench and/or socket
(Figure 1)
(Figure 2)
(Figure 3)
(Figure 4)
MATERIALS:
1. 3/16” NACM Industrial Chain 80”,
316SS (100406)
2. 3/16” Long Quick Link,
316SS (100644)
3. Cable Clamp, 3/16” (12010412)
4. 3/16” cable, 316SS (10014018)
5. 3/16” cable loop, 316SS
3
3
2
4
1
Cable Clamps
Chain Through Float Plate
Tether Cable
Chain
Short Cable
Loop Through Float Arm
(Figure 5)
(Figure 6)
Machine
Attachment
Duckbill Anchor
Attachment
5
©2022 IXOM Watercare Inc. | www.ixomwatercare.com | 866 - 437 - 8076 | [email protected]
Tethering Deployment
Duckbill Anchors
Duckbill Anchoring Deployment
for Tethered SolarBee / GridBee Machines
1106_10130_20220110
O&M_GF2500_10115_20220121 - 13


