1.12
Getting started
Entering characters
Some settings give you a chance to enter characters; for your TTI, remote fax’s name
or others. To enter letters or other characters, use the following guidelines:
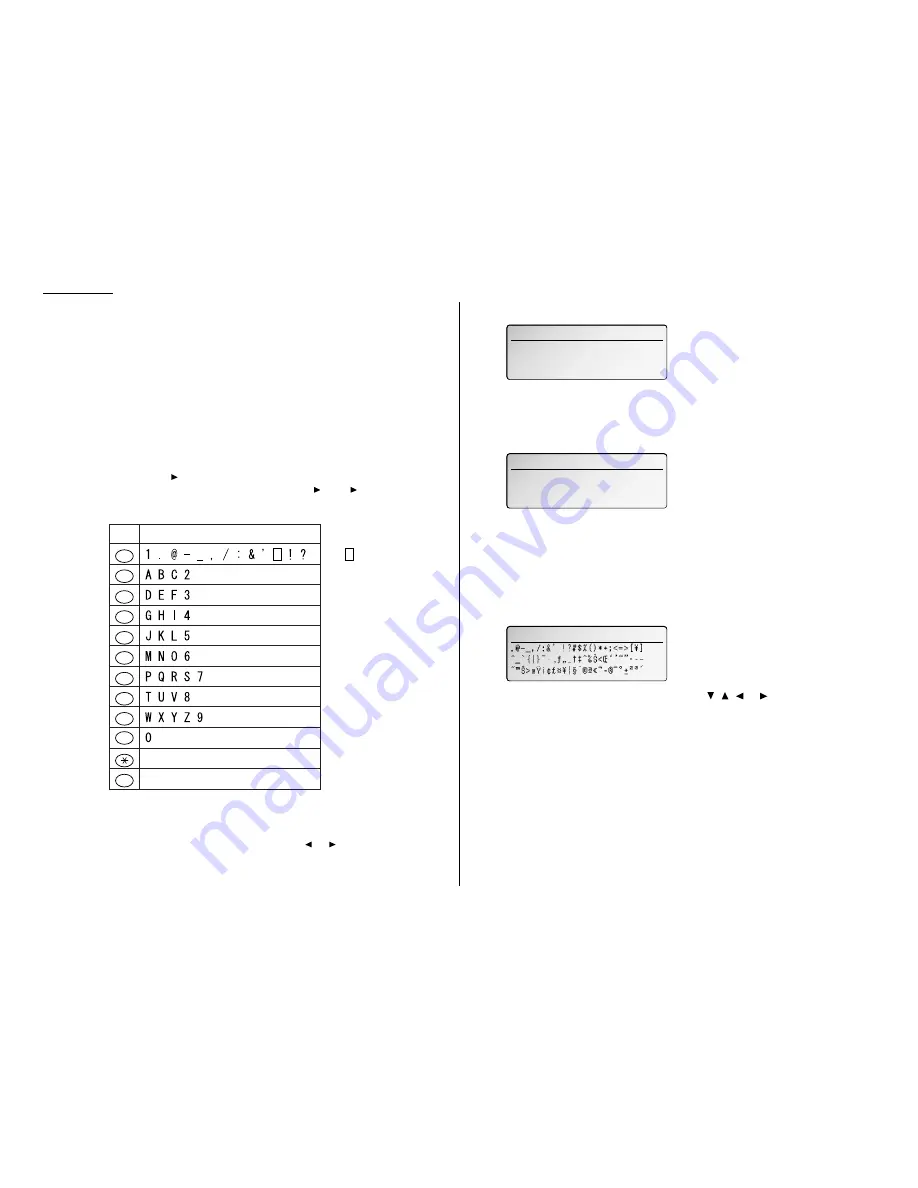
Using numeric keypad to enter characters
You can enter 40 letters, digits or symbols (and space) using the numeric keypad as
shown in the character table below.
Pressing the 2 numeric key once, for example, will enter an “A”. Pressing 2 twice,
will enter a “B”. If you want to enter “LA”, for example, you would press 5, 5, 5, 2.
When you want to enter two characters that share the same numeric key (“D” and
“E”, for example), press
to move the cursor to the right after you enter the first
letter. For example, if you want to enter “ABC”: press 2,
, 2, 2,
, 2, 2, 2.
Canceling characters
If you entered an incorrect letter or digit, press
CANCEL
to erase to the left. To
change just one character in name and/or digit, press
or
to move the cursor to
that character or digit. Then press
CANCEL
to erase it. Re-enter the character or
digit correctly.
To change upper/lower case
Press #(Caps) key to toggle upper case and lower case.
The word “Lower” means the machine will enter only lower-case letters.
To type a upper-case letter, press #(Caps) key.
The
LCD
changes to:
This means the machine will enter upper-case letters.
To switch back for lower-case entries, press #(Caps) key again.
Entering the special characters
You can also enter special characters or symbols.
1
When the machine prompts you to enter a name, press the symbol (
*
) key.
The
LCD
changes to:
2
Select the character you want to enter using ,
,
or
of cursor key.
3
To enter the character, press
ENTER
key.
4
If you want to enter other character, repeat steps 1–3.
Otherwise, go to next step.
5
Press
ENTER
to save the name.
Press ENTER to Enter Character
Press ENTER to Enter Character
9.User Install
9.User Install
TTI 1 Upper Case
TTI 1 Upper Case
_
9.User Install
TTI 1 Upper Case
-
Note:
means space.
Numeric
keypad
Character
Special Characters
Caps Lock
Character Table
3
DEF
7
PQRS
1
2
ABC
4
GHI
5
JKL
6
MNO
8
TUV
9
WXYZ
SYMBOL
#
CAPS
0
Содержание VarioPrint 5000
Страница 1: ...www imagistics com Operating Manual For use with Imagistics and Pitney Bowes Model 5000 5000 Model ...
Страница 7: ...This page intentionally blank ...
Страница 32: ...1 21 Getting started This page intentionally blank ...
Страница 46: ...2 13 Basic operation This page intentionally blank ...
Страница 118: ...Changing the default settings This page intentionally blank 4 11 ...
Страница 139: ...Appendix and index ...


