SE2L User’s Manual (SE9Z-B1865)
78
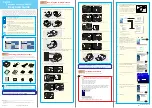
Figure 7-5 Startup setting screen
f)
Click restart and wait for a while.
g)
When startup setting is displayed, press F7 or 7.
After completing the set up, follow the process described in section 7.4.2 to install the driver. To view the
device manager used in the process, right click the mouse button on the empty start window panel and click
on the “all applications” and click on the “device manager”. Start from Step 4 (page 79) of installation
process for Windows7 described in section 7.4.2 to complete the driver installation.
7.4.2 Installing the driver in Windows 7
It is required to install SLS USB driver when SE2L is connected first time to USB port of a PC. Follow the
steps described below to complete the driver installation before running SLS Project Designer application on
Windows7 operating system.
Step 1:
Connect SE2L to USB port of the PC. Following error message will appear on the screen.
Figure 7-6
Содержание SE2L-H05LPC
Страница 1: ...SE9Z B1865 SE2L Series Safety Laser Scanner User s Manual...
Страница 100: ...SE2L User s Manual SE9Z B1865 99 Figure 7 31 b Function Figure7 31 c Area...
Страница 103: ...SE2L User s Manual SE9Z B1865 102 Figure 7 34 a Project report tab Figure 7 34 b Error report tab...
Страница 143: ...SE2L User s Manual SE9Z B1865 142 13 External dimension 13 1 SE2L H05LP mm...
Страница 144: ...SE2L User s Manual SE9Z B1865 143 13 2 SE2L H05LPC mm...
Страница 145: ...SE2L User s Manual SE9Z B1865 144 13 3 Base mounting bracket mm...
Страница 146: ...SE2L User s Manual SE9Z B1865 145 13 4 Rear mounting bracket mm...
Страница 147: ...SE2L User s Manual SE9Z B1865 146 13 5 Simple base mounting bracket mm...
Страница 149: ...SE2L User s Manual SE9Z B1865 148 13 7 Simple rear mounting bracket Long type mm...
Страница 150: ...SE2L User s Manual SE9Z B1865 149 13 8 Cover Protection Bracket mm...