


Chapter 9. Management
451
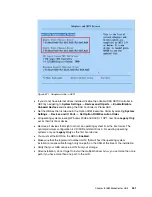
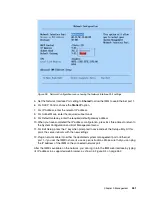
Figure 9-3 Network Configuration menu showing the Network Interface Port settings
5. Set the Network Interface Port setting to Shared to allow the IMM to use Ethernet port 1.
6. For DHCP Control, choose the Static IP option.
7. For IP Address, enter the relevant IP address.
8. For Subnet Mask, enter the required subnet mask.
9. For Default Gateway, enter the required default gateway address.
10.When you have completed the IP address configuration, press Esc three times to return to
the System Configuration and Boot Management menu.
11.For Exit Setup, press the Y key when prompted to save and exit the Setup utility. At this
point, the server reboots with the new settings.
12.Plug a network cable into either the dedicated system management port or Ethernet
port 1, if you set the IMM to share its use as per instructions. Make sure that you can ping
the IP address of the IMM on the connected network port.
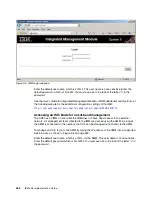
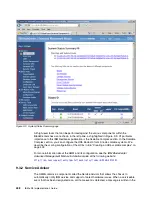
After the IMM is available on the network, you can log in into the IMM web interface by typing
its IP address in a supported web browser, as shown in Figure 9-4 on page 452.
Содержание x3850 X5
Страница 2: ......
Страница 3: ...International Technical Support Organization IBM eX5 Implementation Guide May 2011 SG24 7909 00...
Страница 20: ...xviii IBM eX5 Implementation Guide...
Страница 32: ...12 IBM eX5 Implementation Guide...
Страница 34: ...14 IBM eX5 Implementation Guide...
Страница 74: ...54 IBM eX5 Implementation Guide...
Страница 136: ...116 IBM eX5 Implementation Guide...
Страница 238: ...218 IBM eX5 Implementation Guide...
Страница 392: ...372 IBM eX5 Implementation Guide...
Страница 466: ...446 IBM eX5 Implementation Guide...
Страница 484: ...464 IBM eX5 Implementation Guide Figure 9 14 IMM Remote Control Video Viewer showing power control options...
Страница 560: ...540 IBM eX5 Implementation Guide...
Страница 564: ...544 IBM eX5 Implementation Guide...
Страница 578: ...IBM eX5 Implementation Guide IBM eX5 Implementation Guide...
Страница 579: ......


