background image

Attention: This is a Class A product. In a domestic environment this product may
cause radio interference in which case the user may be required to take adequate
measures.

International Electrotechnical Commission (IEC) Statement

This product has been designed and built to comply with IEC Standard 950.

United Kingdom Telecommunications Safety Requirements

This equipment is manufactured to the International Safety Standard EN60950 and
as such is approved in the UK under the General Approval Number
NS/G/1234/J/100003 for indirect connection to the public telecommunication network.

The network adapter interfaces housed within this equipment are approved sepa-
rately, each one having its own independent approval number. These interface
adapters, supplied by the manufacturer, do not use or contain excessive voltages.
An excessive voltage is one which exceeds 70.7 V peak ac or 120 V dc. They inter-
face with this equipment using Safe Extra Low Voltages only. In order to maintain
the separate (independent) approval of the manufacturer's adapters, it is essential
that other optional cards, not supplied by the manufacturer, do not use main voltages
or any other excessive voltages. Seek advice from a competent engineer before
installing other adapters not supplied by the manufacturer.

Avis de conformité aux normes du ministère des Communications du
Canada

Cet appareil numérique de la classe A respecte toutes les exigences du Réglement
sur le matériel brouilleur du Canada.

Canadian Department of Communications Compliance Statement

This Class A digital apparatus meets the requirements of the Canadian
Interference–Causing Equipment Regulations.

viii

RS/6000 Enterprise Server Model H Series Installation and Service Guide 


Содержание H SERIES RS/6000

Страница 1: ...RS 6000 Enterprise Server Model H Series IBM Installation and Service Guide SA38 0547 01...

Страница 2: ...or the program s described in this publication at any time without notice It is possible that this publication may contain reference to or information about products machines and programs programming...

Страница 3: ...Laser Safety Information xiii About This Book xv ISO 9000 xv Related Publications xv Trademarks xvi Chapter 1 Reference Information 1 1 System Unit Locations 1 1 CPU Drawer Data Flow Model H50 1 12 CP...

Страница 4: ...6 6 Utilities 6 10 Password 6 11 Hard Disk Spin Up Delay 6 15 Error Log 6 16 RIPL 6 17 SCSI ID 6 21 Update 6 22 Text Based System Management Services 6 24 Open Firmware Command Prompt 6 38 Chapter 7 R...

Страница 5: ...y 7 64 SCSI or SSA Backplane 7 65 Chapter 8 Parts Information 8 1 Appendix A High Availability Solutions A 1 Configuring the High Availability Solution System With No Single Points of Failure A 2 Basi...

Страница 6: ...Session E 6 Modem Configuration Samples E 9 Appendix F Service Processor Operational Phases F 1 Index X 1 Reader s Comments We d Like to Hear From You X 3 vi RS 6000 Enterprise Server Model H Series I...

Страница 7: ...connectors or by unauthorized changes or modifications to this equip ment Unauthorized changes or modifications could void the user s authority to operate the equipment This device complies with Part...

Страница 8: ...e manufacturer do not use or contain excessive voltages An excessive voltage is one which exceeds 70 7 V peak ac or 120 V dc They inter face with this equipment using Safe Extra Low Voltages only In o...

Страница 9: ...is used in a domestic environment radio disturbance may arise When such trouble occurs the user may be required to take corrective actions Electromagnetic Interference EMI Statement Taiwan The followi...

Страница 10: ...Ger te d rfen an Orten f r die sie nicht ausreichend entst rt sind nur mit besonderer Genehmigung des Bundesministers f r Post und Telekommunikation oder des Bundesamtes f r Post und Telekommunikatio...

Страница 11: ...Before installing or removing signal cables ensure that the power cables for the system unit and all attached devices are unplugged When adding or removing any additional devices to or from the syste...

Страница 12: ...the electrical outlet before relocating the system CAUTION This unit has more than one power supply cord To reduce the risk of elec trical shock disconnect two power supply cords before servicing xii...

Страница 13: ...e requirements of the International Electrotechnical Commission IEC 825 1st edition 1984 and CENELEC EN 60 825 1991 for Class 1 laser products CAUTION A class 3 laser is contained in the device Do not...

Страница 14: ...xiv RS 6000 Enterprise Server Model H Series Installation and Service Guide...

Страница 15: ...ers set up install options con figure modify and solve minor problems The 7014 Model S00 Rack Installation and Service Guide contains information regarding the 7014 Model S00 Rack which the RS 6000 En...

Страница 16: ...the International Business Machines Corpo ration PowerPC is a trademark of the International Business Machines Corporation Velcro is a trademark of Velcro Industries xvi RS 6000 Enterprise Server Mod...

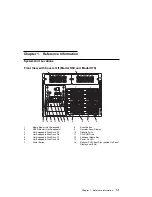
Страница 17: ...e 8 Reset Button 2 DASD Blower Hot Swappable 9 Operator Panel Display 3 Hot Swappable Disk Drive D1 10 Diskette Drive 4 Hot Swappable Disk Drive D6 11 CD ROM Drive 5 Hot Swappable Disk Drive C1 12 Add...

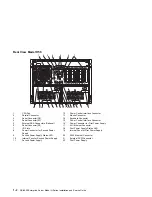
Страница 18: ...External SSA Connectors Optional 16 Power Connector for First Power Supply 6 Serial Connector S3 17 AUI Ethernet Connector 7 I O Slots 18 First Power Supply Status LED 8 Power Connector for Second Po...

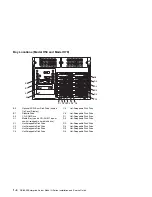
Страница 19: ...nnectors Optional 18 Power Connector for First Power Supply 6 Serial Connector S3 19 AUI Ethernet Connector 7 I O Slots 20 First Power Supply Status LED 8 I O Blower Hot Swappable 21 Internal Fans for...

Страница 20: ...OM Drive D1 Hot Swappable Disk Drive A1 Media Bay can be CD ROM Tape or non hot swappable hard disk drive D2 Hot Swappable Disk Drive C1 Hot Swappable Disk Drive D3 Hot Swappable Disk Drive C2 Hot Swa...

Страница 21: ...nnector J12 Not Used J13 Diskette Drive connector J15 Not Used J16 SCSI Security Jumper J17 Not Used J18 Ethernet connector thick J19 Not Used J21 Ethernet connector twisted pair J22A Operator Panel J...

Страница 22: ...al ports 1 and 2 J7 Serial port 3 J8 Keyboard port J9 Mouse port J10 System board connector J11 Power supply J12 SCSI port 1 connector J13 Diskette drive connector J14 Operator panel connector J15 Pow...

Страница 23: ...cessor card connector 2 J8 J9 Processor card connector 1 J12 Memory card connector 1 J13 Memory card connector 2 J8 Processor card connector 2 J6 Processor card connector 1 J3 Memory card connector 1...

Страница 24: ...e Media Blower J5 Power Supply and Fans 1 2 3 4 Power Supply Fan Assemblies J4 Fan 6 Hot Swappable DASD Blower J1 To I O Board J3 Fan 7 CPU Fan J6 To PCI Connectors J2 Fan 5 Hot Swappable Media Blower...

Страница 25: ...rd J9 J10 J5 J6 J7 J3 J8 J4 Power Supply 2 Media Bays Diskette CD ROM Optional DASD Bay 2 DASD Bay 1 J1 J1 J1 J2 1x4 1x4 J2 J2 30 Amp Wall Cord Power Distribution Bus Display FMC Media Blower DASD Blo...

Страница 26: ...tional DASD Bay 2 DASD Bay 1 J1 J1 J1 J2 1x4 1x4 J2 J2 30 Amp Wall Cord Power Distribution Bus J12 J11 J13 J14 J15 J16 J27 J29 J7 J5 I O Board System Board Display I O Blower FMC Media Blower DASD Blo...

Страница 27: ...First Power Supply LED Second Power Supply LED Off No AC power No AC power No AC power On blinking green System plugged in not turned on System plugged in not turned on System plugged in not turned on...

Страница 28: ...2 PCI Bus B 33 Mhz 32 Bit SDRAMS PCI32 A PCI32 B PCI64 C 87332 SCSI ADAPTER Op Panel J Tag Service Processor Connector 83 MHZ 83 MHZ 50 MHz P1284 I O Board Processor Card Memory Card System Board PCI...

Страница 29: ...Serial Dual UART System Clock 4 Word 85 MHz 6XX Intf Memory Manager Master Oscillator 37 04 MHz 64 MB 8GB 2 32 DIMMS Memory Manager L2 Cache Controller L2 Cache Controller L2 Cache RAM 4 MByte L2 Cac...

Страница 30: ...or Inrush current Maximum altitude 0 52 0 56 200 to 240 autoranging 50 or 60 975 BTU hr 2460 BTU hr 285 watts 600 watts 750 watts 0 8 0 96 50 amps 2135m 7000 ft Temperature Requirements Operating 10 t...

Страница 31: ...feet in length and a tandem blade grounding type attachment plug rated at 15 A 250 V Appliance couplers complying with International Electrotechnical Commission IEC Standard 320 Sheet C13 Power cables...

Страница 32: ...rnal parts of the system unit 2 Check the covers for proper fit to the system unit They should be in place and secure 3 Gently rock the system unit from side to side to determine if it is steady 4 Set...

Страница 33: ...to the power cord b Check for the correct grounded power cable c With the external power cable connected to the device check for 0 1 ohm or less resistance between the ground lug on the external power...

Страница 34: ...1 18 RS 6000 Enterprise Server Model H Series Installation and Service Guide...

Страница 35: ...he VPD from the old operator panel to the new one If the old VPD module has to be replaced call technical support for recovery instructions If recovery is not possible notify the system owner that new...

Страница 36: ...s are dis played on the system console The term POST indicators refer to the icons graphic display or device mnemonics ASCII terminal that appear during the power on self test POST 1 Use MAP 1540 to i...

Страница 37: ...the ASCII terminal is connected to S1 b If problems persist go to the Problem Determination Procedures for the ter minal 4 If you do not find a problem then suspect the I O board Go to MAP 1540 Minimu...

Страница 38: ...o use that ID If settings do not appear to be in conflict 1 Replace the SCSI cable 2 Replace the device 3 Replace the SCSI adapter or I O board if connected to one of the two integrated SCSI controlle...

Страница 39: ...terest Be prepared to record code numbers and use those numbers in the course of ana lyzing a problem Go to Step 1020 1 Step 1020 1 The following steps analyze a failure to load the diagnostic program...

Страница 40: ...ps with a prompt to enter a pass word Enter the password You are not allowed to con tinue until a correct password has been entered When you have entered a valid password go to the beginning of this t...

Страница 41: ...ckpoints on page 3 43 or Model H70 Service Processor Checkpoints on page 3 47 If E1xx EFFF is displayed then go to Firmware Checkpoints on page 3 50 For all other numbers record SRN 101 xxx where xxx...

Страница 42: ...E file by using the Service Hints Service Aid 2 Perform the action listed Keyboard Type Action Type 101 keyboard U S Identify by the size of the Enter key The Enter key is in only one hori zontal row...

Страница 43: ...check the time stamp If the error was logged during the current boot attempt record it Look up the error in the Chapter 3 on page 3 1 and perform the listed action If no recent error is logged in the...

Страница 44: ...u 3 The Service Processor may have been set by the user to monitor server oper ations and to attempt recoveries You may wish to disable these actions while you diagnose and service the system If you d...

Страница 45: ...n A single memory module pair may be installed in module slots J1 and J2 not slots J1 and J3 A second memory module pair could be installed in module slots J5 and J6 slots J3 and J4 do not have to be...

Страница 46: ...the power off 2 Remove the memory card from slot J13 Model H50 or J2 Model H70 3 Install the memory card removed from slot J12 or J3 in its original location 4 Turn the power on Does the system stop...

Страница 47: ...ry card in slot J12 or J3 suspect bad and go to Step 1240 7 on page 2 14 Step 1240 5 1 Turn the power off 2 Install the memory card removed from slot J13 or J2 in it s original location 3 Turn the pow...

Страница 48: ...e 2 36 Step 1240 7 1 Turn the power off 2 Remove all installed memory modules from the memory card you tagged suspect bad Record the position of the memory modules removed so that when instructed to r...

Страница 49: ...e problem Go to Map 0410 Repair Checkout in the Diagnostic Information for Mul tiple Bus Systems YES Go to Step 1240 9 Step 1240 9 The failure may be caused by the last pair of memory modules installe...

Страница 50: ...point displayed on the operator panel NO Go to Map 0410 Repair Checkout in the Diagnostic Information for Mul tiple Bus Systems YES Reinstall the original FRU Repeat this step until the defective FRU...

Страница 51: ...erator panel NO Repeat this step with the second memory module you exchanged in the previous step If both memory modules have been tested go to Map 0410 Repair Checkout in the Diagnostic Information f...

Страница 52: ...tly wired and grounded to prevent an electrical shock Before installing or removing signal cables ensure that the power cords for the system unit and all attached devices are unplugged When adding or...

Страница 53: ...G STBY is displayed on the operator panel There is no indi cation of activity when the power button on the operator panel is pressed None of the power LEDs light and none of the fans including the fan...

Страница 54: ...the PDU PDB has continuity 6 Check that the power cords from the PDU PDB to the power supplies have conti nuity 7 Check that the power outlet has been wired correctly with the correct voltage 8 Plug...

Страница 55: ...pull the the power supply out of the drawer 6 Plug the power cord into the power supply 7 Plug the power cord into the power outlet Does the power LED on the power supply commence flashing within 30 s...

Страница 56: ...he power LED on the power supply change from blinking to solid while you hold the switch When you let go of the switch the fan will turn off and the LED on the power supply will change from solid to b...

Страница 57: ...g the power cords into the power supplies 5 Plug the power cord into the power outlet 6 Press the Power button on the operator panel to turn the power on Does the power LED on the operator panel come...

Страница 58: ...4 Connect the power cables to the power supplies 5 Turn the power on Does the fan in the power supply turn on and the power LED on the operator panel come on and stay on NO Reinstall the original FRU...

Страница 59: ...rocessor card s 6 Unplug the power cable s from the disk drive cage backplane s 7 Unplug the power cables from all the SCSI devices in the media bay 8 Unplug all the fans CPU fan media blower DASD blo...

Страница 60: ...e one of the FRUs in the list 4 Connect the power cables to the power supplies 5 Turn the power on Does the fan in the power supply turn on and the power LED on the operator panel come on and stay on...

Страница 61: ...es 5 Turn the power on Do the power supply fans turn on and the power light on the operator panel come on and stay on NO Replace the last part installed If the memory card was just installed remove al...

Страница 62: ...he system and perform Error Log Analysis Do you get an SRN indicating a Voltage Sensor is out of range NO The last FRU exchanged is defective Go to MAP 410 Repair Checkout in the Diagnostic Informatio...

Страница 63: ...7 22 for instructions on replacing a power supply Before removing a power supply be sure the other power supply is operational by observing the green LED which should be lit Also be aware that the pow...

Страница 64: ...Board 3 Power Distribution Board 4 Service Processor Model H50 Restart the system and perform Error Log Analysis Do you get an SRN indicating a Voltage Sensor is out of range NO The last FRU exchanged...

Страница 65: ...power supply flashing NO Replace the power supply Go to MAP 410 Repair Checkout in Diagnostic Information for Multiple Bus Systems YES Go to Step 1520 17 Step 1520 17 1 Find all the cables connecting...

Страница 66: ...placing all the FRUs in the list go to Step 1540 1 on page 2 37 YES Go to Step 1520 19 Step 1520 19 Perform each of the following steps in order After each apply AC power and verify that the light on...

Страница 67: ...k of the power supply flashing NO The last cable that was attached to the Power Distribution Board is defec tive replace it and go to MAP 410 Repair Checkout in Diagnostic Infor mation for Multiple Bu...

Страница 68: ...page 2 35 YES Model Model H50 go to Step 1520 24 Model Model H70 go to Step 1520 25 on page 2 35 Step 1520 24 Install the Service Processor on the I O board Does the operator panel display OK NO The s...

Страница 69: ...displayed on the operator panel NO Replace the parts listed below in order After each observe if anything displays on the operator panel If something displays the last FRU replaced is defective Replac...

Страница 70: ...indicators refer to the icons graphic display or device mne monics ASCII terminal that appear during the power on self test POST 5 The Service Processor may have recorded one or more symptoms in its e...

Страница 71: ...system are shut down 3 Turn the power off 4 Turn the power on 5 When the keyboard indicator is displayed the word keyboard on an ASCII ter minal or the keyboard and hand icon on a graphical display pr...

Страница 72: ...l H50 slot J5 J6 Model H70 slot J8 If second processor card removed ensure first processor card is in processor card connector 1 8 Record the slot numbers of the memory modules Remove all installed me...

Страница 73: ...l display 16 Turn the power on Does the system stop with code E1F2 E1F3 STBY 20EE000B or 4BA00830 displayed on the operator panel NO Go to Step 1540 3 on page 2 40 YES If a second processor card was r...

Страница 74: ...E1F3 STBY 20EE000B or 4BA00830 displayed on the operator panel NO Reinstall the original FRU Repeat the FRU replacement steps until the defective FRU is identified or all the FRUs have been exchanged...

Страница 75: ...owing order exchange the FRUs that have not been exchanged 1 Processor card last one installed 2 System board 3 I O board See notes on page 2 1 Repeat this step until the defective FRU is identified o...

Страница 76: ...emove all of the memory modules from the second memory card except one pair Repeat this step with the second memory card if previously installed Go to Step 1540 9 on page 2 45 Step 1540 6 The failure...

Страница 77: ...ode E1F2 E1F3 STBY 20EE000B or 4BA00830 displayed on the operator panel NO Replace the memory module If you have not tested both memory modules repeat this step with the second memory module you excha...

Страница 78: ...4BA00830 displayed on the operator panel NO Reinstall the original FRU Repeat this step until the defective FRU is identified or all the FRUs have been exchanged If the symptom did not change and all...

Страница 79: ...lay to it Plug the keyboard into the keyboard connector on the rear of the system unit 3 Turn the power on 4 If the ASCII terminal or graphics display including display adapter are con nected differen...

Страница 80: ...m on that device 2 Graphics adapter if installed 3 Cable async or graphics 4 I O board See notes on page 2 1 Repeat this step until the defective FRU is identified or all the FRUs have been exchanged...

Страница 81: ...se define the System Console screen displayed NO One of the FRUs remaining in the system unit is defective In the following order exchange the FRUs that have not been exchanged 1 SCSI cable 2 CD ROM d...

Страница 82: ...oard 7 Enter the appropriate password if prompted to do so Is the Please define the System Console screen displayed NO One of the FRUs remaining in the system unit is defective In the following order...

Страница 83: ...ber 5 key on an ASCII terminal keyboard 7 Enter the appropriate password if prompted to do so Is the Please define the System Console screen displayed NO One of the FRUs remaining in the system unit i...

Страница 84: ...ssword if prompted to do so Is the Please define the System Console screen displayed NO One of the FRUs remaining in the system unit is defective In the following order exchange the FRUs that have not...

Страница 85: ...ate password if prompted to do so Is the Please define the System Console screen displayed NO In the following order exchange the FRUs that have not been exchanged 1 Last disk drive installed 2 Hot sw...

Страница 86: ...do so Is the Please define the System Console screen displayed NO One of the FRUs remaining in the system is defective In the following order exchange the FRUs that have not been exchanged 1 Diskette...

Страница 87: ...ress the F5 key on the directly attached keyboard or the number 5 key on an ASCII terminal keyboard 8 Enter the appropriate password if prompted to do so Is the Please define the System Console screen...

Страница 88: ...n the operator panel display 4 Turn the power on 5 If the Console Selection screen is displayed choose the system console 6 After the keyboard indicator is displayed press the F5 key on the directly a...

Страница 89: ...eat this step until the defective device or cable is identified or all the devices and cables have been disconnected If all the devices and cables have been removed then one of the FRUs remaining in t...

Страница 90: ...the NEW RESOURCE screen displays select an option from the bottom of the screen Note Adapters or devices that require supplemental media are not shown in the new resource list If the system has adapt...

Страница 91: ...uble found Run diagnostics after each FRU is exchanged If the I O board or a network adapter is replaced see notes on page 2 1 Go to Map 0410 Repair Checkout in the Diagnostic Information for Mul tipl...

Страница 92: ...pport person for assistance Step 1540 23 Select Task Selection 1 Select Process Supplemental Media and follow the on screen instructions to process the media 2 Supplemental media must be loaded and pr...

Страница 93: ...Repeat this step until the defective FRU is identified or all the FRUs have been exchanged If the symptom did not change and all the FRUs have been exchanged call your service support person for assi...

Страница 94: ...nt Procedures Rear Service Position 6 Record the slot numbers of the ISA and PCI adapters Label and record the location of any cables attached to the adapters Disconnect any cables attached to the ada...

Страница 95: ...the system stop with code 26800Dxx 45800000 4880090A 4B2xxx00 or 4B2xxx10 displayed on the operator panel NO Go to Map 0410 Repair Checkout in the Diagnostic Information for Mul tiple Bus Systems YES...

Страница 96: ...play 4 Turn the power on 5 If the Console Selection screen is displayed choose the system console 6 Enter the appropriate password if prompted to do so Does the system stop with code 26800Dxx 45800000...

Страница 97: ...played on the operator panel NO The last device or cable that you disconnected is defective Exchange the defective device or cable Go to Map 0410 Repair Checkout in the Diagnostic Information for Mul...

Страница 98: ...A Hot Swap Disk Drive Attention Unless the system unit needs to be switched off for some other reason do not switch off the power to the system unit when servicing an SSA Hot Swap Disk Drive or the ex...

Страница 99: ...tion Power On Power On Off Power Off Ready On Both SSA connections good and drive is ready Blinking Only one SSA connection good Flickering Drive is executing a command Check On Disk drive failure Sel...

Страница 100: ...here because The system problem determination procedures sent you here Action from an SRN list sent you here A problem occurred during the installation of an SSA Hot Swap Disk Drive module Another MA...

Страница 101: ...sk a Run diagnostics using system verification mode to the pdisk b If you get a five digit SRN go to Table 5 1 on page 5 3 and follow the actions described If you do not get a five digit SRN the disk...

Страница 102: ...avail able run them then go to Step 2010 5 If the system diagnostics and stand alone diagnostics are not available go to Step 2010 1 on page 2 66 Step 2010 5 Run the diagnostics in the problem determ...

Страница 103: ...for Multiple Bus Systems to verify the repair Step 2010 8 Replace the backplane Go to MAP 410 Repair Checkout in Diagnostic Informa tion for Multiple Bus Systems to verify the repair Step 2010 9 Is t...

Страница 104: ...EPOW cable Go to MAP 410 Repair Checkout in Diagnostic Information for Multiple Bus Systems to verify the repair Step 2010 11 Is the middle LED in the drive at the end of the backplane flashing NO Go...

Страница 105: ...AP 410 Repair Checkout in Diagnostic Information for Multiple Bus Systems to verify the repair Step 2010 13 Replace the following 1 Backplane 2 Disk drive with the second LED flashing Go to MAP 410 Re...

Страница 106: ...2 72 RS 6000 Enterprise Server Model H Series Installation and Service Guide...

Страница 107: ...he MAPs indicate that the Operator Panel should be replaced swap the VPD from the old operator panel to the new one If the old VPD module has to be replaced call technical support for recovery instruc...

Страница 108: ...ble using code E174 20A80003 Cannot get server hardware address Refer to Firmware Checkpoints on page 3 50 table using code E174 20A80004 Bootp failed Refer to Firmware Checkpoints on page 3 50 table...

Страница 109: ...urn off then turn on system unit 2 Replace the I O board See notes on 3 1 20E00008 CMOS corrupted or tampering evident CMOS initialized Check your machine for evidence of tampering If no tampering evi...

Страница 110: ...ys have at least 2 integrated PCI SCSI controllers replace the I O board See notes on 3 1 20EE0007 Keyboard not found 1 Plug in keyboard 2 Replace I O board See notes on 3 1 20EE0008 No configurable a...

Страница 111: ...installed on Please refer to your AIX documentation for the exact syntax and usage of the bootlist command In order to boot the Operating System so that the above mentioned values can be reconstructe...

Страница 112: ...vice Errors Notes 1 Before replacing any system compo nents a Ensure that the controller and each device on the SCSI bus is assigned a unique SCSI ID b Ensure SCSI bus is properly ter minated c Ensure...

Страница 113: ...ive Insert diskette containing firmware image 25010001 Diskette seek error 1 Retry function 2 Replace diskette drive 3 Replace diskette cable 4 Replace I O board See notes on 3 1 25010002 Diskette in...

Страница 114: ...processor card If not continue 2 Exchange processor card in processor card connector 1 with the processor card removed in step 1 or replace processor card if only one processor card exists and see if...

Страница 115: ...t nvram invoked ALL of NVRAM initialized Refer to Action under error code 25A80xxx 25A80002 Init nvram invoked some data parti tions may have been preserved Refer to Action under error code 25A80xxx 2...

Страница 116: ...0003 Write enable error Refer to Action under error code 25AA0xxx 25AA0004 Write recv error Refer to Action under error code 25AA0xxx 25AA0005 Write disable error Refer to Action under error code 25AA...

Страница 117: ...y PD Bits on page 3 40 for definition of yy 25Cyy003 PD bits are mis matched or missing one memory module 1 Make sure both memory modules in the pair are the same type 2 Replace the system board See M...

Страница 118: ...failed extent access test 1 Replace the system board 2 Remove processor card in processor card connector 2 if installed and see if the problem is resolved If problem is resolved replace processor card...

Страница 119: ...heck for system firmware updates Apply if update available 6 Replace power supply 7 Replace I O board See notes on 3 1 26020003 Invalid PCI adapter class code 1 Move adapter to another slot behind a d...

Страница 120: ...25 on page 2 60 28030xxx RTC errors 1 Errors reported against the Real Time Clock RTC can be caused by low battery voltage and more rarely power outages that occur during normal system usage These er...

Страница 121: ...ncy measurement error Replace the I O board See notes on 3 1 Note Replacing the battery does not correct this error condition 29000002 Keyboard Mouse controller failed self test Replace the I O board...

Страница 122: ...el VPD Contact service person 251 166 Mhz 1 way Processor card 261 166 Mhz 2 way Processor card 451 332 Mhz 1 way Processor card 461 332 Mhz 2 way Processor card 8A8 340 Mhz 2 way Processor card 2B2xx...

Страница 123: ...lem persists replace battery 2 Replace the I O board See notes on 3 1 2BA00014 Service processor reports bad service processor firmware Use service processor firmware diskette to re program firmware 2...

Страница 124: ...1 2BA00062 Service processor reports system board VPD module not present Replace the system board 2BA00063 Service processor reports system board VPD data corrupted Replace the system board 2BA00064...

Страница 125: ...ette 2 Retry operation 2BA00104 Service processor firmware update file is the same level as the service processor firmware update can celled 1 Obtain new level of service processor firmware 2 Retry op...

Страница 126: ...2 1 Replace Fan 2 2 If problem persists replace power supply 3 Replace I O Board See notes on 3 1 2BA00303 Service Processor reports Slow Fan number 3 1 Replace Fan 3 2 If problem persists replace Po...

Страница 127: ...lert 1 Replace power supply 2 Replace I O Board See notes on 3 1 2BA00323 Service Processor reports 12V Under Voltage Alert 1 Replace power supply 2 Replace I O Board See notes on 3 1 2BA00324 Service...

Страница 128: ...em from normal operation example a cable caught in the fan preventing it from spinning 3 If problem persists replace I O Board See notes on 3 1 2BA00337 Service Processor reports Memory Critical Over...

Страница 129: ...orts Slow DASD Fan 1 1 Replace DASD Fan 1 2 If problem persists replace power supply 3 Replace I O Board See notes on 3 1 2BA00361 Service Processor reports Slow DASD Fan 2 1 Replace DASD Fan 2 2 If p...

Страница 130: ...EC Fan 3 2 If problem persists replace power supply 3 Replace I O Board See notes on 3 1 2BA00371 Service Processor reports Locked CEC Fan 1 1 Remove obstruction from CEC Fan 1 2 Replace CEC Fan 1 3 I...

Страница 131: ...ck cable between CPU card and PDB for proper seating 2 Replace power supply 3 Replace PDB For Model H70 Replace power supply 40110003 Voltage is present but not detected on one processor card If the s...

Страница 132: ...in power supply main enclosure 1 Check I2 C cable to connector on I O Board 2 Power supply 4011000A High 5 0 RA volt detected in power supply main enclosure 1 Check I2 C cable to connector on I O Boa...

Страница 133: ...ue 2 Exchange processor card in processor card connector 1 with the processor card removed in step 1 or replace processor card if only one processor card exists and see if problem is resolved If probl...

Страница 134: ...installed and see if the problem is resolved If problem is resolved replace processor card If not continue 3 Exchange processor card in processor card connector 1 with the processor card removed in st...

Страница 135: ...if installed and see if the problem is resolved If problem is resolved replace processor card If not continue 2 Exchange processor card in processor card connector 1 with the processor card removed in...

Страница 136: ...al temperature on the air flow inlet 40210011 A slow fan detected Check 1 Room operating temperature 2 System fans 40210014 1 A stopped fan detected 2 Fan connector unplugged 3 Fan sensor defective 4...

Страница 137: ...on 3 1 7 Service Processor Model H50 only 8 If the problem persists call the support center for assistance 40B00000 The operating system surveillance interval exceeded 1 Surveillance mode control is...

Страница 138: ...om manded Critical cooling problem Check to ensure the temperature is in the ambient range 40D00004 An unknown fast shutdown com manded Locked fan failure detected Make sure all fans are operating nor...

Страница 139: ...e find the code in the Model H50 Service Processor Checkpoints on page 3 43 or Model H70 Service Processor Checkpoints on page 3 47 or Firmware Checkpoints on page 3 50 and perform the action shown th...

Страница 140: ...ermine the cause of the failure Otherwise continue 2 CPU Card in processor card connector 2 3 System board 4 I O board See notes on 3 1 4B2xxx10 Machine Check 0 1 Attempt to reboot the system in Servi...

Страница 141: ...hange processor card in processor card connector 1 with processor card removed from slot 2 in step 1 replace processor card if only one processor card is exists and see if the problem is resolved If p...

Страница 142: ...replace that CPU Card Otherwise continue 5 Install the CPU Card in slot 2 if there was one If the failure returns replace that CPU Card Otherwise continue 6 If the failure is still absent the problem...

Страница 143: ...4B200056 No CPU card in first slot 1 If only one processor card is used it must be in slot 1 2 If two processor cards are used a Replace the card in slot 1 b Replace the system board c Replace the I O...

Страница 144: ...Replace the service processor Model H50 only 2 Replace the I O board See notes on 3 1 4BA00800 Unknown error Check level of Service Processor if not the latest and problem persist call for support 4BA...

Страница 145: ...e processor card If not continue 3 Exchange processor card in processor card connector 1 with the processor card removed in step 2 or replace processor card if only one processor card exists and see i...

Страница 146: ...devices with all adapters removed from the failing bus If a failure is detected on this system with all adapters removed from the failing bus the I O board is the isolated FRU If a failure is not det...

Страница 147: ...A Bus Diskette Drive port device 01 D1 00 00 I O board See notes on 3 1 Parallel port device 01 R1 I O board See notes on 3 1 Serial ports 1 3 device 01 S1 to 01 S3 I O board See notes on 3 1 Mouse po...

Страница 148: ...ssociated FRU 9CC 101 PCI Bus 01 Device installed in I O Slot 1P 20 58 to 20 5F Adapter Device installed in I O Slot 2P 20 60 to 20 67 Adapter 9CC 102 PCI Bus 02 Internal External SCSI port 2 10 88 I...

Страница 149: ...rrected go to MAP 410 Repair Checkout in the Diagnostic Information for Multiple Bus Systems Table 3 6 Page 1 of 4 Model H50 Service Processor Checkpoints Checkpoint Description Action Possible Failin...

Страница 150: ...paring to set serial port line speed 1 Service Processor Model H50 only 2 I O board See notes on 3 1 3 CPU Card E045 Preparing to initialize serial port 1 Service Processor Model H50 only 2 I O board...

Страница 151: ...H50 only E0C0 Starting X5 BIST 1 CPU Card 2 I O board See notes on 3 1 3 Service Processor Model H50 only E0E0 Pulling CPU out of reset 1 CPU Card 2 I O board See notes on 3 1 3 Service Processor Mode...

Страница 152: ...nutes After 5 minutes the service processor initiates a fast shutdown of the system OK SP Ready Waiting for Power On None Normal operation STBY SP Ready System was shutdown by the operating system and...

Страница 153: ...Information for Multiple Bus Systems Table 3 7 Page 1 of 3 Model H70 Service Processor Checkpoints Checkpoint Description Action Possible Failing FRU E000 System Support Controller begins operation T...

Страница 154: ...enus attempting to disconnect modems 1 I O board See notes on 3 1 2 CPU Card E0A0 Beginning Bring Up Phase 1 I O board See notes on 3 1 2 CPU Card E0B0 Starting CPU BIST 1 CPU Card 2 I O board See not...

Страница 155: ...eplaced within 5 minutes After 5 minutes the service processor initiates a fast shutdown of the system OK SP Ready Waiting for Power On None Normal operation STBY SP Ready System was shutdown by the o...

Страница 156: ...105 Transfer control to Operating System normal boot See Boot Problems and Concerns on page 3 63 E108 Run recovery block base memory test 2K set stack See the note on 3 43 E109 Copy CRC verification c...

Страница 157: ...e service processor See the note on 3 43 E122 No memory detected system lockup Note Disk drive light is on continuously Go to MAP 1240 Memory Problem Resolution on page 2 10 E123 No memory module foun...

Страница 158: ...43 E14C Create terminal emulator node See the note on 3 43 E14D Load boot image See Boot Problems and Concerns on page 3 63 E14E Create client interface node directory See the note on 3 43 E14F NVRAM...

Страница 159: ...43 E162 service processor node VPD cre ation See the note on 3 43 E164 Create PCI graphics node P9 See the note on 3 43 E168 Create PCI graphics node S3 See the note on 3 43 E16C GTX100P Subsystem Op...

Страница 160: ...xxx in Firmware POST Error Codes on page 3 2 E19F Create EEPROM node See the note on 3 43 E1AD See description of checkpoint E1DE See the note on 3 43 E1B0 Create lpt node I O board See notes on 3 1 S...

Страница 161: ...prob lems in the Entry MAP tables If selection screen s can be seen on the terminals and the appropriate key on the input device associated with the desired display or terminal is pressed within 60 s...

Страница 162: ...E5 XCOFF boot image initialization See the note on 3 43 E1E6 Set up early memory allocation heap See the note on 3 43 E1E7 PE boot image initialization See the note on 3 43 E1E8 Initialize primary dis...

Страница 163: ...e image See the note on 3 43 E1EF Erase flash See the note on 3 43 E1F0 Start O B E See the note on 3 43 E1F1 Begin self test sequence on boot device s See the note on 3 43 E1F2 Power On Password prom...

Страница 164: ...mode and 64 32 bit mode on PCG Replace the I O board See notes on 3 1 See the note on 3 43 E208 Assign bus number on PCG Replace the I O board See notes on 3 1 See the note on 3 43 E209 Assign PCI I...

Страница 165: ...hat the system and service processor firmware levels are at the current release levels update as necessary 2 Replace the memory card See notes on 3 1 See the note on 3 43 E441 Generate options node NV...

Страница 166: ...fore another slot pair Problem resolution steps This section attempts to trouble shoot a problem during the memory testing where the system hangs before an error code can be dis played on the operator...

Страница 167: ...ory modules and tag the removed memory module pair as suspect bad f Power the system up If the system stops at an E3xx code skip to step 6 on page 3 62 g Power down the system h If there are more memo...

Страница 168: ...3xx code the memory module tagged suspect bad just installed is defective replace it with the memory module removed in step 5a If the system did not stop at an E3xx code remove the suspect bad tag fro...

Страница 169: ...commodate retries the system may appear to be hung This procedure assumes that a CD ROM drive is installed and connected to the integrated SCSI port 1 connector Model H50 J25 Model H70 J12 and a Diag...

Страница 170: ...ation b Check SCSI cabling signal and power cables c It is possible that another attached SCSI device is causing the problem Disconnect the signal and power cables from the hot swap bay back planes Di...

Страница 171: ...e graphics adapter or the I O board is most likely defective A TTY terminal attached to the serial port also can be used to determine if the graphics adapter is causing the problem This is done by rem...

Страница 172: ...s the base location code of a function from any extended location information A group of logical devices can have the same base location code because they are all on the same physical package but may...

Страница 173: ...location code conveys the same information in a more concise form than an additional level of location identifier for example P1 M1 4 pluggable module 4 on Memory Card 1 on Planar 1 rather than P1 M1...

Страница 174: ...s allows the location code to uniquely identify multiple adapters on individual PCI cards For pluggable ISA adapters CD is equal to the order the ISA cards defined configured either by SMIT or the ISA...

Страница 175: ...the SCSI Device Control Unit Address of the SCSI Device Connector ID devfunc Number Adapter Number or Physical Location Bus Type or PCI Parent Bus Where AB CD EF are the same as non SCSI devices G def...

Страница 176: ...y PCI card in slot 5 Model H50 only 30 60 to 30 67 Any PCI card in slot 6 Model H50 only 40 58 to 40 5F Any PCI card in slot 5 Model H70 only 40 60 to 40 67 Any PCI card in slot 6 Model H70 only 30 68...

Страница 177: ...AIX and Physical Location Code Reference Table Model H50 Chapter 3 Error Code to FRU Index 3 71...

Страница 178: ...3 72 RS 6000 Enterprise Server Model H Series Installation and Service Guide...

Страница 179: ...H 11L 11H 13L 13H 15L 15H Memory Card 2 00 00 P1 M2 Processor Con nector J13 Memory Card 2 modules 1 thru 16 00 00 P1 M2 1 through P1 M2 16 Memory Card Sockets J1 J2 J3 J4 J5 J6 J7 J8 J9 J10 J11 J12 J...

Страница 180: ...20 5F P2 I1 I O board Con nector J1 Host Bridge ID01 Device 01 Card in PCI Slot 2P 20 60 to 20 67 P2 I2 I O board Con nector J2 Host Bridge ID01 Device 02 Card in PCI Slot 3P 10 68 to 10 6F P2 I3 I O...

Страница 181: ...ne C When con nected to SCSI Port 1 P2 Z1 10 60 00 15 0 P2 Z1 B2 Primary SCSI Bus ID 15 SCSI Backplane C When con nected to SCSI Port 2 P2 Z2 30 58 00 15 0 P2 Z2 B2 Secondary SCSI Bus ID 15 DASD in Ba...

Страница 182: ...and G identifies the SCSI Bus ID 8 through 13 P2 In Z1 B2 1 through B2 6 Bus ID 8 through 13 SCSI Backplane E When con nected to PCI adapter in slot P2 In AB CD 00 15 0 Where AB CD identifies the adap...

Страница 183: ...board Con nector J22A Operator Panel Connector P2 L1 I O board Con nector J22A Power Supply Power Supply 1 V1 PDB connector J1A J1B Power Supply 2 V2 PDB connector J2A J2B Note The SCSI bus IDs are t...

Страница 184: ...rd primary Processor Card P2 L1 P2 X4 P2 X4 P2 X2 Memory Card Memory Card Operator Panel Power Distribution Board Power Distribution Board FMC Card 10 60 SCSI Port 1 01 D1 X2 F5 X2 F7 X2 F8 X2 F6 X2 F...

Страница 185: ...P2 E1 P2 R1 P2 Z2 40 58 to 40 5F 40 60 to 40 67 30 70 to 30 77 30 68 to 30 6F 10 70 to 10 77 10 68 to 10 6F 20 60 to 20 67 20 58 to 20 5F PCI 32 Bit PCI 32 Bit PCI 32 Bit PCI 32 Bit PCI 64 Bit PCI 64...

Страница 186: ...rd 2 00 00 P1 M2 Processor Con nector J3 Memory Card 2 Memory modules 1 thru 16 00 00 P1 M2 1 through P1 M2 16 Memory Card Sockets J1 J2 J3 J4 J5 J6 J7 J8 J9 J10 J11 J12 J13 J14 J15 J16 Extents 8L 8H...

Страница 187: ...ice 01 Card in PCI Slot 2P 20 60 to 20 67 P2 I2 I O Planar Con nector J18 Host Bridge ID01 Device 02 Card in PCI Slot 3P 10 68 to 10 6F P2 I3 I O Planar Con nector J19 Host Bridge ID00 Device 03 Card...

Страница 188: ...plane con nector J6 through J11 Slots A through F Primary SCSI Bus ID 8 through 13 DASD in Bays C1 through C6 When con nected to SCSI Port 2 P2 Z2 10 88 00 G 0 Where G identi fies Secondary SCSI Bus I...

Страница 189: ...5 DASD in Bays D1 through D6 When con nected to PCI adapter in slot P2 In AB CD 00 G 0 Where AB CD identifies the adapter s slot and G identifies the SCSI Bus ID 8 through 13 P2 In Z1 B2 1 through B2...

Страница 190: ...l Card Fan Monitor and Control Card X2 I O Planar Con nector J27 Power Supplies Power Supply 1 V1 Power Supply2 V2 Note The SCSI bus IDs are the recommended values Features installed at the manufactur...

Страница 191: ...ed passwords Online Diagnostics can be loaded by booting from the service mode boot list by pressing the F6 key on a directly attached keyboard or the number 6 key on an ASCII terminal The procedure f...

Страница 192: ...nline Diagnostics from the service mode boot list no Diagnostic CD should be in the CD ROM drive since Online Diagnostics is typically run from a hard disk which is in the service mode boot list defin...

Страница 193: ...d in the SRN Table on page 5 2 How likely it is by percentage that the FRU is causing the problem Problem A description of the problem and the action you must take Abbreviations used in the table are...

Страница 194: ...SSA adapters and disk drive modules 3 Report the problem to your support center The center can tell you whether you have a known problem and can if necessary provide you with a correction for the sof...

Страница 195: ...are not available When the failing device is an SSA Hot Swap Disk Drive go to SSA Maintenance Analysis Procedures MAPs on page 2 64 When the failing device is not an SSA Hot Swap Disk Drive go to the...

Страница 196: ...s code indicates that a disk drive module has detected a loss of power Action Use the Link Verification Service Aid to determine if any devices are missing from the SSA link If a device is missing go...

Страница 197: ...ed the POSTs Action 1 Use the Link Verification Service Aid to determine where the SSA link is broken 2 Run diagnostics in the system verifica tion mode to the two disk drive modules that are nearest...

Страница 198: ...Action Exchange the FRU for a new FRU 43PAA Disk drive module See Hot Swappable Disk Drives on page 7 13 SSA adapter card See the installation and service guide for the using system 90 10 Description...

Страница 199: ...allation and service guide for the using system 100 Description The SSA adapter failed to respond to the device driver Action Exchange the FRU for a new FRU 50001 SSA adapter card See the installation...

Страница 200: ...de is in a suspended state Action Run diagnostics in System Verifi cation mode to the SSA adapter If the diagnostics fail exchange the FRU for a new FRU If the diagnostics do not fail go to Software a...

Страница 201: ...n The using system cannot configure the disk drive module This is probably a software problem Action 1 Try again to configure the disk drive module 2 If the problem remains go to Soft ware and Microco...

Страница 202: ...ched off while the format opera tion was running Action Run the format service aid to format this disk drive module D4000 SSA adapter card See the installation and service guide for the using system 1...

Страница 203: ...guide for the using system 100 Description A command or parameter that has been sent or received is not valid This problem is caused either by the SSA adapter or by an error in the microcode Action G...

Страница 204: ...the SSA cables or by removing the excess devices or adapters from the loop 5 Switch on the using system If the SRN occurred because additional devices or adapters were added to a working SSA loop 1 R...

Страница 205: ...C D E F G H Always Always Always P Physical disk drive module L Logical disk drive Adapter position number of the slot 1 through 8 containing the SSA adapter System I O bus identifier Always Always T...

Страница 206: ...le to the disk drive modules The path continues through the disk drive modules then returns through another link to a second connector on the SSA adapter The SSA Adapter The system unit can be attache...

Страница 207: ...sk drive modules are arranged in a string of two to six disk drive modules This string has its own two SSA connectors This string is connected through an internal SSA cable to a pair of connectors on...

Страница 208: ...always be found by the software Service actions are always related to physical disk drives For this reason errors that occur on SSA disk drives are always logged against the physical disk drive pdisk...

Страница 209: ...detect which data path is being used If a disk drive module fails or is turned off the loop is broken and one of the data paths to a particular module is no longer available The disk drive modules on...

Страница 210: ...s 2 and 4 have failed The disk drive module in slot 1 can communicate with the using system only through connector A1 of the SSA adapter The disk drive module in slots 5 and 6 can com municate with th...

Страница 211: ...an ASCII display as your system console see Text Based System Management Services on page 6 24 Graphical System Management Services To start the Open Firmware command line or graphical System Manageme...

Страница 212: ...if the battery had been removed In order to recreate this value issue the bootlist command under AIX with the appropriate parameters as to the location of the operating system in a particular hard dis...

Страница 213: ...rror log and update your system firmware Exit Returns you to the previous screen To select an icon move the cursor with the arrow keys to choose which icon is high lighted then press the Enter key You...

Страница 214: ...akes it possible for you to view information about the setup of your system unit A list similar to the following appears when you select the Config icon 6 4 RS 6000 Enterprise Server Model H Series In...

Страница 215: ...down arrow key or Page Down key displays the next configuration screen which lists your computer s firmware version the date of its development and the firmware part number Chapter 6 System Management...

Страница 216: ...ue the bootlist command under AIX with the appropriate parameters as to the location of the operating system in a particular hard disk See the explanation of the bootlist command in your AIX documenta...

Страница 217: ...lect Software option if supported by the operating system shows the names of the operating system installed This option may not be supported by all operating systems Chapter 6 System Management Servic...

Страница 218: ...ating systems The Install From option produces a list of devices for example the CD ROM where the operating system is installed from You select one of the devices and the system searches the device fo...

Страница 219: ...fault boot sequence is The primary diskette drive CD ROM drive For CD ROM boot go to the Install From icon and then select CD ROM Drive as a boot device Tape id 5 slot 1 Hard disk drive id 6 Slot 1 Ne...

Страница 220: ...choices available on this screen Password Enables you to set password protection for turning on the computer and for using system administration tools Spin Up Enables you to change the spin up delay...

Страница 221: ...pdate the firmware programs on your computer Console If you have more than one display attached to your system unit or if you have an ASCII terminal attached to your system unit in addition to a keybo...

Страница 222: ...you are required to type the password again for verification If you make a mistake press the Esc key and start again After you have entered and verified the password the power on password icon flashes...

Страница 223: ...leged Access Password The privileged access password protects against the unauthorized starting of the system programs When you select the Entry icon a screen with eight empty boxes appears Type your...

Страница 224: ...e that your computer now requires the password you just entered before running system programs Note If you forget the power on password the battery must be removed for longer than 30 seconds to reset...

Страница 225: ...your system Spin up delay values can be entered manually or a default setting can be used All values are measured in seconds The default is two seconds After you have entered the new Spin up delay val...

Страница 226: ...r computer has encountered during operations Selecting the Clear icon erases the entries in this log For an explanation of errors in the system error log see your System Service Guide 6 16 RS 6000 Ent...

Страница 227: ...RIPL Selecting the Remote Initial Program Load RIPL icon gives you access to the fol lowing selections Chapter 6 System Management Services 6 17...

Страница 228: ...2 4 20 may need to be entered as 123 132 004 020 If any of the addresses is incomplete or contains a number other than 0 to 255 an error message is displayed when you select the Save icon To clear thi...

Страница 229: ...cified address is valid by sending a test transmission to that address After choosing the Ping option you may be asked to indicate which communications adapter should be used to send the test transmis...

Страница 230: ...ct the adapter then highlight the OK icon and press the Enter key The next screen allows you to select the configuration of the adapter you have just chosen or allow the system to select the configura...

Страница 231: ...w keys to high light the entry then use the spacebar to scroll through the available IDs After you have entered the new address use the arrow keys to highlight the Save icon and press the Enter key At...

Страница 232: ...rompted insert the firmware update diskette containing the new firmware image ATTENTION While the new firmware image is being copied into your system unit you must not turn off the system unit Turning...

Страница 233: ...your system unit is turned off 4 Insert the firmware recovery diskette into your system unit 5 Turn on your system unit 6 When the keyboard indicator appears press the 1 key if the system console is...

Страница 234: ...ystem unit and to perform such tasks as setting passwords and changing device configurations After the text based System Management Services starts the following screen appears System Management Servi...

Страница 235: ...to the following is displayed Device PowerPC 6 4 L2 Cache 512K Memory slotA 8MB slotB 8MB LPT addr 3BC COM addr 3F8 COM addr 2F8 Audio Keyboard Mouse Diskette addr 3F Integrated Ethernet addr 8 5AF67...

Страница 236: ...hard disk Please see the explanation of the bootlist command in your AIX documentation for more information The Software Default option lets you select the default operating system to start the system...

Страница 237: ...on enables you to view and change the custom boot list which is the sequence of devices read at startup time Select Boot Devices 1 Display Current Settings 2 Restore Default Settings 3 Configure 1st B...

Страница 238: ...e 1 Diskette 2 Ethernet Integrated 3 SCSI CD ROM id 3 slot 1 4 SCSI 5 MB Hard Disk id 6 slot 1 5 SCSI 5 MB Hard Disk id 5 slot 5 X Exit Selecting any of the Configure Boot Device options displays the...

Страница 239: ...up 5 Change SCSI id 6 Update System Firmware 7 Update Service Processor 8 Select Console X Exit Set Password and Unattended Start Mode Entering this selection permits access to the following options P...

Страница 240: ...Password The privileged access password protects against the unauthorized starting of the system programs If you previously set a privileged access password and want to remove it select Remove Privile...

Страница 241: ...P Address 4 Subnet Mask X Exit Selecting the Adapter Parameters option allows you to view an adapter s hardware address as well as configure network adapters that require setup Adapter Parameters Devi...

Страница 242: ...nus 3Com Etherlink Fast XL 1 Media Type Auto 2 Full Duplex Auto X Exit Selecting the Media Type option allows you the change the media employed by the Ethernet adapter MEDIA TYPE 1 1 BaseT 2 1 Base TX...

Страница 243: ...he last option available from the Network Parameters Menu allows you to test a connection to a remote system unit After selecting the Ping option you must choose which adapter communicates with the re...

Страница 244: ...Ping 1 Client IP Address 129 132 4 2 2 Server IP Address 129 132 4 1 3 Gateway IP Address 129 132 4 3 4 Subnet Mask 255 255 255 E Execute X Exit Hard Disk Spin Up Delay Selecting this utility allows y...

Страница 245: ...is displayed when you select this option You can view or clear your computer s error log Error Log Date Time ErrorCode Location Entry 1 96 4 1 12 13 22 25A8 11 Entry 2 no error logged C Clear Error L...

Страница 246: ...ress Y Yes N No System Firmware Recovery If a troubleshooting procedure has indicated that the firmware information in your system unit has been corrupted then you must perform a firmware recovery To...

Страница 247: ...f no console is selected within two minutes the console defaults to Serial Port 2 Select Language This option allows you to change the language used by the text based System Man agement Services scree...

Страница 248: ...275 The Open Firmware command line is used to set up adapters that are not configurable with the System Management Services Your adapter documentation directs you to use this option if it is needed To...

Страница 249: ...13 Hot Swappable Disk Drives 7 13 Removal 7 13 Replacement 7 17 Power Supplies and Power Supply Fan Assemblies 7 22 Removal 7 23 Replacement 7 24 Power Supply Test Switch Procedure 7 25 Hot Swappable...

Страница 250: ...placement 7 53 Battery 7 54 Removal 7 54 Replacement 7 56 Power Distribution Board 7 57 Removal 7 57 Replacement 7 58 Front Service Position 7 59 Front Operating Position 7 61 Media Devices CD ROM Dri...

Страница 251: ...for those devices are unplugged before the signal cables are connected If possible disconnect all power cables from the existing system before you add a device Use one hand when possible to connect or...

Страница 252: ...l you are ready to install the device in the system unit With the device still in its antistatic bag touch it to a metal frame of the system Grasp cards and boards by the edges Hold drives by the fram...

Страница 253: ...n the stabilizer assembly 2 Slide the stabilizer assembly onto the bottom of the rack 3 Install screws at the top of the stabilizer assembly and tighten 4 Tighten the lower screws on the stabilizer as...

Страница 254: ...ed prior to servicing the Enterprise Server H Series CPU Drawer CAUTION The stabilizer must be firmly attached to the bottom front of the rack to prevent the rack from turning over when the drawers ar...

Страница 255: ...rd holes at the front If you do not have two top drawer guides to install at the front of the rack install one nut clip in the 2nd hole from the top on both sides 2 At the rear of the rack install nut...

Страница 256: ...Detail B Right Side Rail Mounting Hardware for Rack Drawer Detail A Left Side Rail Detail C Rear of Left Rail A B C 7 8 RS 6000 Enterprise Server Model H Series Installation and Service Guide...

Страница 257: ...de the shipping box containing the CPU Drawer in front of the rack 2 If present remove the front door of the rack to make installing the drawer easier See 7014 Model S00 Rack Front Door Removal and Re...

Страница 258: ...of Rack 7 Using four M5 x 14 hex head screws supplied with this unit attach the disk drive drawer to the two nut clips and the rails in the front of the rack at the sides 8 Replace the parts that you...

Страница 259: ...ont door 2 Remove the C clip from the bottom of the hinge pins 3 Remove the pins from the door hinges and lift the front door off the hinges 4 The hinge assemblies can be removed for better access to...

Страница 260: ...only one power supply the fan assembly on the power supply blank is Hot Swappable CPU fan at the rear of the drawer I O blower at the rear of the drawer Hot Swappable Media or DASD Blower Assembly No...

Страница 261: ...ou remove a hot swappable disk drive when the CPU Drawer power is off steps 3 and 4 do not apply Attention Follow all procedures for ESD sensitive parts while performing these pro cedures For ESD info...

Страница 262: ...7 14 RS 6000 Enterprise Server Model H Series Installation and Service Guide...

Страница 263: ...system configura tion The yellow LED on the hot swap disk drive should be off Attention Use caution while handling disk drives Drives are more likely to be damaged during installation and service Bum...

Страница 264: ...rive SSA Disk Drive 6 Pull the disk drive out of the drive bay keeping it straight to prevent damage 7 Place the disk drive in an antistatic bag 8 Reminder drawers with SSA disk drives must have a car...

Страница 265: ...2 SSA bays require a carrier in all six connectors of each backplane Either a SSA disk drive in a carrier or a blank carrier must be in each bay To add a SSA disk drive you must first remove the blank...

Страница 266: ...dling 4 It is recommended that you install the hot swappable disk drive in the next unused position of bank B first and then bank C Attention Setting the SCSI address jumpers on the hot swappable disk...

Страница 267: ...facing into the bay c Align the side of the carrier with the raised guides on the left of the bay d Gently slide the carrier into the bay to keep from damaging the drive Slide the carrier to the rear...

Страница 268: ...CSI Disk Drive The following table explains the meaning of the Green and Amber status lights and Spin Down button on a SCSI disk drive SCSI Disk Drive Status Lights Light or Button Status Definition A...

Страница 269: ...er to Media Devices CD ROM Drive Tape Drive Diskette Drive Non Hot Swappable SCSI Disk Drives on page 7 62 8 If you do not have any other procedures to perform replace the cover that you removed in st...

Страница 270: ...illed with a power supply blank which must have a power supply fan assembly attached to it 5 Do not hot swap a power supply if the ambient room temperature is greater than 32 C 90 F as it can cause lo...

Страница 271: ...locate the power supply you need to work on 2 Unplug the power cord from the power supply 3 Reposition any other cables necessary to allow the removal of the power supply 4 Remove the screw from the c...

Страница 272: ...g and pull the plug to discon nect the cables from the front of the power supply b Loosen but do not remove the screw that holds the fan assembly to the power supply c Slide the fan assembly off of th...

Страница 273: ...7 in Power Supplies and Power Supply Fan Assemblies on page 7 22 If the LED on rear of the power supply is blinking go to the next step Power Supply Test Switch 3 Use a pencil to press the test switc...

Страница 274: ...d to the bulkhead using isolators the isolators should remain in the bulkhead If both top isolators are damaged the drawer must be placed in the rear service position as described in Rear Service Posi...

Страница 275: ...the system to remove a hot swappable blower assembly from the CPU Drawer Removal 1 Open the rear door of the rack unit 2 Reposition any cables that hinder access to the I O blower 3 Using a fingernail...

Страница 276: ...ar of the rack to prevent the rack from turning over when the drawers are pulled out of the rack Do not pull out or install any drawer or feature if the stabilizer is not attached to the rack Follow t...

Страница 277: ...securing the power supply handles and remove both power supplies 13 Grasp the handle an opening located between the power supplies and pull the drawer out approximately 16 inches until it is stopped b...

Страница 278: ...r and remove the cross bar 18 Return to the procedure that directed you to place the drawer into the rear service position Note The Enterprise Server H Series CPU Drawer must be installed in the topmo...

Страница 279: ...Chapter 7 Removal and Replacement Procedures 7 31...

Страница 280: ...he screws that attach the drawer to the rear of the rails in the rack 5 Connect the following cables that were removed earlier from the back of the CPU Drawer Adapter cables and cords Keyboard cable D...

Страница 281: ...ervice Position on page 7 28 2 Disconnect the cables from the fan monitor control FMC card noting the locations Label if necessary 1 1 2 2 3 3 H70 H50 3 Remove the screws that hold the FMC card and li...

Страница 282: ...ar service position as described in Rear Service Position on page 7 28 2 Locate the memory cards and determine which one you want to remove 3 Lift both camming latch mechanisms at the same time that h...

Страница 283: ...the memory card out of the slot 5 Remove the memory module by pushing the tabs out on the memory module connector Push Locking Tabs Out to Release Memory Module 1 2 1 Chapter 7 Removal and Replacement...

Страница 284: ...memory card 2 Install the new memory module by pushing down on the memory module until the locking tabs lock it into the connector Do not move the locking tabs your self They lock automatically when...

Страница 285: ...both of the camming latches at the same time to insert and seat the memory card Attention If you do not close both latches at the same time you may damage the card or the card connector 8 If you have...

Страница 286: ...y from the first CPU card if it has a second processor If the CPU card has only one processor this air duct is not required 3 Carefully lift the second air flow duct up and away from the second CPU ca...

Страница 287: ...Removal 1 Follow the steps in Rear Service Position on page 7 28 2 Carefully lift the air flow duct up and away from the first CPU card Replacement Replace in reverse order Chapter 7 Removal and Repla...

Страница 288: ...at needs replaced 3 For Model H50 only disconnect the power cable from the top of the CPU card 4 Lift both camming latch mechanisms at the same time that hold the CPU card in position Attention Do not...

Страница 289: ...the CPU card out of the slot Replacement Notes 1 Slide the CPU card in making sure that the tabs on each end of the card are captured in both of the camming latches Chapter 7 Removal and Replacement...

Страница 290: ...ches at the same time to insert and seat the card into the connector To replace perform the removal steps in reverse order Attention If you do not close both latches at the same you may damage the car...

Страница 291: ...Card on page 7 40 3 Remove one screw from the back and two screws from the base of the CPU card latch mechanism assembly 4 Remove the CPU card latch mechanism assembly 5 Disconnect the power cables to...

Страница 292: ...ed in Rear Service Position on page 7 28 2 Note the slot number of the adapter you are removing J1 J2 J3 J4 J5 J6 J7 J8P J8I J9I J9P 1P 2P 3P 4P 5P 6P 7P 8P I 9P I 1P 2P 3P 4P 5P 6P 7P 8P I 9P I H50 7...

Страница 293: ...o the adapter disconnect them 6 Carefully pull the adapter out of the slot 7 If you are installing another adapter in this expansion slot follow the instructions given under Replacement on page 7 46 8...

Страница 294: ...in the reverse order Note If you replaced an SSA adapter card be sure to connect the cables from the external SSA connectors to connectors B1 and B2 on the SSA adapter card 7 46 RS 6000 Enterprise Ser...

Страница 295: ...e locations of all cables that are connected to the I O and system boards and then disconnect all cables from the boards and position the cables away from the I O and system boards 8 Remove the screws...

Страница 296: ...the connector 13 Carefully slide the I O and system boards toward the front of the system unit tilt the right side of the I O and system boards upward and remove them 14 Disconnect the system board f...

Страница 297: ...order Verify that the security jumpers J16 are in the correct position same as the replaced I O planar J47 J41 J50 J1 J2 J3 J4 J5 J6 J7 J8P J8I J9I J9P External SCSI Port Enabled External SCSI Port Di...

Страница 298: ...on page 7 34 3 Do the removal procedure in CPU Card on page 7 40 4 Remove the screws that attach the system board to the CPU Drawer Attention Use extreme care when separating the system board from th...

Страница 299: ...Replacement To replace do the removal steps in the reverse order Chapter 7 Removal and Replacement Procedures 7 51...

Страница 300: ...t hold the SSA connectors to the drawer and move the internal SSA cables and connectors away from above the I O board 5 Remove the screws that hold the keyboard mouse and power control interface conne...

Страница 301: ...e order Note Connect the I O board securely to the system board before tightening the I O board mounting screws J5 J7 J17 J18 J19 J20 J21 J22 J23 J24 J6 J10 J1 J2 J3 J4 J8 J9 J12 J11 J13 J14 J15 J16 J...

Страница 302: ...ent a risk of fire or explosion The battery connector is polarized do not attempt to reverse polarity Dispose of the battery according to local regulations Removal 1 Place the drawer in the rear servi...

Страница 303: ...J47 J41 J50 Battery Socket H50 J1 J2 J3 J4 J5 J6 J7 J8P J8I J9I J9P J47 J41 J50 Battery Socket H70 J1 J2 J3 J4 J5 J6 J7 J8 Chapter 7 Removal and Replacement Procedures 7 55...

Страница 304: ...shes it out Replacement Tilt the battery so that you can insert it into the battery socket Slide the battery into the battery socket then push it down into the socket Notes 1 Be sure to tell the custo...

Страница 305: ...may cause damage to some cables 1P 2P 3P 4P 5P 6P 7P 8P I 9P I 1P 2P 3P 4P 5P 6P 7P 8P I 9P I Screws Screws H70 H50 1P 2P 3P 4P 5P 6P 7P 8P 1P 2P 3P 4P 5P 6P 7P 8P Note Do not replace the rear covers...

Страница 306: ...D 10 Remove the power distribution board by lifting the right side up and pulling it out disc Replacement Attach the new power distribution board to the bracket and replace in reverse order 7 58 RS 60...

Страница 307: ...m the back of the CPU Drawer Power cords Display cable Keyboard cable Any other cables and cords 4 Remove the screws that attach the drawer to the rear of the rails in the rack 5 If the rack has a fro...

Страница 308: ...drawer 13 Return to the procedure that directed you to place the drawer into the front service position disc 1 2 3 4 1 Top Cover 2 Top Air Baffle 3 Model H50 I O Air Duct Model H70 Foam Block 4 Botto...

Страница 309: ...er or similar tool to depress the spring detents that hold the stops in position 4 Replace the screws that attach the front bezel to the rack 5 Replace the screws that attach the drawer to the rear of...

Страница 310: ...or handling drives roughly can cause latent failures Do not stack drives and always use appropriate ESD practices A drop of as little as 1 4 inch can cause latent failures The drive can take 30 secon...

Страница 311: ...stalling making sure that the correct cables are connected to each drive 4 Slide the drive into the media bay You may need to arrange the cables at the rear of the drive while sliding the it into the...

Страница 312: ...sk Drives on page 7 62 2 Remove the diskette drive as described in Media Devices CD ROM Drive Tape Drive Diskette Drive Non Hot Swappable SCSI Disk Drives on page 7 62 3 Note the locations of the cabl...

Страница 313: ...ve carriers from the backplane and slide them out just enough that they clear the backplane connectors 4 Remove the blower from over the disk drive banks to get to the access hole for the backplane sc...

Страница 314: ...w backplane for proper setting The jumpers should be set as shown If you installed a SSA backplane be sure to connect the internal SSA cable between the backplane and the internal connectors on the ex...

Страница 315: ...Chapter 8 Parts Information Chapter 8 Parts Information 8 1...

Страница 316: ...3 2 1 4 5 12 6 7 13 8 9 10 11 8 2 RS 6000 Enterprise Server Model H Series Installation and Service Guide...

Страница 317: ...7 08L0733 1 CPU Memory Lever front Model H70 08L0729 1 CPU Memory Lever rear Model H70 93H8549 CPU Levers Rear Model H50 93H8554 Front Lever Assembly Model H50 93H8558 Memory Levers Rear Model H50 8 9...

Страница 318: ...21 29 20 27 26 28 30 25 23 24 29 22 31 32 14 16 15 17 18 19 8 4 RS 6000 Enterprise Server Model H Series Installation and Service Guide...

Страница 319: ...y DASD media 18 93H9159 1 Rail right side 93H9156 1 Rail left side 19 05L0044 1 CEC cage Model H50 05L0723 1 CEC cage Model H70 20 41L6269 2 Blower assembly 21 93H9551 1 Power Distribution Board Model...

Страница 320: ...42 41 36 33 34 35 37 38 39 40 8 6 RS 6000 Enterprise Server Model H Series Installation and Service Guide...

Страница 321: ...er 38 93H2166 1 2 SCSI Backplane Hot swap 93H6321 0 2 SSA Backplane Hot swap 39 41L4875 1 Foam baffle Model H70 See note 1 Diskette drive 40 06H7082 1 LCD Display Panel 06H7946 1 Bracket Display Panel...

Страница 322: ...al DASD Bay 2 DASD Bay 1 J1 J1 J1 J2 1x4 1x4 J2 J2 30 Amp Wall Cord Power Distribution Bus Display FMC SCSI 4 Drop OP Panel Diskette DASD Backplane Power Control Inf 14 15 16 12 13 17 1 2 3 4 11 5 9 1...

Страница 323: ...er 11 93H8563 1 Power Cable FMC to Right Blower 12 93H9653 1 PCI Signal Cable FMC to Bulkhead 13 93H8567 1 Power Cable PDB to FMC 14 93H8571 1 Power Cable PDB to DASD Banks 93H8876 1 Power Cable DASD...

Страница 324: ...1 J1 J1 J1 J2 1x4 1x4 J2 J2 30 Amp Wall Cord Power Distribution Bus J12 J11 J13 J14 J15 J16 J29 J27 J7 J5 I O Board System Board Display I O Blower FMC Media Blower DASD Blower CPU Fan SCSI 4 Drop OP...

Страница 325: ...1L5870 1 Power Cable FMC to I O Blower 12 41L6252 1 PCI Signal Cable FMC to Bulkhead 13 93H8567 1 Power Cable PDB to FMC 14 93H8571 1 Power Cable PDB to DASD Banks 93H8876 1 Power Cable DASD Banks 15...

Страница 326: ...Keyboard Belgian French Dutch 1391411 1 Keyboard Finnish 1391407 1 Keyboard Danish 1399583 1 Keyboard Bulgarian 1395881 1 Keyboard Swiss French 1385882 1 Keyboard Swiss German 1391409 1 Keyboard Norwe...

Страница 327: ...93286 1 Keyboard Turkish ID 179 8125409 1 Keyboard Turkish ID 440 8131596 1 Keyboard Arabic 06H5286 1 Keyboard Korean 1393990 1 Keyboard Chinese 006H3048 1 Keyboard United States OEM 2 11H4878 1 Mouse...

Страница 328: ...8 14 RS 6000 Enterprise Server Model H Series Installation and Service Guide...

Страница 329: ...PCI SSA disk adapters SSA cabling two 10 100 Mbs Ethernet PCI adapters one Ethernet transceiver one CD ROM one AIX 1 2 user license and one HACMP license It is highly recommended that a 3153 ASCII ter...

Страница 330: ...lication disruption should a disk adapter fail The following table describes outages and their impacts for the minimum High Avail ability Solution configuration with redundant SSA adapters 2 Ethernet...

Страница 331: ...lution Heartbeat Connections 1P 2P 3P 4P 5P 6P 7P 8P I 9P I 1P 2P 3P 4P 5P 6P 7P 8P I 9P I 1P 2P 3P 4P 5P 6P 7P 8P I 9P I 1P 2P 3P 4P 5P 6P 7P 8P I 9P I 1 1 3 2 2 Index Part Feature Number Units Per D...

Страница 332: ...in Power Circuit 2 Power Supply Power Supply Power Supply Optional2 7133 020 ExternalSSA Subsystem nd Power Distribution Unit 4 4 Note The only way to ensure a truly robust HA operation is to connect...

Страница 333: ...ystem B2 B1 A2 A1 Adapter SSA0 Adapter SSA1 H Series Node 2 B2 B1 A2 A1 Adapter SSA0 Adapter SSA1 H Series Node 1 J1 J16 J8 J9 7133 SerialDisk System 5 5 5 5 5 5 Index Part Feature Number Units Per De...

Страница 334: ...I 1P 2P 3P 4P 5P 6P 7P 8P I 9P I H Series Drawer Node 1 H Series Drawer Node 2 S1 Connectors 3153 ASCII Terminal A U X E I A 2 6 7 2 Index Part Number Units Per Description 6 12H1204 1 Serial Cable wi...

Страница 335: ...de 1 H Series Node 2 Graphical Terminal R G B Graphical Terminal R G B Mouse Keyboard 1P 2P 3P 4P 5P 6P 7P 8P I 9P I 1P 2P 3P 4P 5P 6P 7P 8P I 9P I Mouse Keyboard 1P 2P 3P 4P 5P 6P 7P 8P I 9P I 1P 2P...

Страница 336: ...I H Series Node 1 H Series Node 2 LAN Connection Cluster Administration Workstation Supplemental Cabling Information Because the basic cabling information in this document is not the only way to con...

Страница 337: ...with Second Serial Disk System J1 J16 7133 SerialDisk System 7133 SerialDisk System J1 J16 B2 B1 A2 A1 Adapter SSA1 Adapter SSA1 Adapter SSA0 Adapter SSA0 H Series Node 1 B2 B1 A2 A1 H Series Node 2 A...

Страница 338: ...al SSA Adapters B2 B2 B1 B1 A2 A2 A1 A1 Adapter SSA1 Adapter SSA0 H Series Node 1 H Series Node 1 B2 B1 A2 A1 Adapter SSA0 H Series Node 2 B2 B1 A2 A1 Adapter SSA1 H Series Node 2 7133 SerialDisk Syst...

Страница 339: ...SSA Bank B2 B2 I2 I2 I1 I1 B1 B1 A2 A2 A1 A1 Slot 9P I Adapter SSA1 Adapter SSA1 Adapter SSA0 Adapter SSA0 H Series Node 1 H Series Node 1 H Series Node 1 Internal SSA Bank B2 B1 A2 A1 H Series Node...

Страница 340: ...A 12 RS 6000 Enterprise Server Model H Series Installation and Service Guide...

Страница 341: ...le Routing All cables must be organized and routed at least 2 inches away from the rear sur faces of the RS 6000 Enterprise Server Model H Series system This will help opti mize the system cooling and...

Страница 342: ...RS 6000 Enterprise Server Model H Series are listed in Chapter 8 on page 8 1 and for the 7014 Model S00 Rack are found in the 7014 Model S00 Rack Installation and Service Guide 1 1P 2P 3P 4P 5P 6P 7P...

Страница 343: ...when server power is on and the Service Processor has detected a server problem such as loss of surveillance During the first power up i e power cord is plugged into the outlet Service Processor menus...

Страница 344: ...Power on System Y3 Power off System Y2 Read NVRAM Y2 Reset Service Processor Y2 Setup Reboot Restart Policy Y2 Y3 Start Talk Mode Y2 Enable Disable Console Mirroring Y2 Y1 Select Modem Line Speed Y2 Y...

Страница 345: ...SCII terminal to either serial port Because the presence of the ASCII terminal cannot be con firmed by the Service Processor you must press a key on the ASCII terminal to confirm its presence Next the...

Страница 346: ...NU 1 Power On System 2 Read VPD 3 Read Progress Indicators from Last System Boot 4 Read Service Processor Error Logs 5 Read System POST Errors 6 View System Environmental Conditions 99 Exit from Menus...

Страница 347: ...d Universal Time CUT a k a Greenwich Mean Time GMT AIX error logs have more information available and are able to time stamp with local time See C 33 for an example of the error log Read System POST E...

Страница 348: ...ng setup You need the firmware version for reference when you either update or repair the functions of your service processor The System Name an optional field is the name your server reports in probl...

Страница 349: ...ly Service Processor Firmware EPROM 1997 915 FLASH 1997 512 Copyright 1997 IBM Corporation SYSTEM NAME MAIN MENU 1 Service Processor Setup Menu 2 System Power Control Menu 3 System Information Menu 4...

Страница 350: ...ntly Disabled 4 Start Talk Mode 5 OS Surveillance Setup Menu 6 Reset Service Processor 7 Reprogram Service Processor Flash EPROM 98 Return to Previous Menu 99 Exit from Menus Note Unless otherwise sta...

Страница 351: ...rd to access AIX If the error threshold is reached by someone entering passwords remotely the Service Processor disconnects the modem to prevent potential security attacks on the server by unauthorize...

Страница 352: ...For more information see Console Mirroring on page C 30 Start Talk Mode In a console mirroring session it is useful for those that are monitoring the session to be able to communicate with each other...

Страница 353: ...vice Processor Reprogram Service Processor Flash EPROM This is an automatic process An update diskette can be acquired from the RS 6000 Support page on the Internet or from your service team The Inter...

Страница 354: ...at require automatic power on after a power failure Ring Indicator Power On Menu Ring Indicate Power On is an alternate method of dialing in without establishing a Service Processor session If the sys...

Страница 355: ...em Boot 3 Read Progress Indicators from Last System Boot 4 Read Service Processor Error Logs 5 Read System POST Errors 6 Read NVRAM 7 View System Environmental Conditions 98 Return to Previous Menu 99...

Страница 356: ...Greenwich Mean Time GMT AIX error logs have more information available and are able to time stamp with local time See C 33 for an example of the error log Read System POST Errors Selecting this item...

Страница 357: ...tolerance 12 Volts A low 12 voltage reading detected 12 Volts A high 12 voltage reading detected Press Return to Continue Language Selection Menu LANGUAGE SELECTION MENU 1 English 2 Francais 3 Deutsch...

Страница 358: ...Indicate Power On Menu see C 12 Modem Configuration Menu The first two lines of the Modem Configuration Menu are status lines showing the current selections Selections are made in the two section lab...

Страница 359: ...z_sp 7 modem_z _sp 8 none 9 Save configuration to NVRAM and Configure modem 98 Return to Previous Menu Serial Port Selection Menu Serial Port Selection Menu 1 Serial Port 1 Call Out Currently Disabled...

Страница 360: ...numbers for Service Center Telephone Number The telephone number of the maintenance provider s computer Customer Administration Center Telephone Number The telephone number of the local system support...

Страница 361: ...ustomer Administration Center Telephone Number is the number of the System Administration Center computer catcher that receives problem calls from servers Contact your system administrator for the cor...

Страница 362: ...service or administration center represen tatives need this number to make direct contact with your server for problem investigation This is also referred to as the call in phone number Call Out Poli...

Страница 363: ...r messages Customer Account Setup Menu Customer Account Setup Menu 1 Customer Account Number Currently Unassigned 2 Customer RETAIN Login UserID Currently Unassigned 3 Customer RETAIN Login Password C...

Страница 364: ...boot the number of times specified Entry values equal to or greater than 0 are valid Only successive failed reboots attempts count not reboots that occur after a restart attempt At restart the counter...

Страница 365: ...ocessor to call out and report the event This item is valuable if the number of these events becomes excessive signalling a bigger problem Service Processor Functions and Features The following sectio...

Страница 366: ...nable disable Flash Gold Recovery block Update Flash Composite block Update System Name Modem Configuration Remote User Functions Call Out Call Home Reporting Boot failure OS Termination Surveillance...

Страница 367: ...on refer to the shutdown t command on servers using AIX Working in conjunction with AIX the Service Processor in your server can operate a timer much like the wake up timer on your clock radio You ca...

Страница 368: ...erating system activity see the SERVICE PROCESSOR SETUP MENU item Set Surveillance Parameters If OS activity stops the Service Processor can initiate a reboot restart process based on the settings in...

Страница 369: ...surveillance and either 1 The Use OS Defined restart policy is set to NO OR 2 The Use OS Defined restart policy is set to YES and the operating system has NO automatic restart policy Refer to Service...

Страница 370: ...owered on logs an error and offers menus to the user If Call out is enabled the Service Processor calls to report the failure and dis plays the operating system surveillance failure code on the operat...

Страница 371: ...tem surveillance failure if supported by Operating System Critical environmental failures Restarts To enable the call out feature you need to do the following Have a modem connected to serial port 1 o...

Страница 372: ...console mirroring can be invoked 1 Remote session first then local session added a Remote session already in progress b Remote user uses the Service Processor menus to enable console mirroring allowi...

Страница 373: ...fter initiation the processes are identical and automatic There are two areas in each firmware module that may need updating 1 The gold code or base code or EPROM area 2 The custom or main program or...

Страница 374: ...rvice Aids Note This service aid is only supported for Online Diagnostics This service aid allows you to update the system or service processor flash Additional update and recovery instructions may be...

Страница 375: ...e filename is the name of the flash update image During the process the server powers down and reboots The process is complete when the login prompt reappears Service Processor Logs Service Processor...

Страница 376: ...POST Errors Version Severity Disposition Initiator Event being reported Extended Error Log Data xC2 x x84 x 9 x x x x x2 x x x x x x72 x74 x63 x x x x x x x x x x28 x 3 x x 5 x x 1 x x x x x x x x x4...

Страница 377: ...he System Name Privileged User Menus on page C 6 6 Enable Surveillance see C 8 and Service Processor Functions and Features on page C 23 7 Configure Call In Call Out see Call in Call out Setup Menu on...

Страница 378: ...n asked if you wish to continue powering on the system 4 After the system firmware and operating system have initialized the server the login prompt appears at your remote terminal if you set up Seaml...

Страница 379: ...d error condition for the purposes of this test 4 After a few moments a message appears regarding an illegal entry Press Enter to clear the message and return to the main menu 5 When your telephone ri...

Страница 380: ...ed none are listed If you wish to configure serial ports that are not listed continue with the remaining steps 3 Identify the serial port s with the modem s 4 Enter smit tty 5 Select add tty 6 Select...

Страница 381: ...rmware in the usr share modems subdirectory if your server is using AIX with the following names A listing of each specific file is included in this appendix A listing of each generic file is in the R...

Страница 382: ...o the PTSN connector Also see the note on page E 3 If No continue with step 3 3 Does your modem respond to the extended command set prefixed with If Yes go to step 5 If No continue with step 4 4 Does...

Страница 383: ...1 You should edit out these commands from the modem configuration file if yours is such a modem See your modem manual for more information Note Some modems such as IBM 7857 017 are not designed for th...

Страница 384: ...m_f cfg as a model to modify 1 Find the necessary command in your modem manual 2 Copy usr share modems modem_f cfg to a new file with a different name for example modem_fx cfg 3 In the new file modem_...

Страница 385: ...terrupt only on the first ring signal they receive AT T DataPort 2001 is an example of such a modem The Service Processor uses the ring interrupt request to count the number of rings when Ring Indicat...

Страница 386: ...e modem is communicating and to assure it has been initialized recently Another strategy particularly if your system is difficult to access physically is to protect it with an Uninterruptable Power So...

Страница 387: ...his information The Dn command appears in three places each in three of the sample modem configuration files1 2 Will the server s modem disconnect when the power drops You can make this observation at...

Страница 388: ...to manifest the modem s response to DTR transitions If a local ASCII terminal or a graphics console is to be a permanent part of your server then make one of them the primary console Your remote term...

Страница 389: ...lt settings except switches 11 and 12 These must be to UP AT responses and DOWN Asynchronous operation respectively ICDelay 1 DefaultTO 1 CallDelay 12 N Call Out phone number R Return phone number PRO...

Страница 390: ...lts Reliable mode Echo off ignore r or OK r n timeout 2 Ignore modem response send AT E12 E14 r Disable pacing Disable data compression expect r or OK r n timeout 2 Confirm commands successful send AT...

Страница 391: ...nse send AT E12 E14 r Disable pacing Disable data compression expect r or OK r n timeout 2 Confirm successful command send AT SF1 S S9 1 r DSR independent of CD Force DSR on CD respond time 1 ms expec...

Страница 392: ...ntract with IBM Corp ICDelay 1 DefaultTO 1 CallDelay 12 N Call Out phone number R Return phone number PROGRAMMING NOTE No blanks between double quote marks condout send AT F E E r Reset to factory def...

Страница 393: ...tible messages Answer on 2nd ring expect r timeout 2 Confirm commands successful done waitcall ignore 2 r timeout 1 Ignore first ring expect 2 r timeout 1 Pick up second ring or timeout Expect a conne...

Страница 394: ...ric response code AT compatible messages Auto Answer disabled expect r timeout 2 Confirm commands successful done error Handle unexpected modem responses expect 8 r or 7 r or 4 r or 3 r delay 2 done E...

Страница 395: ...it Escape to command mode S 2 Answer on second ring H Hang up T Tone mode When used as T r it is a no op to maintain program synchronization when modem may will echo the commands N Call Out phone numb...

Страница 396: ...second ring or timeout Expect a connection response expect 16 r or 15 r or 14 r or 12 r or 1 r or 5 r or 1 r timeout 6 done page send ATDT N R r N pager call center number Add enough commas to wait f...

Страница 397: ...it Escape to command mode S 2 Answer on second ring H Hang up X Limit modem response codes T Tone mode When used as T r it is a no op to maintain program synchronization when modem may will echo the c...

Страница 398: ...ring expect 2 r timeout 1 Pick up second ring or timeout Expect a connection response expect 16 r or 15 r or 14 r or 12 r or 1 r or 5 r or 1 r timeout 6 done page send ATDT N R r N pager call center n...

Страница 399: ...nswer inhibit Escape to command mode S 2 Answer on second ring H Hang up X Limit modem response codes T Tone mode When used as T r it is a no op to maintain program synchronization when modem may will...

Страница 400: ...and successful done waitcall ignore 2 r timeout 1 Ignore first ring expect 2 r timeout 1 Pick up second ring or timeout Expect a connection response expect 16 r or 15 r or 14 r or 12 r or 1 r or 5 r o...

Страница 401: ...expect 8 r or 7 r or 6 r or 4 r or 3 r delay 2 done Appendix E Modem Configurations E 21...

Страница 402: ...onses S Automatic answer inhibit Escape to command mode S 2 Answer on second ring H Hang up X Limit modem response codes T Tone mode When used as T r it is a no op to maintain program synchronization...

Страница 403: ...essful send AT C1 D2 R1 r Detect carrier and DTR Ignore RTS expect r timeout 2 Confirm command successful done waitcall ignore 2 r timeout 1 Ignore first ring expect 2 r timeout 1 Pick up second ring...

Страница 404: ...done RI Power On enabled error Handle unexpected modem responses expect 8 r or 7 r or 6 r or 4 r or 3 r delay 2 done E 24 RS 6000 Enterprise Server Model H Series Installation and Service Guide...

Страница 405: ...econd ring H Hang up X Limit modem response codes T Tone mode When used as T r it is a no op to maintain program synchronization when modem may will echo the commands C1 Detect CD D2 Respond to DTR of...

Страница 406: ...r timeout 2 Confirm command successful done waitcall ignore 2 r timeout 1 Ignore first ring expect 2 r timeout 1 Pick up second ring or timeout Expect a connection response expect 16 r or 15 r or 14...

Страница 407: ...error Handle unexpected modem responses expect 8 r or 7 r or 6 r or 4 r or 3 r delay 2 done Appendix E Modem Configurations E 27...

Страница 408: ...E 28 RS 6000 Enterprise Server Model H Series Installation and Service Guide...

Страница 409: ...when the Power On Self Tests POSTS and configurations tasks are completed The Pre Standby phase components are SP Initialization SP performs any necessary hardware and software initializations SP POST...

Страница 410: ...rompt for a password verify the password and remotely display the standby menu The remote session can be mirrored on the local ASCII console if the server is so equipped and the user enables this func...

Страница 411: ...onding to System Processor Commands The SP will respond to any command issued by the system processor Runtime Phase This phase includes the tasks that the SP performs during steady state execution of...

Страница 412: ...F 4 RS 6000 Enterprise Server Model H Series Installation and Service Guide...

Страница 413: ...t C 30 system configuration C 30 CPU air duct removal 7 39 CPU card removal 7 40 CPU drawer data flow Model H50 1 12 CPU drawer data flow Model H70 1 13 CPU Drawer installation 7 9 CPU drawer location...

Страница 414: ...continued drawer rails 7 6 rear stabilizer 7 5 L language selection C 15 laser compliance statement 7 62 laser safety information xiii LED status 1 11 loading the system diagnostics 4 1 locations AIX...

Страница 415: ...one setup C 18 support menus service processor menus C 2 service processor service aids C 2 SMS C 2 modem configuration file selection E 2 configurations E 1 seamless transfer E 6 modem_f cfg sample f...

Страница 416: ...7 13 Hot Swappable blower assembly 7 12 Hot Swappable CPU fan 7 26 Hot Swappable DASD blower 7 12 removal and replacement procedures continued Hot Swappable I O blower 7 27 Hot Swappable media blower...

Страница 417: ...service processor test D 1 service provider C 19 sp checklist D 1 sp installation checklist D 1 SP operational phases F 1 sp setup D 1 sp test D 1 specifications CPU drawers 1 14 SSA serial storage ar...

Страница 418: ...tions 1 1 T tape drive removal 7 62 testing the setup call in D 2 call out D 3 trademarks xvi U unattended start mode enable disable C 12 Utilities program 6 10 V voice phone number C 20 VPD vital pro...

Страница 419: ...Index X 7...

Страница 420: ...X 8 RS 6000 Enterprise Server Model H Series Installation and Service Guide...

Страница 421: ...n improve this book Thank you for your response May we contact you Yes No When you send comments to us you grant us a nonexclusive right to use or distribute your comments in any way we believe approp...

Страница 422: ...tion Development Department H6DS 9561 11400 Burnet Road Austin TX 78758 3493 Cut or Fold Along Line Cut or Fold Along Line BUSINESS REPLY MAIL NO POSTAGE NECESSARY IF MAILED IN THE UNITED STATES POSTA...

Страница 423: ......

Страница 424: ...IBM Part Number 41L6148 Printed in the United States of America on recycled paper containing 10 recovered post consumer fiber SA38 547 1 41L6148...

Отзывы: