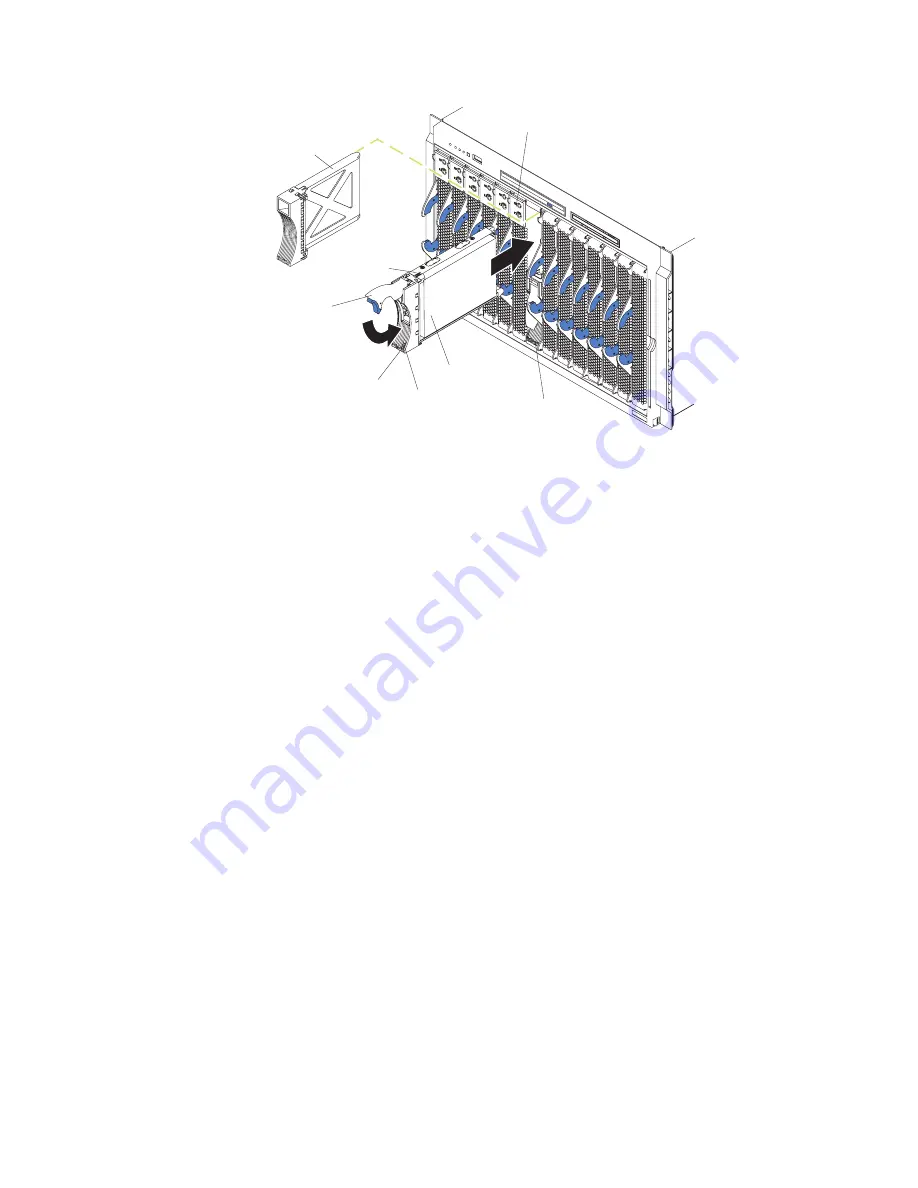
Filler
panel
Drive tray
Drive handle
(in open position)
Storage
expansion unit
Blade
Hard disk drive
Hard disk drive
status LED
Hard disk drive
activity LED
Complete the following steps to install a SCSI hot-swap hard disk drive in a storage
expansion unit.
Attention:
To maintain proper system cooling, do not operate the BladeCenter
unit for more than one minute without either a hot-swap hard disk drive or a filler
panel installed in each storage expansion unit bay.
1. Review Appendix B, “Safety information,” on page 97 and “Installation
guidelines” on page 27.
2. Remove the filler panel from one of the empty hot-swap bays by inserting your
finger into the depression at the top of the filler panel and pulling it away from
the expansion unit.
3. Install the SCSI hot-swap hard disk drive:
a. Ensure that the tray handle is open (that is, perpendicular to the hard disk
drive).
b. Align the hard disk drive assembly with the guide rails in the bay.
c. Gently push the hard disk drive assembly into the bay until it stops.
d. Push the tray handle to the closed (locked) position.
e. Check the hard disk drive LEDs to verify that the hard disk drive is operating
properly.
v
If the amber hard disk drive status LED for a hard disk drive is lit
continuously, that hard disk drive is faulty and needs to be replaced.
v
If the green hard disk drive activity LED is flashing, the hard disk drive is
being accessed.
See the documentation that comes with the expansion unit for information about
configuring the expansion unit and SCSI hard disk drives.
Chapter 5. Customer replacement units
49
Содержание eServer BladeCenter HS20 Type 8832
Страница 1: ...BladeCenter HS20 Type 8832 Hardware Maintenance Manual and Troubleshooting Guide ...
Страница 2: ......
Страница 3: ...BladeCenter HS20 Type 8832 Hardware Maintenance Manual and Troubleshooting Guide ...
Страница 6: ...iv BladeCenter HS20 Type 8832 Hardware Maintenance Manual and Troubleshooting Guide ...
Страница 10: ...viii BladeCenter HS20 Type 8832 Hardware Maintenance Manual and Troubleshooting Guide ...
Страница 18: ...8 BladeCenter HS20 Type 8832 Hardware Maintenance Manual and Troubleshooting Guide ...
Страница 64: ...54 BladeCenter HS20 Type 8832 Hardware Maintenance Manual and Troubleshooting Guide ...
Страница 66: ...56 BladeCenter HS20 Type 8832 Hardware Maintenance Manual and Troubleshooting Guide ...
Страница 118: ...108 BladeCenter HS20 Type 8832 Hardware Maintenance Manual and Troubleshooting Guide ...
Страница 119: ...Appendix B Safety information 109 ...
Страница 120: ...110 BladeCenter HS20 Type 8832 Hardware Maintenance Manual and Troubleshooting Guide ...
Страница 121: ...Appendix B Safety information 111 ...
Страница 122: ...112 BladeCenter HS20 Type 8832 Hardware Maintenance Manual and Troubleshooting Guide ...
Страница 123: ...Appendix B Safety information 113 ...
Страница 124: ...114 BladeCenter HS20 Type 8832 Hardware Maintenance Manual and Troubleshooting Guide ...
Страница 136: ...126 BladeCenter HS20 Type 8832 Hardware Maintenance Manual and Troubleshooting Guide ...
Страница 137: ...Appendix B Safety information 127 ...
Страница 138: ...128 BladeCenter HS20 Type 8832 Hardware Maintenance Manual and Troubleshooting Guide ...
Страница 139: ...Appendix B Safety information 129 ...
Страница 140: ...130 BladeCenter HS20 Type 8832 Hardware Maintenance Manual and Troubleshooting Guide ...
Страница 141: ...Appendix B Safety information 131 ...
Страница 146: ...136 BladeCenter HS20 Type 8832 Hardware Maintenance Manual and Troubleshooting Guide ...
Страница 152: ...142 BladeCenter HS20 Type 8832 Hardware Maintenance Manual and Troubleshooting Guide ...
Страница 156: ...146 BladeCenter HS20 Type 8832 Hardware Maintenance Manual and Troubleshooting Guide ...
Страница 157: ......
Страница 158: ... Part Number 49Y0165 Printed in USA 1P P N 49Y0165 ...


