Notes:
1. If you are upgrading the IDE drive and a drive tray is currently installed,
complete steps 1 through 4 of this procedure, and then go to step 9 on page
39.
2. Do not install an IDE drive in IDE connector 2 if you intend to also install an
optional I/O expansion card. The I/O expansion card occupies the same area as
the second IDE drive.
Complete the following steps to install a 2.5-inch IDE drive:
1. Review Appendix B, “Safety information,” on page 97 and “Installation
guidelines” on page 27.
2. Shut down the operating system, turn off the blade server, and remove the
blade server from the BladeCenter unit (see “Removing the blade server from
the BladeCenter unit” on page 29).
3. Carefully lay the blade server on a flat, static-protective surface.
4. Open the blade server cover (see “Opening the blade server cover” on page
34).
5. Insert the riser card from the option kit into an IDE connector on the blade
server system board.
Important:
Drives must be installed in the following order: IDE connector 1
(J13) first, then IDE connector 2 (J62).
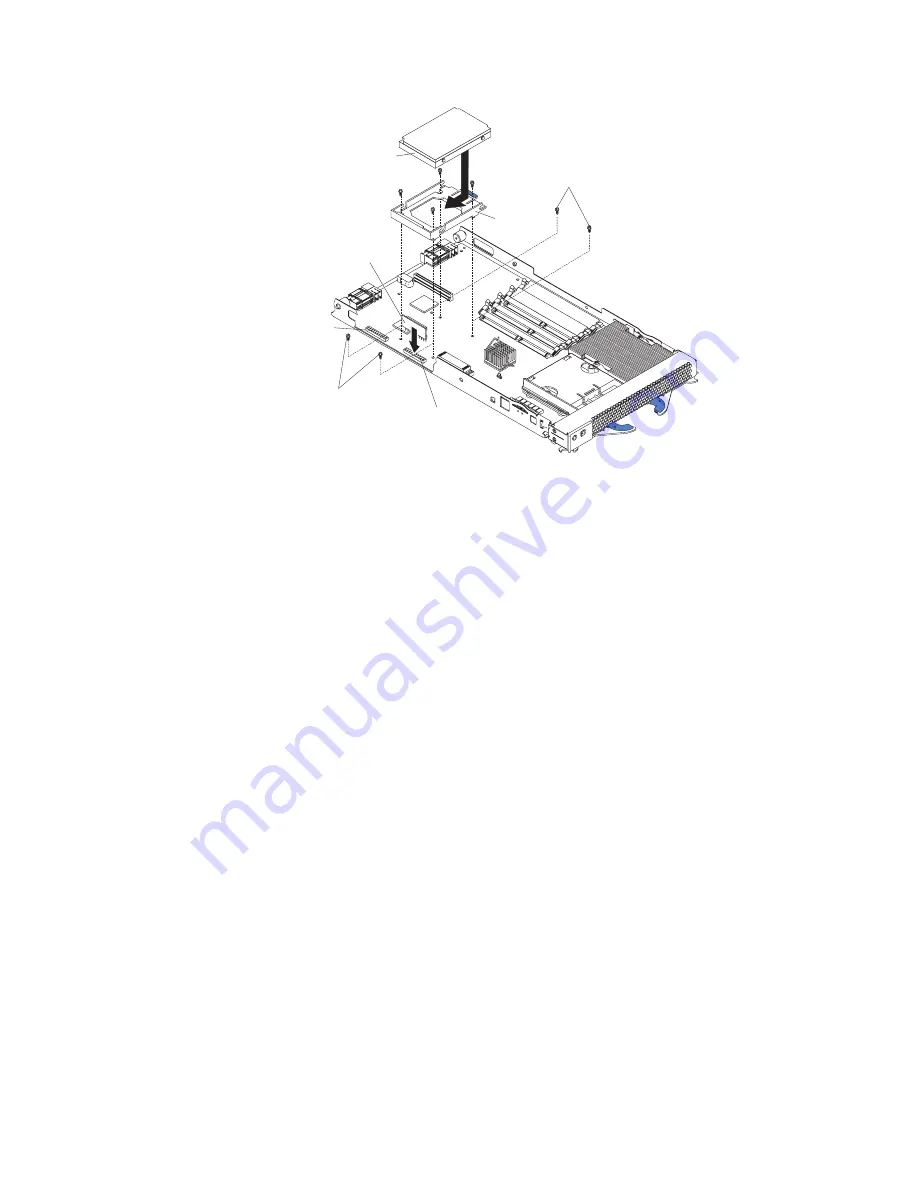
6. Place the IDE drive tray from the option kit over the riser card as shown in
Figure 18, aligning the tray with the four screw holes on the system board.
Note:
Some models will contain screws in all four holes, and some will contain
only two.
7. Remove the tray temporarily; then, remove the screws from the screw holes on
the system board and replace the tray. Secure the tray to the system board
with the screws from the kit.
8. Set any jumpers or switches on the IDE drive.
IDE drive
Tray
Riser
card
Short screws
Short screws
IDE connector 1
(J13)
IDE connector 2
(J62)
Figure 18. Installing an IDE drive
38
BladeCenter HS20 Type 8832: Hardware Maintenance Manual and Troubleshooting Guide
Содержание eServer BladeCenter HS20 Type 8832
Страница 1: ...BladeCenter HS20 Type 8832 Hardware Maintenance Manual and Troubleshooting Guide ...
Страница 2: ......
Страница 3: ...BladeCenter HS20 Type 8832 Hardware Maintenance Manual and Troubleshooting Guide ...
Страница 6: ...iv BladeCenter HS20 Type 8832 Hardware Maintenance Manual and Troubleshooting Guide ...
Страница 10: ...viii BladeCenter HS20 Type 8832 Hardware Maintenance Manual and Troubleshooting Guide ...
Страница 18: ...8 BladeCenter HS20 Type 8832 Hardware Maintenance Manual and Troubleshooting Guide ...
Страница 64: ...54 BladeCenter HS20 Type 8832 Hardware Maintenance Manual and Troubleshooting Guide ...
Страница 66: ...56 BladeCenter HS20 Type 8832 Hardware Maintenance Manual and Troubleshooting Guide ...
Страница 118: ...108 BladeCenter HS20 Type 8832 Hardware Maintenance Manual and Troubleshooting Guide ...
Страница 119: ...Appendix B Safety information 109 ...
Страница 120: ...110 BladeCenter HS20 Type 8832 Hardware Maintenance Manual and Troubleshooting Guide ...
Страница 121: ...Appendix B Safety information 111 ...
Страница 122: ...112 BladeCenter HS20 Type 8832 Hardware Maintenance Manual and Troubleshooting Guide ...
Страница 123: ...Appendix B Safety information 113 ...
Страница 124: ...114 BladeCenter HS20 Type 8832 Hardware Maintenance Manual and Troubleshooting Guide ...
Страница 136: ...126 BladeCenter HS20 Type 8832 Hardware Maintenance Manual and Troubleshooting Guide ...
Страница 137: ...Appendix B Safety information 127 ...
Страница 138: ...128 BladeCenter HS20 Type 8832 Hardware Maintenance Manual and Troubleshooting Guide ...
Страница 139: ...Appendix B Safety information 129 ...
Страница 140: ...130 BladeCenter HS20 Type 8832 Hardware Maintenance Manual and Troubleshooting Guide ...
Страница 141: ...Appendix B Safety information 131 ...
Страница 146: ...136 BladeCenter HS20 Type 8832 Hardware Maintenance Manual and Troubleshooting Guide ...
Страница 152: ...142 BladeCenter HS20 Type 8832 Hardware Maintenance Manual and Troubleshooting Guide ...
Страница 156: ...146 BladeCenter HS20 Type 8832 Hardware Maintenance Manual and Troubleshooting Guide ...
Страница 157: ......
Страница 158: ... Part Number 49Y0165 Printed in USA 1P P N 49Y0165 ...


