13
CLEANING, SANITIZING, AND CARTRIDGE REPLACEMENT
NO WATER FLOW MONITOR:
Complete Steps 26 - 29
OPTIONAL SMARTAP
®
WATER FLOW MONITOR:
Complete Steps 18 – 29
NOTE:
The water flow monitor and battery are mounted
inside the manifold cover.
Monitor must be reset to zero each time system is
serviced and cartridges replaced.
If monitor is not reset, there is no way to determine
when filters were changed or if the system is still
operating within specifications.
Monitor is reset when the battery is disconnected
from the clip.
Installing a new battery when filter cartridges are
replaced ensures an accurate indication of system
performance and a continuing supply of high
quality drinking water.
Failure to replace battery may result in yellow light
when system is reconnected.
Use caution when working with module. The
wiring therein connects the control board to the
sending unit. If these wires are damaged, the
monitor will not function.
Do not get the monitor components wet (includes
circuit board, phone jack, and battery connections).
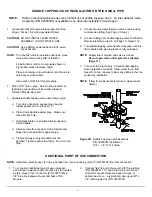
18. Loosen three mounting bracket screws. Gently pull
module cover up and away from module body.
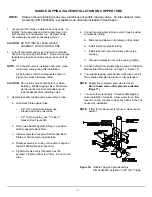
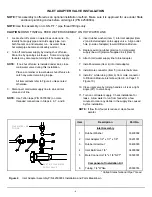
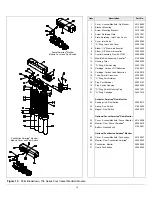
19. Disconnect the battery. The connection to the battery
is a snap type connector (See Figure 11).
20. Remove the battery by sliding it out of its holder.
21. Replace the battery with a new alkaline 9-volt transistor
battery (P/N 31300001).
22. Carefully slide the battery into its holder.
NOTE:
Use caution when reconnecting the battery (See
Figure 11).
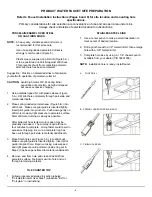
23. Reconnect the battery by pressing the clip onto the
battery terminals.
24. Replace the module cover and tighten bracket screws.
25. Turn feed water valve slowly to the open position.
26. To test the connections, activate the Smartap
®
monitor
by pressing the test button or opening the product
water faucet. If an indicator light illuminates,
connections are good.
27. Open product water (and extra point-of-use) faucet.
Let water flow until all air has been expelled from
system.
28. Close product water (and extra point-of-use) faucet. In
5 minutes, check the connections for leaks and correct
if necessary.
Icemaker: Let the tray/bin fill with ice cubes. Discard
all ice cubes to the drain. This flushes sanitizing
solution from the lines to the icemaker.
29. Open product water (and extra point-of-use) faucet.
Let the water flow for 10 minutes. This will expel any
remaining air from the system.
NOTE:
The system is ready to use. Should there be any
aftertaste or odor to the water or ice cubes, repeat
Step 29.
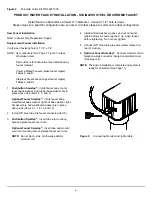
Figure 11
Smartap
®
Battery Connection

