2.
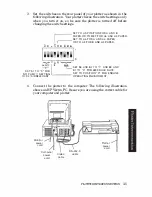
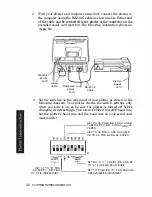
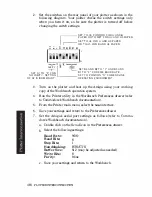
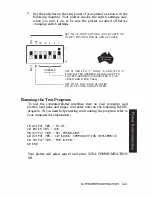
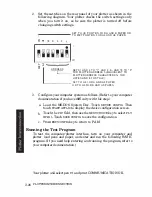
Set the switches on the rear panel of your plotter as shown in the
following diagram. Your plotter checks the switch settings only
when you turn it on, so
be
sure
the
plotter is
turned off before
changing the switch settings.
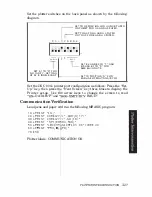
SET TO US POSITION FOR A AND B
PAPER OR TO MET FOR A4 AND A3 PAPER.
SET TO A4 FOR A AND A4 PAPER
OR TO A3 FOR 8 AND A3 PAPER.
� -
" "
)- � � iD m ; iI)
o
---,-
SET 84 AND 82 TO
" 1
�
AND 83 AND
PARITY
seT 5 1 TO
· 0 ·
FOR
8 1 TO
· 0 ·
FOR
9600
BAUD RATE.
NO PARITY. SETTING
seT TO POSITION
" 0 "
FOR ENDLlNE
OF 52 IS IRRELEVANT.
OPERATING ENVIRONMENT.
3.
Turn on the plotter and boot up the Amiga using your working
copy of the Workbench operation system.
4.
Run the Printer utility in the Workbench Preferences drawer (refer
to Commodore's Workbench documentation).
5.
From the Printer main menu, select the
Serial
interface.
6.
Save your settings and return to the Preferences drawer.
7.
Set the Amiga's serial port settings as follows (refer to Comm<>
dore's Workbench documentation).
a. Double click on the
Serial
icon in the Preferences drawer.
b. Select the following settings.
Baud Rate:
9600
Read Bits:
8
Stop Bits:
1
Handshaking:
RTS/Cl'S
Buffer Size:
512
(may be adjusted as needed)
Write Bits:
8
Parity:
None
c. Save your settings and return to the Workbench.
3-18 PLO'ITER INTERCONNECJ'JON
Содержание 7475a
Страница 1: ... FliOW HEWLETT PACKARD HP 7475A Graphics Plotter ...
Страница 2: ...OPERATION HP 7475A AND Graphics Plotter INTERCONNECTION MANUAL ...
Страница 8: ...f i oil I V J ...
Страница 18: ......
Страница 51: ...NOTES ...
Страница 52: ......
Страница 80: ......
Страница 86: ...NOTES ...
Страница 100: ...NOTES ...

