6-20
Removal and Replacement
MEDIA SENSOR REMOVAL
To remove the media sensor, perform the following steps:
1. Remove the electronics enclosure cover.
2. Disconnect the media sensor cable connector from the main PCA.
3. Remove the right endcover.
4. Using a TORX T-10 screwdriver, remove the screw that attaches the media sensor to
the entry platen. The screw is accessible from underneath the entry platen.
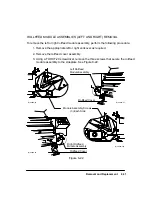
5. Remove the sensor through the access hole in the right sideplate. See Figure 6-14.
Note
During installation ensure that the sensor is properly aligned to its mounting
hole in the entry platen before screwing it down. Perform the sensor calibra-
tion procedure when completed.
Figure 6-14.
Access Hole
Media Sensor Cable
(C)C2858-3
Содержание 650c - DesignJet Color Inkjet Printer
Страница 1: ...PrinterFAQ COM HP DesignJet650C User Guide ...
Страница 126: ...7 10 Adjustments Calibrations Notes ...
Страница 156: ...9 4 Product History Notes ...
Страница 161: ...10 5 Parts and Diagrams Illustrated Parts Breakdown Stand Assemblies 1 2 3 4 5 6 7 8 1 3 5 3 3 3 3 3 9 9 C C2858 1 1 ...
Страница 165: ...10 9 Parts and Diagrams Illustrated Parts Breakdown C2859A Electronics Enclosure C C2858 3 1 ...
Страница 167: ...10 11 Parts and Diagrams Illustrated Parts Breakdown C2858A Electronics Enclosure C C2858 4 1 ...
Страница 177: ...10 21 Parts and Diagrams Illustrated Parts Breakdown Service Station Assembly 1 2 3 4 5 6 C C2858 9 1 7 8 9 10 11 12 ...
Страница 181: ...10 25 Parts and Diagrams 1 3 Illustrated Parts Breakdown 5 6 Pen Carriage Assembly C C2858 11 1 7 2 8 9 2 4 5 10 ...
Страница 183: ...10 27 Parts and Diagrams Illustrated Parts Breakdown Paper Drive Assemblies C C2858 12 1 ...
Страница 185: ...10 29 Parts and Diagrams Illustrated Parts Breakdown Bail and Overdrive Support Assemblies C C2858 13 1 ...
Страница 189: ...10 33 Parts and Diagrams Illustrated Parts Breakdown Starwheel Starguard and Chassis Assemblies C C2858 15 1 ...
Страница 199: ......


