8-12
Troubleshooting
TROUBLESHOOTING TIPS
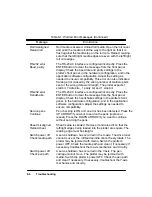
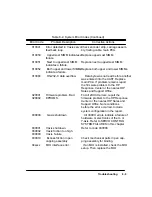
Certain failures, such as the media sensor and pinchwheel sensor, will not allow access to the
service menu after the normal initialization process occurs. The front panel will be locked at
this point. To alleviate this situation, perform the following steps:
1. Unload media (if present).
2. Switch OFF the plotter.
3. Simultaneously press the ENTER and UP ARROW buttons while switching ON the
plotter.
Performing the above steps will cause the plotter to stop short of complete initialization. The
display will read ªSTATUS: Initializingº. The ªService Testsº menu can now be accessed
from the ªUtilitiesº menu in the normal way.
After a repair has taken place, consider if any calibrations were affected.
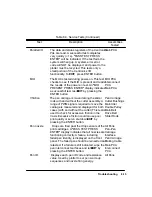
The demonstration plot and configuration plot can be used to help diagnose problems. Proce-
dures for running the demonstration plot are given in chapter 3 of this manual. The demon-
stration plot has no special diagnostic features built in, but can be used to look at overall print
quality including smoothness and straightness of lines, arcs, circles, and characters. Proce-
dures for running the configuration plot are given later in this chapter.
ROM CODE REVISION LEVEL
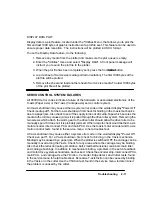
When powered on, the plotter scans the ROM SIMM slots from top to bottom in sequence
and determines the presence of any code revision level upgrades. If any upgrade modules are
present, the plotter executes the first code upgrade encountered and overrides the code level
resident in the ROM on the main PCA. Typically, any ROM SIMM code upgrade will be a
higher level than that on the main PCA. The only way this could be reversed is if new main
PCA ROMS were installed while an older revision level ROM SIMM was left in the plotter.
This latter situation should be avoided and checked whenever new ROMS are installed on the
main PCA.
If a code upgrade ROM and an enhancement ROM (ie: KANJI) are both installed, the code
upgrade ROM must be in the upper ROM slot. If the code upgrade ROM SIMM is placed in
the wrong slot, the plotter will lock up, displaying a two dot pattern.
Firmware code revision levels can be checked using the Utilities main menu and Statistics
submenu accessible through the front panel menu structure.
Содержание 650c - DesignJet Color Inkjet Printer
Страница 1: ...PrinterFAQ COM HP DesignJet650C User Guide ...
Страница 126: ...7 10 Adjustments Calibrations Notes ...
Страница 156: ...9 4 Product History Notes ...
Страница 161: ...10 5 Parts and Diagrams Illustrated Parts Breakdown Stand Assemblies 1 2 3 4 5 6 7 8 1 3 5 3 3 3 3 3 9 9 C C2858 1 1 ...
Страница 165: ...10 9 Parts and Diagrams Illustrated Parts Breakdown C2859A Electronics Enclosure C C2858 3 1 ...
Страница 167: ...10 11 Parts and Diagrams Illustrated Parts Breakdown C2858A Electronics Enclosure C C2858 4 1 ...
Страница 177: ...10 21 Parts and Diagrams Illustrated Parts Breakdown Service Station Assembly 1 2 3 4 5 6 C C2858 9 1 7 8 9 10 11 12 ...
Страница 181: ...10 25 Parts and Diagrams 1 3 Illustrated Parts Breakdown 5 6 Pen Carriage Assembly C C2858 11 1 7 2 8 9 2 4 5 10 ...
Страница 183: ...10 27 Parts and Diagrams Illustrated Parts Breakdown Paper Drive Assemblies C C2858 12 1 ...
Страница 185: ...10 29 Parts and Diagrams Illustrated Parts Breakdown Bail and Overdrive Support Assemblies C C2858 13 1 ...
Страница 189: ...10 33 Parts and Diagrams Illustrated Parts Breakdown Starwheel Starguard and Chassis Assemblies C C2858 15 1 ...
Страница 199: ......


