


7-3
Adjustments/Calibrations
All calibration procedures are accessible through the front panel menu structure. Procedures
accessed by users are available through the ª
Utilities
º main menu. These procedures include
Pen Alignment and Accuracy submenus. The Accuracy submenu contains two lower subme-
nus, Restore Factory settings and Recalibrate procedures. The Config Plot function, also lo-
cated in the ª
Utilities
º menu, is used in conjunction with the Accuracy procedures for com-
parison purposes. Procedures reserved for service use are available through the ª
Service
Tests
º menu, which is a subset of the ª
Utilities
º menu.
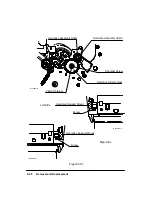
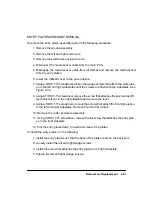
SHEET LENGTH CALIBRATION
This calibration uses the X-axis to correct for tolerances in x-axis components that are used to
measure media length during media loading. Perform this calibration if the hardclip margins
are not within the 2 mm specification.
Sheet Length Calibration is accessible through the ª
Service Tests
º menu. To perform the
sheet length calibration, do the following:
1. Press
Enter
at the ª
Status
º display.
2. Use the arrow buttons to scroll to the ª
Utilities
º main menu. Press
Enter
. Either the
Short or Full menu mode will access the
ªService Test
º submenu.
3. Simultaneously press the
Enter
and the
Up Arrow
buttons to access the
ªService
Test
º submenu.
4. Scroll to the ªSheet Length
Calib
º submenu. Press
Enter
.
5. Messages in the plotter display will inform you to load cut-sheet media in a land-
scape orientation. Any standard size or type of media may be used.
6. The plotter will scan across the media, accurately locating the media edges.
7. The sheet must then be removed, rotated 90
, and reloaded into the plotter.
8. The media edges are again scanned and the calibration is completed.
9. Check the margins by measuring the hardclip limit borders on the Configuration
Plot.
Содержание 650c - DesignJet Color Inkjet Printer
Страница 1: ...PrinterFAQ COM HP DesignJet650C User Guide ...
Страница 126: ...7 10 Adjustments Calibrations Notes ...
Страница 156: ...9 4 Product History Notes ...
Страница 161: ...10 5 Parts and Diagrams Illustrated Parts Breakdown Stand Assemblies 1 2 3 4 5 6 7 8 1 3 5 3 3 3 3 3 9 9 C C2858 1 1 ...
Страница 165: ...10 9 Parts and Diagrams Illustrated Parts Breakdown C2859A Electronics Enclosure C C2858 3 1 ...
Страница 167: ...10 11 Parts and Diagrams Illustrated Parts Breakdown C2858A Electronics Enclosure C C2858 4 1 ...
Страница 177: ...10 21 Parts and Diagrams Illustrated Parts Breakdown Service Station Assembly 1 2 3 4 5 6 C C2858 9 1 7 8 9 10 11 12 ...
Страница 181: ...10 25 Parts and Diagrams 1 3 Illustrated Parts Breakdown 5 6 Pen Carriage Assembly C C2858 11 1 7 2 8 9 2 4 5 10 ...
Страница 183: ...10 27 Parts and Diagrams Illustrated Parts Breakdown Paper Drive Assemblies C C2858 12 1 ...
Страница 185: ...10 29 Parts and Diagrams Illustrated Parts Breakdown Bail and Overdrive Support Assemblies C C2858 13 1 ...
Страница 189: ...10 33 Parts and Diagrams Illustrated Parts Breakdown Starwheel Starguard and Chassis Assemblies C C2858 15 1 ...
Страница 199: ......