6-19
Removal and Replacement
WINDOW SENSOR REMOVAL
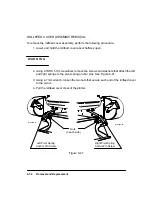
To remove the window sensor, perform the following procedure:
1. Remove the right endcover.
2. Disconnect the window sensor cable connector from the front panel PCA.
3. Using a TORX T-8 screwdriver, remove the two screws that attach the window sen-
sor to the right sideplate and lift the sensor clear of the plotter. See Figure 6-13.
Don’t cross-thread or over-tighten the screws when installing.
Figure 6-13.
Window Sensor
Window Sensor Cable
(C)C2858-49b
Содержание 650c - DesignJet Color Inkjet Printer
Страница 1: ...PrinterFAQ COM HP DesignJet650C User Guide ...
Страница 126: ...7 10 Adjustments Calibrations Notes ...
Страница 156: ...9 4 Product History Notes ...
Страница 161: ...10 5 Parts and Diagrams Illustrated Parts Breakdown Stand Assemblies 1 2 3 4 5 6 7 8 1 3 5 3 3 3 3 3 9 9 C C2858 1 1 ...
Страница 165: ...10 9 Parts and Diagrams Illustrated Parts Breakdown C2859A Electronics Enclosure C C2858 3 1 ...
Страница 167: ...10 11 Parts and Diagrams Illustrated Parts Breakdown C2858A Electronics Enclosure C C2858 4 1 ...
Страница 177: ...10 21 Parts and Diagrams Illustrated Parts Breakdown Service Station Assembly 1 2 3 4 5 6 C C2858 9 1 7 8 9 10 11 12 ...
Страница 181: ...10 25 Parts and Diagrams 1 3 Illustrated Parts Breakdown 5 6 Pen Carriage Assembly C C2858 11 1 7 2 8 9 2 4 5 10 ...
Страница 183: ...10 27 Parts and Diagrams Illustrated Parts Breakdown Paper Drive Assemblies C C2858 12 1 ...
Страница 185: ...10 29 Parts and Diagrams Illustrated Parts Breakdown Bail and Overdrive Support Assemblies C C2858 13 1 ...
Страница 189: ...10 33 Parts and Diagrams Illustrated Parts Breakdown Starwheel Starguard and Chassis Assemblies C C2858 15 1 ...
Страница 199: ......


