background image

DeltaMyc Operation Manual J810018 (7 Oct 2014) 

Operation 

3-16


Select point of interest 

Click on the Select Point of 
Interest item.  

 
The 

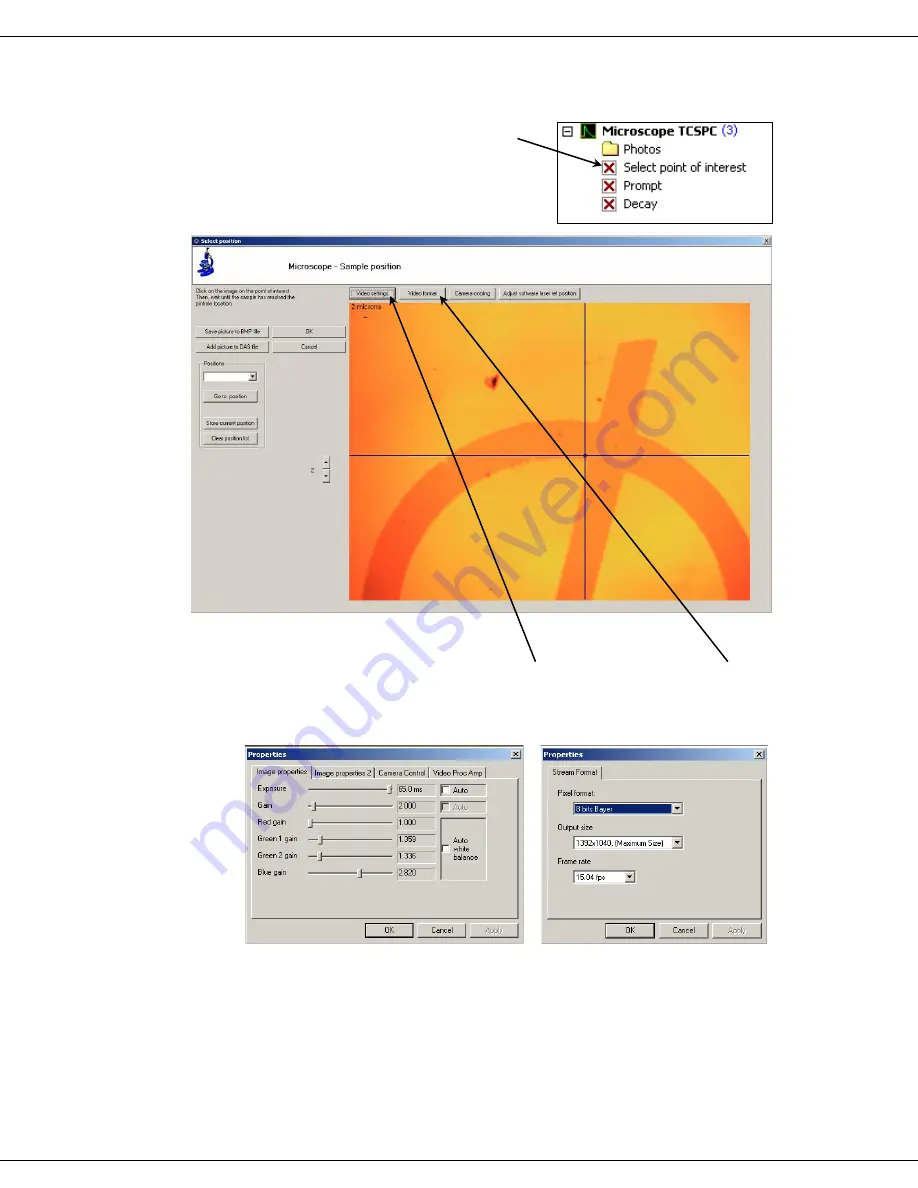
Select position

 window opens (Fig. 19): 

Fig. 19. 

Select position

 window 


Adjust the camera settings using the 

Video settings

 button and 

Video 

format

 button. 

Both of these buttons open different 

Properties

 windows (Fig. 20a and 

20b). 


Fig. 20a. 

Properties

 window for video 

image settings. 

Fig. 20b. 

Properties 

window 

for video-streaming format 
settings. 


Содержание DeltaMyc J810018

Страница 1: ...D e l t a My c F l u o r e s c e n c eL i f e t i me I ma g i n gMi c r o s c o p eS y s t e m O p e r a t i o nMa n u a l P a r t n u mb e r J 8 1 0 0 1 8...

Страница 2: ......

Страница 3: ...DeltaMyc Operation Manual J810018 7 Oct 2014 i DeltaMyc Microscope Fluorescence Lifetime Mapping System Operation Manual http www HORIBA com...

Страница 4: ...form by any means including electronic or mechanical photocopying and recording without prior written permission from HORIBA Instruments Incorporated Requests for permission should be requested in wr...

Страница 5: ...2 2 Environmental requirements 2 3 Electrical requirements 2 4 Unpacking and Installation 2 5 3 System Operation 3 1 Introduction 3 1 Controlling the hardware 3 3 Single point measurement 3 11 Lifeti...

Страница 6: ...DeltaMyc Operation Manual J810018 7 Oct 2014 iv...

Страница 7: ...ler PPD detector near IR up to 900 nm options available host computer with pre installed data acquisition cards and software DataStation measurement and control software DAS decay analysis software Fo...

Страница 8: ...DeltaMyc 2 Requirements Installation Power and environmental requirements select the best spot for the instrument and set up 3 System Operation Operation of the fluorometer system and calibration in s...

Страница 9: ...misuse of any such products including without limitation to persons injured directly or indirectly in connection with your use or operation of the products The foregoing indemnification shall in no e...

Страница 10: ...from loss of use loss of data or loss of profits arising out of or in connection with our products or the use or possession there of HORIBA Instruments Incorporated is also in no event liable for dama...

Страница 11: ...erstood and met HORIBA Instruments Incorporated is not responsi ble for damage arising out of improper use of the equipment A CAUTION notice denotes a hazard It calls at tention to an operating proced...

Страница 12: ...precautions are not taken This symbol cautions the user that excessive hu midity if present can damage certain equipment Hot This symbol warns the user that hot equip ment may be present and could cre...

Страница 13: ...uring your lifetime The long term risks for large cumulative exposure include premature aging of the skin wrinkles and most seriously skin cancer and cataract Damage to vision is likely following expo...

Страница 14: ...this work NORMAL EYEGLASSES OR CONTACTS OFFER VERY LIMITED PROTECTION Training For the use of UV sources new users must be trained by another member of the labora tory who in the opinion of the member...

Страница 15: ...r manent injury to the retina This type of injury can occur during a single prolonged ex posure Excessive exposure to visible light can result in skin and eye damage Visible light sources that are not...

Страница 16: ...In addition the heat deposited in the cornea may be conducted to the lens of the eye This heating of the lens is believed to be the cause of so called glassblow ers cataracts because the heat transfe...

Страница 17: ...es under the ob jectives for they can reflect or scatter the excitation light Also see safety notices relat ing to light sources Some DeltaDiode excitation sources generate laser light Do not look dir...

Страница 18: ...DeltaMyc Operation Manual J810018 7 Oct 2014 Introduction 0 12...

Страница 19: ...my of the DeltaMyc 1 1 1 Anatomy of the DeltaMyc Introduction The DeltaMyc is made up of a large number of devices and hardware Therefore this chapter is designed to help you understand how all the de...

Страница 20: ...DeltaMyc Operation Manual J810018 7 Oct 2014 Anatomy of the DeltaMyc 1 2 Block diagram Following is a block diagram showing how the major sections of the DeltaMyc are inter connected...

Страница 21: ...natomy of the DeltaMyc 1 3 DeltaMyc Inverted IX73 microscope Tungsten halogen lamp x y Stage PPD detector PPD detec tor power supply DeltaDiode controller TCSPC electronics Joystick Stage controller D...

Страница 22: ...natomy of the DeltaMyc 1 4 DeltaMyc Upright BX53 microscope Tungsten halogen lamp x y Stage PPD detector PPD detec tor power supply DeltaDiode controller TCSPC electronics Stage controller Joystick De...

Страница 23: ...training includes but is not limited to Understanding the risks of exposure to ultraviolet visible and infrared light and how to avoid unsafe exposures to these types of radiation Handling various lig...

Страница 24: ...ts Installation 2 2 Surface requirements A sturdy table or bench top Surface must hold 90 kg 200 lbs Surface should be about 27 72 69 cm 183 cm to hold spectrofluorometer com puter and accessories com...

Страница 25: ...ation Caution Excessive humidity can damage the optics Caution Airflow inside the FluoroHub module de pends on the top cover being in place Ensure ad equate airflow to avoid damage to certain compo ne...

Страница 26: ...djacent to the IEC mains power inlet Fuse ratings are listed in Specifications Note HORIBA Scientific recom mends connecting the host com puter monitor and printer to a sin gle surge protector to make...

Страница 27: ...ed as close as possible to the selected location DeltaMyc carton contents Quantity Item Part number 1 Microscope frame BX73 or IX73 with one port for the at tachment of the microscope lamp in reflecti...

Страница 28: ...pplicable 1 DeltaHub 1 Host computer with data acquisition cards if applicable 1 or more DeltaDiode light source s specified in the order 1 DeltaDiode controller if applicable 1 PPD photon detector Al...

Страница 29: ...ace the microscope frame on a flat surface Refer to the microscope instructions to set up the microscope lamp and illuminator if they are not already attached to the microscope frame Place the DeltaHu...

Страница 30: ...witched on and off using the switch next to the inlet The interlock plug must be in place to ensure proper operation Turn ON OFF the laser power using the key on the front panel The DeltaDiode head co...

Страница 31: ...d on be cause the various USB devices are not necessarily connected to the same USB connector they were previously using For further details please refer to the application user guides for DataStation...

Страница 32: ...y of connections Type of connec tion Number of connections Equipment AC mains 110 V or 220 V 7 Microscope frame DeltaHub PC Monitor Motorized stage controller Camera DC adaptor DeltaDiode controller U...

Страница 33: ...f the decay time either from a previous measurement or lit erature Starting the software 1 After checking that the appropriate hardware is connected turn on the host computer Delta Hub the Tango stage...

Страница 34: ...ty can be varied You can select a suitable filter cube in the illuminator and use the binoculars top camera to view image the sample The laser is only on when the camera only position Note that in th...

Страница 35: ...f the microscope motorized stage and the camera pixels and lets the system know where the pinhole is located in the horizontal plane Therefore run the calibration routine each time that the system con...

Страница 36: ...stage camera relative position The Microscope Calibration window is shown in figure 13 and the calibration proce dure is detailed below Fig 13 Microscope Calibration window For this step the motorized...

Страница 37: ...hest magnification objective Calibration of laser reference position and diameter if applicable The calibration procedure is detailed below Using the internal camera the laser position is identified o...

Страница 38: ...a on the microscope stage c Rotate the filter cube dial to the filter cube that matches your DeltaDiode d Make sure the dual lamp adapter selec tor knob is upward so that the light guide illuminates t...

Страница 39: ...Myc Operation Manual J810018 7 Oct 2014 Operation 3 7 f Click the TCSPC Single point icon then click the New button The main window appears g Click Stage calibration The Calibration warning window app...

Страница 40: ...ia gain control j Select pinhole on the camera adapter 2 Calibrate the instrument a Shut off the white light to the micro scope by pulling down on the dual lamp adapter selector knob b Gently remove t...

Страница 41: ...DeltaMyc Operation Manual J810018 7 Oct 2014 Operation 3 9 d Illuminate the pinhole with a small flashlight You should see the circular image of the pinhole on the monitor...

Страница 42: ...tate the knob to match the blue circle to the size of the image f Remove the flashlight return the filter and reinstall the detector tight ening the set screw g Redo stage calibration h In the main wi...

Страница 43: ...tton then click the OK button k First change the calibration distance to 0 05 mm l Identify a particular site on the sample and click The image shifts to center upon that site m Re identify that same...

Страница 44: ...ation Manual J810018 7 Oct 2014 Operation 3 12 c Pull down the dual lamp adapter selector knob so that the DeltaDiode illuminates the microscope The image of the sample s fluorescence should appear on...

Страница 45: ...al J810018 7 Oct 2014 Operation 3 13 d Move the DeltaDiode s alignment adapter knobs to center the laser illu mination on the crosshair target 4 Optional Adjust software position by clicking Adjust so...

Страница 46: ...n be accessed manually to read the current position and move the stage to a new location The Advanced button gives access Fig 16 to advanced options for the stage In this window you can select the typ...

Страница 47: ...first In the measurement tree four items are now available This tree is illustrated in Fig 18 Figure 18 Measurement tree for microscope single point measurements The Photos folder contains all the pic...

Страница 48: ...elect position window opens Fig 19 Fig 19 Select position window e Adjust the camera settings using the Video settings button and Video format button Both of these buttons open different Properties wi...

Страница 49: ...ove the sample click on the image on the feature of interest The point of interest is then moved at the pinhole location and becomes ready for the measurement i Save the live image to a BMP file using...

Страница 50: ...lter beam splitter position Data display 1 Click on the Prompt and Decay items to display the measurement data as in standard TCSPC mode 2 To display any pictures that have been added to the DAS file...

Страница 51: ...DeltaMyc Operation Manual J810018 7 Oct 2014 Operation 3 19 Open the DAS files with the DAS6 software for further analysis...

Страница 52: ...It is possible to map non contiguous non rectangular areas TCSPC FLIM Acquisition time ranges from 5 ms to 1 s per decay Only rectan gular areas can be mapped Anchor control An additional anchor contr...

Страница 53: ...nchor control The Select position window appears Fig 21 The purpose of this window is to store the location and the picture of the area of the sample that is to be mapped Fig 21 Select position window...

Страница 54: ...parameters and the measurement locations on the anchored sample are con figured using the microscope scan wizard 1 Click the Click here to begin item in the meas urement tree The wizard window is disp...

Страница 55: ...e delay between the prompt and the decay curve The logarithm of the decay data is then fitted with this calculated lifetime in its linear part If no prompt was acquired the estimated lifetime is calcu...

Страница 56: ...se points radio button b Click on the center of the cell to be deleted or click and drag to draw over an area of points to be removed The resolution of the grid is defined by the laser spot diameter H...

Страница 57: ...nue The data are now ready for review If a prompt is measured after the decays the data analysis will occur after this last ac quisition Therefore it may take a few minutes before this dialog box appe...

Страница 58: ...layed To obtain more information about a particular measurement location move the mouse pointer to this location The relevant data are shown in the Information section To display the data curve of a p...

Страница 59: ...the first zoom area corner drag and click to define the second cor ner of the zoom area The zoom area is then displayed in a new window Utilities Print map Offers various options for printing the map...

Страница 60: ...2D Microscope Map window To display the data of a particular decay click on the relevant Decays item The data can also be ex ported using the functions on the item s popup menu Starting a new Microsc...

Страница 61: ...dard TCSPC measurement For a full de scription of the software we recommend that you consult the DAS6 manual 1 Click the DAS6 icon on the desktop to start the DAS6 software 2 Open the relevant microsc...

Страница 62: ...obal sum fit For more information regarding these algorithms see the DAS6 manual 6 Choose the Fit button which opens the 1 5 exponentials window Fig 29 1 5 exponentials window a Select the desired num...

Страница 63: ...hted residuals indicates how the fitted function differs from the data and a reduced 2 value CHISQ or XSQ Other indicators are also provided The usual values of interest are the lifetime T value its e...

Страница 64: ...ticular pixel is displayed across the top of the screen when hovering over the pixels with the mouse A histogram displays the statistical distribution of the fit parameter across the sample The displa...

Страница 65: ...ting 4 1 4 Maintenance Troubleshoot ing Maintenance If the instrument requires cleaning then disconnect it from the AC mains supply Ap ply a mild detergent solution using a soft slightly damp cloth Al...

Страница 66: ...pe frame and the wall socket The bulb needs to be replaced Please check the Olympus documenta tion supplied with the microscope frame and replace the lamp bulb The lamp is ON but the intensity is set...

Страница 67: ...h the DeltaHub With the Lifetime module With the Tango stage controller The hardware is not ON Switch the DeltaHub ON Switch the Tango controller ON Connect the power supply unit cable to the lifetime...

Страница 68: ...tage have been moved or replaced Run the calibration procedure If there is no move ment at all the stage may be not operation al Make sure that the Tango control ler is ON and check the XY ca bles The...

Страница 69: ...fic support in tracing the problem The most recent log file is always named APP LOG where APP is the name of the application that produced the file i e DataStation or DAS6 The log files are al ways cr...

Страница 70: ...back on 2 Make sure all accessories are properly config ured and turned on as needed 3 Run the verification tests to make sure the sys tem is properly calibrated Print the spectrum or table for each...

Страница 71: ...ifferent port you may have to reinstall the appropriate USB driver Usually this process is handled by Windows In some cases you may have to point to the driver manually All drivers are supplied on CDs...

Страница 72: ...DeltaMyc Operation Manual J810018 7 Oct 2014 USB Port Configuration 5 2...

Страница 73: ...of the DeltaMyc spectrometer fol low Microscope Microscope type Based on upright Olympus IX53 or IX73 Objectives Plan achromat 10 and 60 other magnifications available Turret with five positions avai...

Страница 74: ...it spread time 200 ps Dark count 80 cps Filters Available positions Eight manually selected interchangeable cubes Excitation filters Optional 10 nm bandpass filters or short pass filters Dichroic beam...

Страница 75: ...itter 3 22 4 2 BF 4 2 bitmap file 3 22 block diagram 1 2 BMP file 3 17 BS 4 2 BX73 2 5 C C mount 2 5 cables 2 4 7 4 3 4 calibration procedure 3 3 5 3 15 3 17 Calibration warning window 3 7 caution not...

Страница 76: ...xcitation wavelength 3 1 Expansion port A 2 8 9 Export data 3 27 F face shield 0 6 File menu 3 18 3 20 3 28 filters 6 2 filter cube 3 2 3 3 6 4 2 4 4 Fit button 3 30 Fit button 3 30 FLIM icon 3 28 flu...

Страница 77: ...ocket 2 8 power supply 3 1 PPD detector 0 1 2 6 2 8 4 4 6 1 2 Print map 3 27 Prompt item 3 15 3 18 3 28 Properties window 3 16 protective gloves 0 6 R Ratemeters window 3 18 Read this manual notice 0...

Страница 78: ...e Video settings button 3 16 Time resolved mode 3 2 Tools 3 27 Transparency slider 3 26 trinocular 2 5 4 4 troubleshooting 4 1 2 turret 6 1 U ultraviolet light notice 0 5 unpacking and installation 2...

Страница 79: ...up application images are collaged in the overall design Beginning from a nano size element the scale of the story develops all the way to the Earth with a gentle flow of the water 3880 Park Avenue Ed...

Страница 80: ......

Отзывы: