6 SETTING
- 60 -
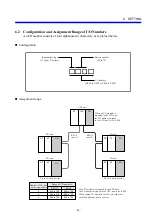
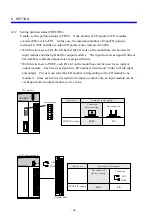
Example 2: I/O numbers assigned and number of points occupied when the first I/O number is
000 and the partition status is set to FIX
0 X000 to X00F
1 X010 to X01F
2 X020 to X02F
3 X030 to X03F
4 Y000 to Y00F
5 Y010 to Y01F
6 Y020 to Y02F
7 Y030 to Y03F
0 X000 to X00F
1 Y000 to Y00F
16
0 X000 to X01F
1 X020 to X03F
2 Y000 to Y01F
3 Y020 to Y03F
0 X000 to X01F
1 X020 to X03F
2 X040 to X05F
3 X060 to X07F
4 Y000 to Y01F
5 Y020 to Y03F
6 Y040 to Y05F
7 Y060 to Y07F
0 X000 to X01F
1 Y000 to Y01F
32
0 X000 to X03F
1 X040 to X07F
2 Y000 to Y03F
3 Y040 to Y07F
0 X000 to X03F
1 X040 to X07F
2 X080 to X0BF
3 X0C0 to X0FF
4 Y000 to Y03F
5 Y040 to Y07F
6 Y080 to Y0BF
7 Y0C0 to Y0FF
0 X000 to X03F
1 Y000 to Y03F
64
0 X000 to X07F
1 X080 to X0FF
2 Y000 to Y07F
3 Y080 to Y0FF
0 X000 to X07F
1 X080 to X0FF
2 X100 to X17F
3 X180 to X1FF
4 Y000 to Y07F
5 Y080 to Y0FF
6 Y100 to Y17F
7 Y180 to Y1FF
0 X000 to X07F
1 Y000 to Y07F
128
16
32
64
128
Number of I/O points
0 X000 to X00F
1 X010 to X01F
2 Y000 to Y00F
3 Y010 to Y01F
CPU
PS
CPU
PS
CPU
PS
CPU
PS
FREE
FIX
Input or output modules
(in all I/O slots)
Input modules
(in the I/O slots of the left half)
Output modules
(in the I/O slots of the right half)
Slots into which to insert I/O modules
2-slot mount base
4-slot mount base
Boundary between input and output modules that is placed according to the partition status setting.
The numeric parts of the I/O numbers for an input module and output module pair are the same.
Only the characters (X and Y) that indicate input or output differ.
2 slots
4 slots
8 slots
I/O
numbers
I/O
numbers
I/O
numbers
Input
Input
Input
Output
Output
Output
Number of
points occupied
8-slot mount base
8-slot mount base
32
64
128
256
64
128
256
512
Number of
points occupied
Number of
points occupied
Содержание S10mini D
Страница 1: ......
Страница 14: ...THIS PAGE INTENTIONALLY LEFT BLANK ...
Страница 19: ...1 BEFORE USE ...
Страница 28: ...THIS PAGE INTENTIONALLY LEFT BLANK ...
Страница 29: ...2 OVERVIEW ...
Страница 34: ...THIS PAGE INTENTIONALLY LEFT BLANK ...
Страница 35: ...3 NAMES AND FUNCTIONS OF PARTS ...
Страница 45: ...4 INSTALLATION ...
Страница 54: ...THIS PAGE INTENTIONALLY LEFT BLANK ...
Страница 55: ...5 WIRING ...
Страница 68: ...THIS PAGE INTENTIONALLY LEFT BLANK ...
Страница 69: ...6 SETTING ...
Страница 84: ...THIS PAGE INTENTIONALLY LEFT BLANK ...
Страница 85: ...7 OPERATION PROCEDURES ...
Страница 91: ...8 EXPLANATION OF OPERATION ...
Страница 111: ...9 MAINTENANCE ...
Страница 128: ...THIS PAGE INTENTIONALLY LEFT BLANK ...
Страница 129: ...10 SPECIFICATIONS ...


