background image

9  MAINTENANCE


- 101 -


9.3 Troubleshooting 

If the S10mini causes a failure, troubleshoot it as described below. 

 
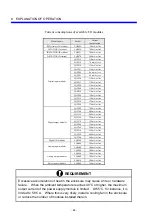
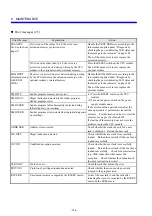
(1)  Check the status of the operation LED on power supply module and the message in the indicator 

on the CPU module. 

(2) Replace 

modules. 


HITACHI  

S10mini

LQP000

LADDER

MODE

PROTECT

RESET

STOP

RUN

SIMU

NORM

OFF

ON

PS

LQV000

POWER

ON

OFF

H

N

LG

FG

AC100-120V

DC5V

GND

SERVICE

CHECK

POWER

D.INPUT

LQX100

100-120VAC

0

1

2

3

4

5

6

7

8

9

A

B

C

D

 E

F

D.INPUT

LQX100

100-120VAC

0

1

2

3

4

5

6

7

8

9

A

B

C

D

 E

F

CPU unit (2-slot mount base)

Power indicating LED

LEDs

Power supply module

CPU module

DI/DO module

Indicator

PS

LQV000

POWER

ON

OFF

H

N

LG

FG

AC100-120V

DC5V

GND

SERVICE

CHECK

POWER

D.INPUT

LQX100

100-120VAC

0

1

2

3

4

5

6

7

8

9

A

B

C

D

 E

F

D.INPUT

LQX100

100-120VAC

0

1

2

3

4

5

6

7

8

9

A

B

C

D

 E

F

I/O unit (2-slot mount base)

Power indicating LED

LEDs

Power supply module

Remote I/O

station module

DI/DO module

LQS000

HITACHI 

HSC-1000

RI/O

U

ST.ND

RI/O

L

CPU RUN


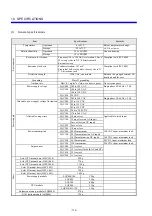
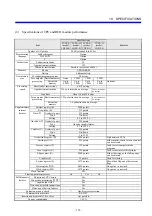
Содержание S10mini D

Страница 1: ......

Страница 2: ...ion March 2003 SME 1 100 E out of print Sixth Edition April 2004 SME 1 100 F out of print Seventh Edition September 2004 SME 1 100 G All Rights Reserved Copyright 1998 2004 Hitachi Ltd The contents of this publication may be revised without prior notice No part of this publication may be reproduced in any form or by any means without permission in writing from the publisher Printed in Japan BI BI ...

Страница 3: ...ely This manual divides the safety precautions into DANGERs and CAUTIONs Failure to observe these warnings may result in death or serious injury Failure to observe these cautions may result in injury or property damage Failure to observe any may lead to serious consequences All of these DANGERs and CAUTIONs provide very important precautions and should always be observed Additional safety symbols ...

Страница 4: ... smell or otherwise misbehave turn it off immediately and probe into the cause See Chapter 1 on page 8 An external supply voltage will cause electrical shock hazards if you mount or demount the module or connect or disconnect the cable with the power switch turned on and then touch the power terminal by accident Also this hardware unit may be damaged due to a short circuit or noise Be sure to swit...

Страница 5: ...output module and for the load power supply Use of different power supplies can cause malfunctioning Do not use transceivers cell phones or the like near the system Electromagnetic noise interference from such gear can cause the system to malfunction See Chapter 1 on page 8 To avoid possible failures allow for at least one second between turning on and turning off of the power switch See Chapter 3...

Страница 6: ...age 34 Have qualified technicians wire cables Improper wiring can lead to fires failures and electrical shock hazards See Chapter 5 on page 49 Modules may be damaged due to static electricity Discharge static charges from your body before setting switches connecting or disconnecting the cables or inserting or removing the connectors See Chapter 9 on page 94 Even if the input voltage of the power s...

Страница 7: ...ammable controller beyond such an extent as may be defined in this manual We will not be liable for any damages to our programmable controller and ancillary equipment and for physical injury arising out of such actions To prevent noise caused malfunctioning keep the 100 VAC VDC cable and the network cable at least 100 mm apart from each other rather than bundle them together See Chapter 5 on page ...

Страница 8: ...rges from your body before setting switches connecting or disconnecting the cables or inserting or removing the connectors See Chapter 4 on page 35 A surge voltage may cause hardware units to malfunction or to be damaged When a coil such as a relay is connected to the PCs OK output circuit install a surge absorbing diode or similar device Use a diode with its peak inverse voltage at least 10 times...

Страница 9: ...al waste disposal business See Chapter 9 on page 100 REQUIREMENT An electric shock may lead to a death or burn Noise may cause the system to malfunction Ground the line ground LG frame ground FG and shield SHD terminals as described below Leave the mount base insulated from the enclosure To assure this do not remove the insulating sheet from the mount base Ground the LG and FG terminals separately...

Страница 10: ...g of the OS is not required As for the user programs and various settings they need to be reloaded or made again from scratch If the message LOAD OS does not disappear clear all the memory by following Clearing all the memory on page 106 If the CPU module is still not recovered it is a hardware problem Replace the CPU module 2 Batch save load feature Disallowing loading and saving of files between...

Страница 11: ... contains system programs for the analog modules and pulse counter module in flash memory within the CPU module loading of the system programs is not required loading of the various settings however is required If you load the four channel analog pulse counter system inadvertently reset the CPU module The S10mini system will then start up ...

Страница 12: ...S 7890 03 CPMS load system S 7890 04 CPMSE load system S 7890 05 CPMS debugger system S 7890 06 CPMSE debugger system S 7890 07 GP IB system S 7890 08 Batch save load system S 7890 09 4α ladder diagram system S 7890 17 4αH ladder diagram system S 7890 18 RS 232C higher level link system S 7890 20 High speed remote I O system S 7890 21 CPU link system S 7890 22 Four channel analog pulse counter sys...

Страница 13: ...er than that which was delivered The malfunction was caused by modifications or repairs made by a vendor other than the vendor that delivered the unit The malfunction was caused by a relay or other consumable which has passed the end of its service life The malfunction was caused by a disaster natural or otherwise for which the vendor is not responsible The warranty mentioned here means the warran...

Страница 14: ...THIS PAGE INTENTIONALLY LEFT BLANK ...

Страница 15: ...ls Although the descriptions contained in this manual are based on the standard model follow the instructions set forth in the manual for proper use of the product even if you use the environmentally resistant model Trademarks Microsoft Windows operating system Microsoft Windows 95 operating system and Microsoft Windows 98 operating system are registered trademarks of Microsoft Corporation in the ...

Страница 16: ... 27 4 1 Installation 28 4 2 Clearances 29 4 3 Outside Dimensions 30 4 4 Securing the Mount Base 32 4 5 Securing Modules 33 5 WIRING 37 5 1 Cable Specifications 38 5 2 Wiring the Power Supply 39 5 3 Wiring for Grounding 41 5 4 Wiring the Power Supply Module 43 5 5 Wiring for External Input Output Signals 43 5 5 1 Wiring for the PCs OK signal 44 5 5 2 Wiring for the RI O STOP and RUN STOP signals 44...

Страница 17: ... 3 RUN ladder program execution mode 70 7 2 4 SIMU simulated ladder program execution mode 70 7 2 5 RESET mode 70 7 2 6 PROTECT ON mode 71 7 2 7 PROTECT OFF mode 71 8 EXPLANATION OF OPERATION 73 8 1 Ladder Diagram Program 74 8 1 1 Execution 74 8 1 2 Program execution order 75 8 1 3 Executing arithmetic functions 76 8 1 4 When to start execution 76 8 2 Remote I O 77 8 2 1 Remote I O transfer 77 8 2...

Страница 18: ...ctions on Mounting Option Modules 84 8 7 Output Current of the Power Supply Module 86 8 8 Memory Backup 89 8 9 Output Timing of the PCs OK Signal 92 9 MAINTENANCE 93 9 1 Preventive Maintenance 94 9 2 Replacing the Backup Battery 97 9 2 1 Procedure 97 9 2 2 Disposing of used batteries 99 9 3 Troubleshooting 101 10 SPECIFICATIONS 111 ...

Страница 19: ...1 BEFORE USE ...

Страница 20: ...ut 1 mm into the slot at the lower right of the front cover see the figure below Then carefully open the front cover in the direction of the arrow NOTICE Do not insert the slotted screwdriver more than 1 mm Otherwise the internal PC board may be damaged Slotted screwdriver or finger nail Front cover CPU module Front panel Open in this direction Terminal block Front cover Slot Push the connector of...

Страница 21: ...ttery plug PC board Installation The programmable controller is not fireproof dustproof or dripproof At installation time house the programmable controller in an iron made dust proof drip proof enclosure and install it in a proper place to avoid exposure to water Iron enclosure CPU unit I O unit Fill up the hole with putty CAUTION To prevent possible failures house the programmable controller in a...

Страница 22: ...LQV100 85 to 132 VAC 85 to 132 VDC LQV020 20 4 to 28 8 VDC LQV200 170 to 264 VAC Temperature Operating 0 to 55 C Storage 20 to 75 C Rate of temperature change 10 C h or lower Relative humidity Operating 30 to 90 RH Storage 10 to 90 RH Non condensing Resistance to vibration Compliant with JIS C0040 Frequency 10 to 150 Hz Acceleration 10 m s2 20 sweep cycles in X Y Z directions each 8 minute sweep R...

Страница 23: ... counter module and an I O module rated at 100 VAC VDC or higher Wire each I O module separately in accordance with each supply voltage used Mount option modules in a group on the side of the CPU module apart from the I O module When mounting an option module and an I O module rated at 100 VAC VDC or higher leave one slot vacant between them Separate wiring for I O modules and option modules CPU o...

Страница 24: ... 15 m from the grounding point of a power distribution panel It is best to ground the S10mini to a steel frame of a building If such grounding is not possible bury a grounding rod in the ground Separate the grounding point of the PCs panel from that of a power distribution panel by at least 15 m LG ground line FG ground line PCs panel Power distribution panel Steel frame Class D grounding is defin...

Страница 25: ...er than those described in the manual If such a part fails replace the module in its entirety When replacing parts ask a Hitachi maintenance person Inserting and removing modules Be sure to turn off the power switch before plugging modules in or out to avoid failures and electrical shock hazards Installing additional facilities If an additional peripheral facility has been installed or the existin...

Страница 26: ... with overvoltage and overcurrent protection features When the programmable controller smokes gives off an offensive smell or otherwise misbehave turn it off immediately and probe into the cause CAUTION Choose a power supply matching the rating of a module and connect it to that module Connecting an improper power supply to a module can cause the module to fire Parts containing gallium arsenide Ga...

Страница 27: ...NT Attach a fuse or circuit protector to the external power supply to protect against short circuits Use a circuit protector matching the rating of the power supply Verify the wiring before turning on the programmable controller Do not shut down turn off or reset the programmable controller without making sure that the peripheral equipment is off or will be unaffected by the shutdown of the progra...

Страница 28: ...THIS PAGE INTENTIONALLY LEFT BLANK ...

Страница 29: ...2 OVERVIEW ...

Страница 30: ...ni 2α R600 PC PC RI O 1 RI O 2 PS JST I O I O PS JST I O JST I O JST I O I O PS I O PS I O PS RI O I O I O PS RI O I O I O PS RI O I O I O PS RI O I O I O N1 N2 MEM 10BASE 5 Up to 1024 stations can be connected Host computer OD RING up to 64 stations CPU units example arrangement I O units I O units I O units I O units I O units I O units I O units up to 31 units per port I O units up to 31 units ...

Страница 31: ...hen 1 MB extension memory modules LQM000 available as CPU options are installed The CPU comes standard with remote I O capabilities Remote I O units can be connected directly from the CPU module without an optional remote I O option module Three programming languages supported ladder diagram C and HI FLOW In addition to the ladder diagram language the CPU module also supports the easy to see easy ...

Страница 32: ... E F D INPUT LQX100 100 120VAC 0 1 2 3 4 5 6 7 8 9 A B C D E F D INPUT LQX100 100 120VAC 0 1 2 3 4 5 6 7 8 9 A B C D E F PS LQV000 POWER ON OFF H N LG FG AC100 120V DC5V GND SERVICE CHECK POWER HITACHI S10mini LQP000 LADDER MODE STOP RUN CPU S Mounted on an 8 slot mount base PROTECT RESET OFF ON SIMU NORM HITACHI S10mini LQP000 LADDER MODE STOP RUN CPU S PROTECT RESET OFF ON SIMU NORM Example comb...

Страница 33: ... POWER LQS000 HITACHI HSC 1000 R IO U L STND RI O D INPUT LQX100 100 120VAC 0 1 2 3 4 5 6 7 8 9 A B C D E F D INPUT LQX100 100 120VAC 0 1 2 3 4 5 6 7 8 9 A B C D E F 8 slot mount base HSC 1081 Example combination of modules Mounted on a 2 slot mount base Required modules Power supply module Remote I O station module LQS000 I O modules 16 point AC input module LQX100 16 point DC input module LQX200...

Страница 34: ...THIS PAGE INTENTIONALLY LEFT BLANK ...

Страница 35: ...3 NAMES AND FUNCTIONS OF PARTS ...

Страница 36: ...N CPU S CPU RUN CPU RUN PCs OK COM GND 150 Ω 100 Ω RI O2 A RI O2 B SHD FG 150 Ω 100 Ω RI O1 A RI O1 B SHD RI O STOP STOP RUN COM SHD B1 B2 B3 B4 B5 B6 B7 B8 B9 A1 A2 A3 A4 A5 A6 A7 A8 A9 Signals on the terminal block CPU modules CPU model Type Built in memory capacity Model S LQP000 None Model H LQP010 1 MB Model F LQP011 1 MB Model D LQP120 2 MB For details of the specifications see 10 SPECIFICAT...

Страница 37: ...characters PCs OK contact output Indicates it to the outside that the CPU is running normally The contacts are opened at the time of a stop reset or power down I O setting switches 2 Set the following operation conditions for the I O modules mounted in the CPU unit Partition FIX or FREE Number of input output points 16 32 64 or 128 Setting for I O mounting 1 Whether to hold the output HOLD RI O ST...

Страница 38: ...e B1 B2 B3 B4 B5 B6 B7 B8 B9 A2 A4 A5 A6 A7 A8 A9 LQS000 RI O HITACHI HSC 1000 U L ST NO U L ST NO RI O A1 A3 COM FIX HOLD 128M 64M 32M COM SHD Signals on the terminal block RI O LQS000 HITACHI HSC 1000 RI O RI O2 A RI O2 B SHD NC FG RI O1 A RI O1 B 150Q COM 100Q ...

Страница 39: ...ESET or HOLD which the output modules enters when the remote I O line is broken RI O line input Used to connect the remote I O cable defined as upper level RI O line branching Used to connect the remote I O cable defined as lower level Terminating resistor setting Terminates the station module through a built in terminating resistance 100 Ω or 150 Ω when the station module is connected as the last...

Страница 40: ...e protected area NOTE An extension memory module receives backup voltage from the CPU when the CPU unit is mounted Memory on the extension module is not backed stand alone Therefore note the following points When using the extension memory module for the first time clear the data in the extension memory PCs edition Perform PCs memory initialization When the extension memory module is removed the i...

Страница 41: ...Monitor When an external I O operation is on the LED corresponding to it lights Example signals on the terminal block For details see the specifications of each I O module LQX100 LQX200 LQY100 B1 B2 B3 B4 B5 B6 B7 B8 B9 A1 A2 A3 A4 A5 A6 A7 A8 A9 0 1 2 3 8 9 A B C1 C0 4 5 6 7 C D E F LQY200 B1 B2 B3 B4 B5 B6 B7 B8 B9 A1 A2 A3 A4 A5 A6 A7 A8 A9 0 1 2 3 8 9 A B C0 V 4 5 6 7 C D E F LQY140 B1 B2 B3 B...

Страница 42: ...E CHECK POWER PS LQV000 POWER Power supply modules Name Type Remarks AC input power supply LQV000 100 VAC to 120 VAC input power supply DC input power supply LQV020 24 VDC input power supply AC DC input power supply LQV100 100 VAC to 120 VAC 100 VDC to 110 VDC input power supply AC input power supply LQV200 200 VAC to 240 VAC input power supply For details of the specifications see 10 SPECIFICATIO...

Страница 43: ...ge check Power switch POWER Turns on or off the power input to the power supply module Power supply terminal block H N Supplies input power to the power supply module The input voltage varies with each type of power supply module Line filter ground terminal LG Ground terminal for the power supply line filter Connected to the enclosure unit ground Frame ground terminal FG Connected to the mount bas...

Страница 44: ...ase HSC 1040 Power supply CPU 4 slots for CPU options and I O modules 8 slot mount base HSC 1080 Power supply CPU 8 slots for CPU options and I O modules I O unit 2 slot mount base HSC 1021 Power supply station 2 slots for I O modules 4 slot mount base HSC 1041 Power supply station 4 slots for I O modules 8 slot mount base HSC 1081 Power supply station 8 slots for I O modules No Name Function PS s...

Страница 45: ...4 INSTALLATION ...

Страница 46: ...tions line Do not use different types of cables Otherwise normal operation is not guaranteed Set a different station number for each station PS RI O I O I O I O I O PS RI O I O I O I O I O PS RI O I O I O PS RI O I O I O PS RI O I O I O I O I O PS RI O I O I O PS CPU RI O 1 RI O 2 Up to 300 m Up to 12 units per line Select the most suitable cable according to the total length Cable for short dista...

Страница 47: ...UTION Heat may build up inside the enclosure to such a degree that it will cause the units to fail Units may malfunction under the influence of electromagnetic interference from the adjoining units Allow specified clearances between the enclosure and each unit and between the units to assure heat dissipation and lessen electromagnetic interference Temperature raises vary depending on the manner of...

Страница 48: ...QP000 LADDER MODE PROTECT RESET STOP RUN SIMU NORM OFF ON PS LQV000 POWER ON OFF H N LG FG AC100 120V INPUT DC5V GND SERVICE CHECK POWER D INPUT LQX100 100 120VAC 0 1 2 3 4 5 6 7 8 9 A B C D E F D INPUT LQX100 100 120VAC 0 1 2 3 4 5 6 7 8 9 A B C D E F B 213 4 281 6 418 0 A 232 4 300 6 437 0 100 0 138 6 39 61 FG Front view modules mounted on a 2 slot mount base 2 slots 4 slots 8 slots Center Power...

Страница 49: ...ule HITACHI S10mini LQP000 LADDER MODE PROTECT RESET STOP RUN SIMU NORM OFF ON PS LQV200 POWER ON OFF H N LG FG AC200 240V INPUT DC5V GND SERVICE CHECK POWER D INPUT LQX100 100 120VAC 0 1 2 3 4 5 6 7 8 9 A B C D E F D INPUT LQX100 100 120VAC 0 1 2 3 4 5 6 7 8 9 A B C D E F B 213 4 281 6 418 0 A 232 4 300 6 437 0 100 0 138 6 39 61 FG CPU RUN Unit mm 2 slot mount base Top view 69 34 34 159 149 140 5...

Страница 50: ...e to the internal vertical surface of the back of the enclosure Enclosure CPU unit I O unit Insulating sheets Rear of the mount base PROHIBITION Keep the insulating sheets in position to insulate the mount base from the enclosure Never insert fingers or foreign matter into the clearances between parts of the connectors and mount base REQUIREMENT Secure the mount base to the predetermined vertical ...

Страница 51: ...the dust cover to protect the connector Dust entering the inside of the connector can cause malfunctioning or failures D INPUT LQX100 100 1 20VAC 0 1 2 3 4 5 6 7 8 9 A B C D E F 2 slot mount base Groove in which to insert a Phillips screwdriver Insert a Phillips screwdriver into the groove and tighten the screw Mount base Phillips screwdriver Module Screw to install the module supplied with the mo...

Страница 52: ... or disconnecting it or its cable CAUTION Dust deposited on the connector can result in degraded contact Install and wire the equipment immediately upon unpacking Modules are susceptible to damage Note the following points when installing or removing modules Check that the connectors are free from bent or broken pins and the pins are aligned straight and are free from dust Move modules along the v...

Страница 53: ...ately tightened screws can cause malfunctioning smoking or firing Damage to the module can result from static electricity Discharge static charges from your body before setting switches connecting or disconnecting the cables or inserting or removing the connectors ...

Страница 54: ...THIS PAGE INTENTIONALLY LEFT BLANK ...

Страница 55: ...5 WIRING ...

Страница 56: ...ng resistor 150 Ω For short Characteristic impedance 100 Ω distances Attenuation ratio 21 dB km 750 kHz 100 m or less Sectional area of wire 0 3 mm2 per line Recommended cables CO SPEV SB 1P 0 3 mm2 Manufactured by Hitachi Cable Ltd Resistance of terminating resistor 100 Ω PCs OK Wire type Shielded twisted pair Cable length 100 m or less Sectional area of wire 0 5 mm2 or more CPU STOP RUN RI O STO...

Страница 57: ...rminal block single point for LG Grounding terminal insulated from the enclosure Terminal block single point for FG Class D grounding Class D grounding When an insulating transformer is installed in the S10mini NFB H N H N LG LG FG FG I O unit Power supply 100 to 120 VAC single phase 50 60 Hz Class D grounding Power distribution panel Insulating transformer Enclosure grounding NFB Enclosure ground...

Страница 58: ...nel grounding 5 5 mm2 or more Grounding not used by the PCs unit To the control power supply CPU unit H N LG H N LG I O unit Terminal block 2 mm2 or more Insulating transformer with electrostatic shielding Grounding terminal for the PCs unit Insulate this grounding terminal from the panel Insulate the bottom from the floor 5 5 mm2 or more ...

Страница 59: ...LQS000 LQS000 HITACHI HSC 1000 RI O U L ST NO RI O D INPUT D INPUT LQX100 100 120VAC 100 120VAC 0 1 2 3 4 5 6 7 8 9 A B C D E E F D INPUT LQX100 100 120VAC 100 120VAC 0 1 2 3 4 5 6 7 8 9 A B C D E E F LG FG LG FG FG FG PS LQV000 POWER POWER ON ON OFF OFF H N LG LG FG FG AC100 120V AC100 120V DC5V DC5V GND GND SERVICE SERVICE CHECK CHECK POWER POWER HITACHI S10mini LQP000 LQP000 LADDER LADDER MODE ...

Страница 60: ... and LG cable sizes Inside the enclosure 2 mm 2 or more Outside the enclosure 5 5 mm 2 or more Terminal block single point for FG RI O U L ST NO REQUIREMENT An electric shock may lead to a death or burn Noise may cause the system to malfunction Ground the line ground LG frame ground FG and shield SHD terminals as described below Leave the mount base insulated from the enclosure To assure this do n...

Страница 61: ...HECK POWER H N LG FG To the FG terminal on the mount base Twisted pair cable 100 m or less LQV000 100 to 120 VAC 50 60 Hz LQV100 100 to 120 VAC 50 60 Hz To the terminal block used as a single point for LG LQV020 24 VDC LQV200 200 to 240 VAC 50 60 Hz 100 to 110 VDC 5 5 Wiring for External Input Output Signals REQUIREMENT A surge voltage may cause hardware units to malfunction or to be damaged When ...

Страница 62: ... 0 5 A 100 VDC 0 1 A AC power supply Surge eliminating circuit Coil load Fuse Fuse R Load impedance 100 VAC Twisted pair cable PCs OK COM CPU RUN 5 5 2 Wiring for the RI O STOP and RUN STOP signals HITACHI S10mini LQP000 LADDER MODE PROTECT RESET STOP RUN SIMU NORM OFF ON CPU S RI O STOP CPU STOP RUN A1 A1 A2 A2 A3 A3 A3 Input switch circuits Fuse 12 to 24 VDC Twisted pair cable 100 m or less Fuse...

Страница 63: ...For details see 5 6 3 Setting terminating resistors If the remote I O cable is connected improperly communication may fail Connect the remote I O cable as specified For details see 5 6 1 Examples of improper wiring After the remote I O cable is connected set the CPU module and remote I O station module as described in 6 SETTINGS Ground to a single point the shield terminals of all remote I O cable...

Страница 64: ...it CPU unit I O unit CPU unit I O unit I O unit I O unit I O unit I O unit I O unit CPU unit I O unit I O unit CPU unit I O unit I O unit CPU unit I O unit I O unit I O unit I O unit I O unit RI O 2 1 RI O 2 1 RI O 2 1 RI O Port 1 1 2 RI O 1 2 RI O 1 2 RI O 1 2 RI O 1 2 RI O 1 2 RI O 1 2 RI O 1 2 RI O 1 2 RI O 1 2 RI O 1 2 RI O 1 2 RI O 1 2 RI O 1 2 TB TB TB TB RI O 1 2 RI O 1 2 Only up to 12 I O ...

Страница 65: ...I O 1 LQS000 HITACHI HSC 1000 RI O A A4 B A5 SHD A6 RI O 1 A B5 B B6 SHD B7 RI O 2 Setting for termination with a 150 Ω resistor CPU module RI O 1 Terminated with a 100 Ω resistor RI O 2 Terminated with a 150 Ω resistor Setting for termination with a 100 Ω resistor RI O 1 RI O cable 100 m or less CO SPEV SB 1P 100 Ω Setting for termination with a 150 Ω resistor RI O station module not terminated R...

Страница 66: ... RI O 1 side On the RI O 1 side R Characteristic impedance of the remote I O cable A B Tighten the terminal together with the signal cable A Tighten the terminal together with the signal cable A Tighten the terminal together with the signal cable Terminate those ports to which the remote I O cable is not connected R Characteristic impedance of the remote I O cable A B Tighten the terminal together...

Страница 67: ... from each other rather than bundle them together REQUIREMENT Before proceeding with power wiring make sure that the power cable does not have a voltage applied to it Attach the terminal cover immediately upon power wiring Damage to the module can result from static electricity Discharge static charges from your body before setting switches connecting or disconnecting the cables or inserting or re...

Страница 68: ...THIS PAGE INTENTIONALLY LEFT BLANK ...

Страница 69: ...6 SETTING ...

Страница 70: ... slot on the mount base Where each of some mounted I O modules occupies a different number of I O points set the largest number of I O points for all other modules DO output status Set this item to RESET or HOLD which is one of the output states of the output module arising in case of an error on a remote I O line If it is set to RESET the output is zeroized or zerofilled If it is set to HOLD the ...

Страница 71: ...en an I O module is mounted in the CPU unit the I O number assigned to the CPU unit is set to 000 I O unit I O unit I O unit I O unit Up to 12 units per line Up to 12 units per line RI O 1 port 1 RI O 2 port 2 2 4 8 RI O1 000 to 3E0 000 to 3C0 000 to 380 RI O2 400 to 7E0 400 to 7C0 400 to 780 If an I O module is mounted in the CPU unit the I O number assigned to the CPU unit is set to 000 When set...

Страница 72: ...0 400 to 780 Number of I O slots on the mount base Range of I O numbers CPU module Jumper plugs 1 FREE FIX 2 HOLD 3 128 I O points 4 64 I O points 5 32 I O points 6 PI O mounting 7 Unused Jumper plug No Jumper plug Connected Not connected Under the factory setting jumper plugs 1 to 6 are connected When any of jumper plugs 3 to 5 is connected the 16 point setting is valid Station number setting As ...

Страница 73: ...s occupied by each slot on the mount base HITACHI S10mini LADDER MODE PROTECT RESET STOP RUN SIMU NORM OFF ON CPU S 1 2 3 4 5 6 7 CPU module Jumper plugs CPU RUN LQP000 NOTE At PI O mounting attach a terminator 150 Ω to those ports to which the remote I O cable is not connected Item to set Setting of jumper plug 6 Connected factory setting Not connected Station number None None I O number 000 to x...

Страница 74: ...n the mount base can be used for an input or output module Each slot is assigned two I O numbers X and Y for both input and output The user can select the I O number corresponding to the I O module to be mounted Since each slot is not restricted to input or output only an input module can be exchanged with an output module or vice versa HITACHI S10mini LADDER MODE PROTECT RESET STOP RUN SIMU NORM ...

Страница 75: ...r an input module and an output module in the following range I O number for an input module I O number for an output module and Each slot of the left half of all the I O module slots is assigned an I O number for an input module in the following range Each slot of the right half of all the I O module slots is assigned an I O number for an output module in the following range X to X Y to Y Merit a...

Страница 76: ...r the 16 point module If the number of I O points is set to 16 the 32 point module is assigned I O numbers for only 16 points HITACHI S10mini LQP000 LADDER MODE PROTECT RESET STOP RUN SIMU NORM OFF ON CPU S 1 2 3 4 5 6 7 LQS000 HITACHI HSC 1000 RI O U ST NO RI O Terminal block RI O station module Connected Connected Connected Connected Not connected Not connected Connected Connected 16 32 64 128 C...

Страница 77: ...e 2 Example 1 I O numbers assigned and number of points occupied when the first I O number is 000 and the partition status is set to FREE 0 000 to 00F 1 010 to 01F 2 020 to 02F 3 030 to 03F 4 040 to 04F 5 050 to 05F 6 060 to 06F 7 070 to 07F 0 000 to 00F 1 010 to 01F 16 0 000 to 01F 1 020 to 03F 2 040 to 05F 3 060 to 07F 0 000 to 01F 1 020 to 03F 2 040 to 05F 3 060 to 07F 4 080 to 09F 5 0A0 to 0BF...

Страница 78: ...0 to X07F 1 X080 to X0FF 2 X100 to X17F 3 X180 to X1FF 4 Y000 to Y07F 5 Y080 to Y0FF 6 Y100 to Y17F 7 Y180 to Y1FF 0 X000 to X07F 1 Y000 to Y07F 128 16 32 64 128 Number of I O points 0 X000 to X00F 1 X010 to X01F 2 Y000 to Y00F 3 Y010 to Y01F CPU PS CPU PS CPU PS CPU PS FREE FIX Input or output modules in all I O slots Input modules in the I O slots of the left half Output modules in the I O slots...

Страница 79: ...ECT RESET STOP RUN SIMU NORM OFF ON CPU S 1 2 3 4 5 6 7 Jumper plugs CPU module LQS000 HITACHI HSC 1000 RI O U ST NO RI O Terminal block A2 A3 Zero Output when RESET is set Output when HOLD is set Break The cause of the error is corrected Connected RESET Not connected HOLD Item to set Not connected RESET Connected HOLD Item to set A2 COM A3 HOLD Factory setting Duration during which the remote I O...

Страница 80: ...te I O station module U 0 0 0 L 0 1 2 000 010 020 RI O1 RI O2 2 U L ST NO U First digit L Second digit I O number Channel Setting of ST NO First I O number 1 Remarks Last starting I O number making all eight slots of 8 slot mount base usable Last starting I O number making all four slots of 4 slot mount base usable Last starting I O number making the two slots of 2 slot mount base usable 400 410 4...

Страница 81: ...50 to 05F 3 060 to 06F 4 070 to 07F PS ST NO 00 U 0 L 0 ST NO 02 U 0 L 2 ST NO 04 U 0 L 4 ST NO 40 U 4 L 0 ST NO 42 U 4 L 2 RI O 1 RI O 2 Station number CPU unit 2 slots 16 point modules Slot number I O numbers In practice each number listed here is prefixed with one of the letters X or Y X000 to X00F Y000 to Y00F I O unit 2 slots 16 points FREE I O unit 2 slots 16 points FREE I O unit 8 slots 16 ...

Страница 82: ...t contains memory take care so that duplication will not occur The table below shows the memory areas usable in the extension memory module for each CPU CPU Memory area in the CPU Usable memory areas in the extension memory module LQP000 None 100000 to 4FFFFF LQP010 100000 to 1FFFFF 200000 to 4FFFFF LQP011 100000 to 1FFFFF 200000 to 4FFFFF LQP120 100000 to 2FFFF 300000 to 4FFFFF NOTE When mounting...

Страница 83: ...KB 3 00000 to 3FFFF 256 KB 4 00000 to 4FFFF 320 KB 5 00000 to 5FFFF 384 KB 6 00000 to 6FFFF 448 KB 7 00000 to 7FFFF 512 KB 8 00000 to 8FFFF 576 KB 9 00000 to 9FFFF 640 KB A 00000 to AFFFF 704 KB B 00000 to BFFFF 768 KB C 00000 to CFFFF 832 KB D 00000 to DFFFF 896 KB E 00000 to EFFFF 960 KB F 00000 to FFFFF 1024 KB An asterisk in an address in the area to be write protected indicates a value set du...

Страница 84: ...THIS PAGE INTENTIONALLY LEFT BLANK ...

Страница 85: ...7 OPERATION PROCEDURES ...

Страница 86: ...lication task too needs to be loaded only when you run the programmable controller for the first time If the application task has to be reloaded for reasons such as remaking to the programmable controller abort all existing tasks and then reload the application task Tasks are running even when the CPU key switch is in the STOP position as indicated in the table below Rewriting a running task may r...

Страница 87: ...ch on the power module When the CPU starts up normally the following indications are provided The operation LED on the power module lights The indicator on the CPU module displays the operation status of the CPU HITACHI S10mini LQP000 LADDER MODE PROTECT RESET STOP RUN SIMU NORM OFF ON CPU operation switch LADDER Mode switch MODE Protection switch PROTECT CPU STOP Note Immediately after power up t...

Страница 88: ...d down the RESET switch for one second Note Do not press the RESET switch hard CPU status During resetting The indicator displays nothing The program and remote I O transfer stop After resetting The I O registers X and Y and internal registers identified by other letters are cleared However the keep relay K counter C or fixed constant D register is not cleared The CPU starts according to the setti...

Страница 89: ...itch cannot protect optional extension memory For details see PROTECT switch in 7 2 7 PROTECT OFF mode 7 2 7 PROTECT OFF mode Setting Set the PROTECT switch to OFF CPU status Tasks can rewrite all memory areas When changing the setting of the timer one shot coil or counter set the PROTECT switch to OFF HITACHI S10mini LQP000 LADDER MODE PROTECT RESET STOP RUN SIMU NORM OFF ON CPU RUN HITACHI S10mi...

Страница 90: ...protected A B A The values of the LPET DW T U and C registers are included B The values of the UFET PRET T U and C registers are included Extension memory To protect extension memory operate the write protect switch on the extension memory module LQM000 However the extension memory in the CPU module cannot be protected For details see 6 4 Setting an Extension Memory Module Protection error With th...

Страница 91: ...8 EXPLANATION OF OPERATION ...

Страница 92: ... equal to the sequence cycle time Upon completion of processing by the ladder diagram program it waits until the next start time comes This method is used for integration differential and other operations Repeated start If the specified sequence cycle time is shorter than the processing time taken by the ladder diagram program the sequence cycle time is used only for the first start Then the ladde...

Страница 93: ... within the sequence cycle time X000 R000 R001 R002 R000 R001 X000 R000 R001 R002 Sequence cycle time Incorrect ladder diagram program example Suppose that processing is programmed in such a way that the conditions to start that processing are checked after it is actually started The program requires three sequence cycles until the processing is started This wastes two sequence cycle When the exec...

Страница 94: ...t operation Conditions to stop operation F F XW100 XW110 YW040 XW100 XW110 YW040 8 1 4 When to start execution When to start execution of an arithmetic function can be set using the rising or falling edge of a signal Which of the rising and falling edges of a signal to use is determined by the direction of the arrow indicated by the edge detector V000 shown below Operation starts when X000 changes...

Страница 95: ...sabled ON ON Disabled ON OFF STOP NORM Enabled ON OFF STOP SIMU Enabled ON OFF RUN NORM Enabled ON OFF RUN SIMU Disabled 8 2 2 Output mode setting for use in case of a stop of remote I O transfer When an error occurs during remote I O transfer the output from the output module can be zeroized or held at the value immediately before the transfer stopped For details of holding the previous value see...

Страница 96: ...O MODULE manual number SME 1 114 2 Remote I O transfer time The remote I O transfer time is taken for data transfer on the remote I O line That time varies with the specified number of I O points 512 points About 5 ms 1024 points About 10 ms 1536 points About 16 ms 2048 points About 21 ms 3 Ladder processing time The ladder processing time is taken by the ladder diagram program for processing That...

Страница 97: ... 1 Time registers The time registers store information on the year month day hours minutes and seconds To set a time set such information in these registers in binary format MSB 215 28 27 20 LSB SW280 Unused Seconds SW290 Unused Minutes SW2A0 Unused Hours SW2B0 Unused Day SW2C0 Unused Month SW2D0 Year SW2E0 Unused Day of the week Notes on setting a time Enter the day of the week using a number 1 f...

Страница 98: ... control register The clock starts from the set time Set 0s in both S201 and S202 of the time control register The clock returns to ordinary operating condition 3 Time display control register The time display control register is used to set the format in which time is displayed in the indicator The bit assignment of the register is shown below MSB 215 20 LSB SW210 1 0 1 0 1 0 Unused S212 Month da...

Страница 99: ...000 SW200 1 FW100 7 SW280 2 H6000 SW200 3 0 SW200 4 F F F F S R S200 Procedure 1 When X000 is turned on the program sets S201 to 1 2 The program moves the clock information seconds minutes hours day month year and day of the week stored in F registers FW100 to FW106 in advance to time registers SW280 to SW2E0 3 The program sets S202 to 1 4 The program sets both S201 and S202 to 0 F registers Time ...

Страница 100: ...on April June September or November 30 When this date and time is set it is updated to 31 of that month April 30 April 31 23 59 59 on February 28 in a common year When this date and time is set it is updated to February 29 February 28 February 29 23 59 59 on February 28 in a leap year When this date and time is set it is updated to March 1 February 28 March 1 8 4 5 Clock precision The clock precis...

Страница 101: ...ized Zeroized Started Started Paused Paused CU Up down counter CD Zeroized Held CR CO Global link register G Zeroized G input after zeroizing G input G output G input G output G input G input NM Nesting coil NZ Zeroized Zeroized NO Process register P Zeroized Zeroized Event register E Zeroized Zeroized Edge contact V Zeroized Zeroized Z register Z Zeroized Zeroized System register S The condition ...

Страница 102: ... FL NET LQE000 LQE500 2 Mounted starting with the leftmost position CPU link LQE050 LQE550 2 Mounted starting with the leftmost position RS 232C LQE160 LQE560 2 7 Mounted starting with the leftmost position RS 422 LQE165 LQE565 2 7 Mounted starting with the leftmost position J NET LQE040 LQE540 2 6 Mounted starting with the leftmost position J NET INT LQE045 LQE545 2 6 Mounted starting with the le...

Страница 103: ...points is limited by the ambient temperature and the load current 6 Up to two modules of LQE040 LQE540 LQE045 LQE545 LQE046 LQE546 can be mounted per CPU Set either module as main the other as subordinate 7 Up to two modules of LQE160 LQE560 LQE165 LQE565 can be mounted per CPU In this case the channel setting must be unique 8 Up to four modules of LQE170 LQE570 LQE175 LQE575 can be mounted per CP...

Страница 104: ...current consumption of it is less than output current LQV200 has no restriction to be used When ambient temperature is 55 C the maximum output current is 7 0 A 0 10 20 30 40 50 60 0 1 1 0 2 0 3 0 4 0 5 0 6 0 7 0 8 0 When the ambient temperature is 48 C or below the maximum output current is 7 0 A When the ambient temperature is 55 C the maximum output current is 5 85 A Output current A Ambient tem...

Страница 105: ...21 725 mA or less SD LINK LQE030 LQE530 1160 mA or less J NET LQE040 LQE540 820 mA or less J NET INT LQE045 LQE545 820 mA or less IR LINK LQE046 LQE546 820 mA or less CPU LINK LQE050 LQE550 445 mA or less RS 232C LQE160 LQE560 410 mA or less RS 422 LQE165 LQE565 420 mA or less D NET LQE170 LQE570 510 mA or less D NET power supplied from on extenal source LQE175 LQE575 460 mA or less When designing...

Страница 106: ...ss LQY140 400 mA or less LQY150 800 mA or less LQY160 320 mA or less LQY170 320 mA or less LQY200 120 mA or less LQY300 260 mA or less LQY310 260 mA or less LQY350 400 mA or less Digital output modules LQY360 400 mA or less Digital I O modules LQZ300 300 mA or less LQA000 500 mA or less LQA100 500 mA or less Analog input modules LQA200 500 mA or less LQA500 500 mA or less LQA600 500 mA or less Ana...

Страница 107: ... 5 years LQP010 Internal memory 1 MB D to E LQP011 Internal memory 1 MB E to F 30 000 h 3 4 years LQP120 Internal memory 2 MB B to C 29 000 h 3 3 years 28 000 h 3 1 years 27 000 h 3 years LQP000 No internal memory F 22 000 h 2 5 years LQP010 Internal memory 1 MB F LQP011 Internal memory 1 MB G 21 000 h 2 3 years LQP120 Internal memory 2 MB D 20 000 h 2 2 years 19 000 h 2 1 years 18 000 h 2 years L...

Страница 108: ...p guaranteed time The life expectancy of the lithium battery may decrease and leakage may occur depending on the environment Replace the battery if you have used it in five to six years even if it has not reached the backup guaranteed time under the use of high temperature and humidity Replace the lithium battery within three minutes after removing the battery connector The memory data is backed u...

Страница 109: ...e program error Unknown data OS program error or C mode program error CPU DOWN CPU error that stops CPU operation ROM IDLE Error in memory for the OS program ILG INST Illegal instruction exception occurred INV INT Invalid interrupt occurred OS PTY Parity error in memory for the OS program SMD INVL Illegal instruction detected by a ladder program SMD PTY Parity error in memory for the ladder progra...

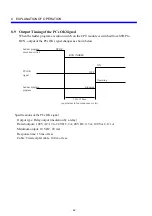
Страница 110: ...elow RUN NORM STOP OFF ON Ladder program execution switch PCs OK signal Ladder diagram program 90 to 120 ms equivalent to four sequence cycles Stopping Operating Specifications of the PCs OK signal Output type Relay output insulation by a relay Rated outputs 100 VAC 12 to 24 VDC 2A 48 VDC 0 5 A 100 VAC 0 1 A Minimum output 10 VDC 20 mA Response time 15 ms or less Cable Twisted pair cable 100 m or ...

Страница 111: ...9 MAINTENANCE ...

Страница 112: ...er there is an abnormal condition Mounting screws and screws on the terminal blocks Check the screws that secure modules the screws on the terminal blocks and other screws for looseness If loose screws are found re tighten them Loose screws may cause the system to malfunction At worst circuits may be burnt due to excessive heat Cable sheaths Check the cable sheaths to see if they are not heated or...

Страница 113: ...he power supply module from the voltage measured at the SERVICE CHECK terminals shown below For the operating power supply voltage of each module and the voltage of the external power supply see the manual supplied with the module PS LQV000 POWER ON OFF H N LG FG AC100 120V INPUT DC5V GND SERVICE CHECK POWER SERVICE CHECK terminals CAUTION Even if the input voltage of the power supply module falls...

Страница 114: ... in a system in which the relay opens and closes frequently or either the output voltage or the power current is high 20 30 50 100 200 300 500 1000 2000 10 0 02 0 05 0 1 0 2 0 3 0 5 1 0 2 0 Load current A The L load includes surge current Number of times unit ten thousand 24 VDC R load 110 VDC L load L R 7 ms 220 VAC L load COSφ 0 4 120 VAC L load COSφ 0 4 120 VAC R load 24 VDC L load L R 7 ms 110...

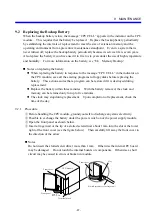
Страница 115: ...tion assures that a program can be restored if it is destroyed during replacement Replace the battery within three minutes With the battery removed the clock and memory can be retained only for up to five minutes The clock may stop during replacement Upon completion of replacement check the time of the day 9 2 1 Procedure Before handling the CPU module ground yourself to discharge any static elect...

Страница 116: ...n the left figure below in the direction of the arrow Insert the new battery ER6T 3WK41 Z along the guide rails installed on the left side in the CPU module see the right figure below Insert the battery connector into the plug on the CPU board Check the time of the day If it is incorrect set the correct time again Notes If the battery connector is disconnected or poorly connected backup data may b...

Страница 117: ...y in the vessel In general batteries having an offensive odor must be handled individually 2 Place of collection Collect used batteries in place where There is no fire near them There is no dangerous thing as stated by the fire protection law near them They are not wetted by rain or water 3 Packing Take action so that used batteries are not disordered during transportation For instance insert foam...

Страница 118: ... the battery is handled improperly it may catch fire or explode Some used batteries may still have a considerable amount of charge To deliver such used batteries to a waste disposal site safely follow the general rules for collection packing and transportation For concrete methods of packing and transportation consult with professionals of your local waste disposal business ...

Страница 119: ...POWER D INPUT LQX100 100 120VAC 0 1 2 3 4 5 6 7 8 9 A B C D E F D INPUT LQX100 100 120VAC 0 1 2 3 4 5 6 7 8 9 A B C D E F CPU unit 2 slot mount base Power indicating LED LEDs Power supply module CPU module DI DO module Indicator PS LQV000 POWER ON OFF H N LG FG AC100 120V DC5V GND SERVICE CHECK POWER D INPUT LQX100 100 120VAC 0 1 2 3 4 5 6 7 8 9 A B C D E F D INPUT LQX100 100 120VAC 0 1 2 3 4 5 6 ...

Страница 120: ...res When the indicator indicates one of the following messages troubleshoot the S10mini by taking action as described for that message Message Action ROM IDLE Hold down the reset switch for at least 20 seconds In case when the CPU is not recovered by the above method clear all the memory by following Clearing all the memory on page 106 NST OVER The nesting level of the ladder diagram program is fi...

Страница 121: ...ists even after the above procedure is performed clear all the memory For information on how to clear the memory see pages 106 through 109 If clearing of the memory does not solve the problem replace the CPU module If is one of the values 10 4F the error is an extension memory parity error Clear all the memory Then if the same error recurs replace the extension memory For information on how to cle...

Страница 122: ...rogram table abnormality detected during initial diagnosis on resetting SMD PERR Ladder program error detected during initial diagnosis on resetting 1 Press the RESET switch on the CPU module 2 Turn on the power switch on the power supply module again If the error condition persists even after the above procedure is performed clear all the memory For information on how to clear the memory see page...

Страница 123: ...e ladder residing in the memory Thus be sure to back up all those necessary items before clearing the memory The optional module can be determined from the EX PTY and EX PRT messages by looking up the table below which shows the relationships between and each optional module Corresponding Optional Module 10 to 4F Extension memory 80 81 CPU link 80 main module 81 submodule 92 93 J NET J NET INT IR ...

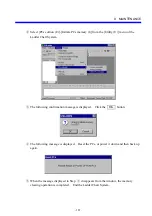
Страница 124: ...operation When the Windows version of the tool and the PCs can both be placed into an online state without being disturbed by errors such as an line error all the memory as described above can be cleared with the PCs memory initialization feature of the Ladder Chart System To accomplish this perform the following procedure Operation on the PCs Put the CPU into the STOP state by operating the Ladde...

Страница 125: ...hart System The following confirmation message is displayed Click the OK button The following message is displayed Reset the PCs or power it down and then back up again When the message displayed in Step disappears from the window the memory clearing operation is completed End the Ladder Chart System ...

Страница 126: ...rocedure Before handling the CPU module ground yourself to discharge any static electricity Turn off the power switch on the power supply module Open the front panel as shown below Insert a finger nail or the tip of a slotted screwdriver about 1 mm into the slot at the lower right of the front cover see the figure below Then carefully lift away the front cover in the direction of the arrow Notes D...

Страница 127: ...in super condenser Use a connector for I O setting as the short circuit connector and make sure to return it to its original position after use Disconnect the short circuit connector for clearing the memory after five minutes of shorting Make sure that the short circuit connector is removed before inserting the battery connector and replace the front cover Turn on the power supply Check that no er...

Страница 128: ...THIS PAGE INTENTIONALLY LEFT BLANK ...

Страница 129: ...10 SPECIFICATIONS ...

Страница 130: ...0 Hz 5 HZ LQV000 85 to 132 VAC 85 to 132 VAC LQV100 85 to 132 VDC LQV020 20 4 to 28 8 VDC Allowable power supply voltage fluctuation LQV200 170 to 264 VAC LQV000 10 ms or less 10 ms or less on AC input LQV100 5 ms or less on DC input LQV020 5 ms or less Allowable outage time LQV200 10 ms or less Applicable to rated input LQV000 80 VA maximum 80 VA maximum on AC input 100 VAC input maximum load LQV...

Страница 131: ...nternal Keep relay K 512 points features Time T Number of points 512 points Type On delay Setting 0 1 to 999 9 s One shot U Number of points 256 points Type One shot multivibrator Setting 0 1 to 999 9 s Counter C Number of points 256 points Type Up down Setting 1 to 9999 Global link register G 4096 points Link between CPUs Nesting coil N 256 points Either master control or zone control can be sele...

Страница 132: ...or 150 or 100 Ω Total cable length 300 m External PCs OK Output form Relay output insulation by relay input output Output ratings 100 VAC 12 to 24 VDC 2 A 48 VDC 0 5 A 100 VDC 0 1 A Minimum output 12 VDC 20 mA Response time 15 ms or less Cable Twisted pair cable 100 ms or less CPU STOP RUN RI O STOP Input form Contact input insulation by optical coupler Rated input 24 VDC 10 mA 12 VDC 5 mA Input v...

Отзывы: