background image

30 

P5416904

Maintenance Mode  

Management Mode


Control Mode

10

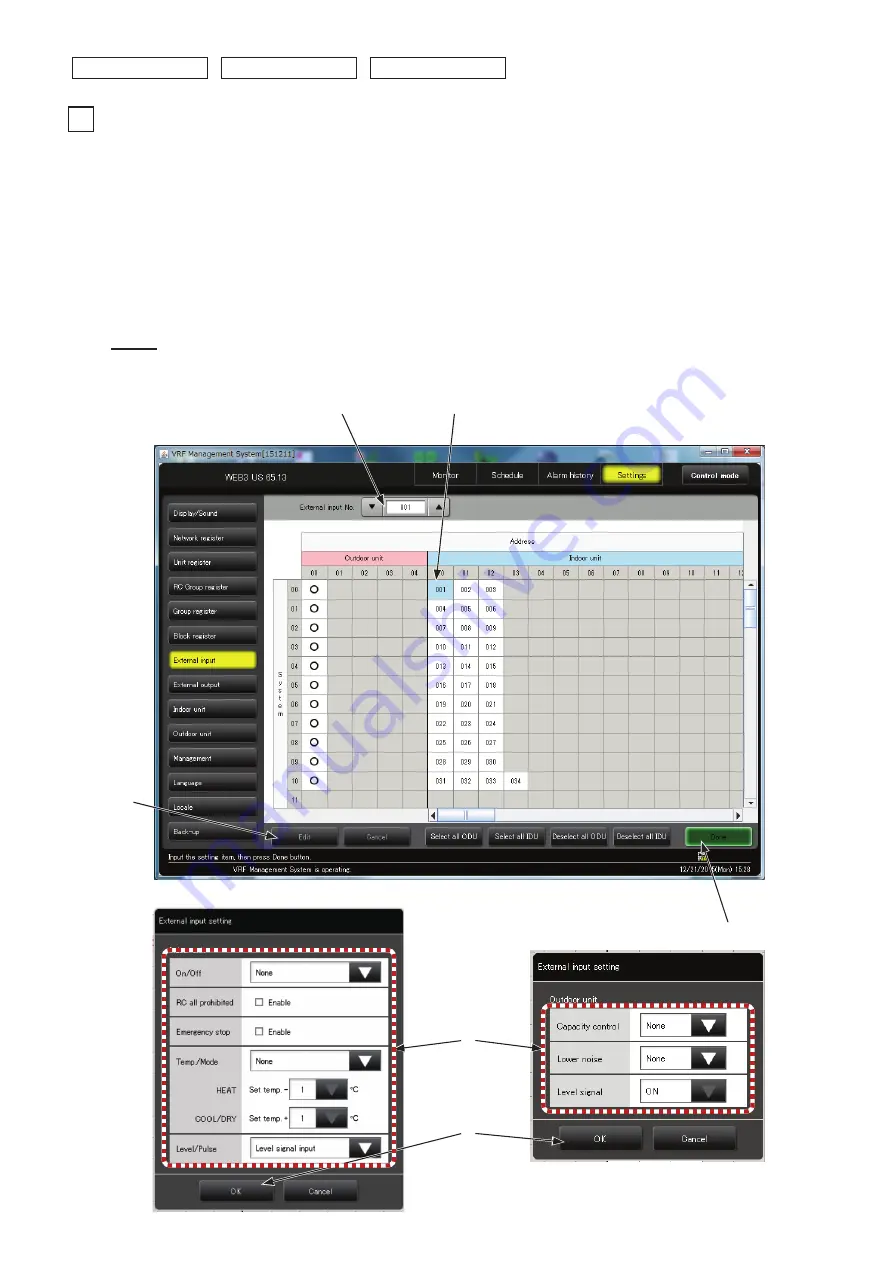
External input setting 

< This item is not required but set if necessary for install location. >

■ Click on [Settings] then [External input].

(1)   External input (Indoor unit - Outdour unit)

1. Select the External input No.. (1 is for the highest priority and 8 is for the lowest priority)

2. Select the unit.

3. Click on [Edit].

4. Modify the setting.

5. Click on [OK].


• When registering multiple External Input, repeat the steps 1 to 5.

6. Click on [Done].

NOTE:

1. To cancel the setting, click on [Cancel] after selecting the unit and then click on [Done].

2. When multiple units are selected at the same time, the setting value of the smallest unit is indicated.

Содержание PSC-A128WEB3

Страница 1: ...IMPORTANT READ AND UNDERSTAND THIS MANUAL BEFORE USING THIS WEB ENABLED CENTRAL CONTROLLER KEEP THIS MANUAL FOR FUTURE REFERENCE Operation Manual VRF MANAGEMENT SYSTEM WEB ENABLED CENTRAL CONTROLLER PSC A128WEB3 ...

Страница 2: ...ter 24 6 Remote Control Group Group Block 26 7 RC group register 27 8 Group register 28 9 Block register 29 10 External input setting 30 11 External output setting 34 12 Indoor unit setting 35 13 Outdoor unit setting 37 14 Management setting 38 15 Locale setting 39 16 Backup method 40 17 Configuration for Connection with a Computer 42 18 Add Modify Air conditioner 43 OPERATING Monitor 1 Monitor 46...

Страница 3: ...or replacement parts HITACHI will not assume any liability for injuries or damage caused by not following steps outlined or described in this manual Unauthorized modifications to HITACHI products are prohibited as they May create hazards which could result in death serious injury or equipment damage Will void product warranties May invalidate product regulatory certifications May violate OSHA stan...

Страница 4: ...e potential for communication errors When shielded cabling is applied proper bonding and termination of the cable shield is required as per HITACHI guidelines Plenum and riser ratings for communication cables must be considered per application and local code requirements The polarity of the input terminals is important so be sure to match the polarity when using contacts that have polarity Highly ...

Страница 5: ...n management of the Air Conditioning Unit When performing a Backup for the Remote Control setting system setting and schedule setting please check the Initial Setting of 16 Backup method page 40 OPERATING Please see Monitor page 46 when the operation status of the air conditioning unit is checked or operated via the system Please see Schedule page 53 when the air conditioning unit is operated by S...

Страница 6: ...ller used in combinations 2 3 PSC A128WX2 PSC A64S PSC A16RS PSC A32MN NOTE When connecting the facility unit with control and monitor using the External Input Output function refrigerant systems 62 and 63 cannot be used 1 The number for total equipment is the total of Outdoor unit Indoor unit Central Controller and facility unit which performs controlling and monitoring by using Input Output func...

Страница 7: ...of the AC and so need to be updated periodically The computer is not included in this package The costs such as data transfer work depending on this computer and failures are not included in this product When the entire AC system does not operate correctly perform control again if needed after recovery When alarm 60 61 64 or 65 is generated because the communication error between each AC and this ...

Страница 8: ...sary 5 Unit register Page 24 6 Remote Control Group Group Block Page 26 7 RC Group register Page 27 8 Group register Page 28 9 Block register Page 29 10 External input setting Page 30 11 External output setting Page 34 12 Indoor unit setting Page 35 13 Outdoor unit setting Page 37 14 Management setting Page 38 15 Locale setting Page 39 16 Backup method Page 40 Other Setting 17 Configuration for Co...

Страница 9: ...emote PCs tablets to one PSC A128WEB3 4 It is recommended to connect no more than three 3 PSC A128WEB3 adapters to a single remote PC tablet When utilizing PSC A128WEB3 from plural computers unify all the settings of time time zone and DST System Configuration 2nd device 3rd device Internet External input points Up to 8 External output points Up to 3 Indoor unit Indoor unit Indoor unit Outdoor uni...

Страница 10: ...em are either registered trademarks or trademarks of Microsoft Corporation in the United States and or other countries Oracle and Java are registered trademarks of Oracle and or its affiliates Other names may be trademarks of their respective owners 2 If there are two or three connected units Item Specifications OS Windows 7 Home Premium 32bit 64bit Windows 7 Professional 32bit 64bit Windows 7 Ult...

Страница 11: ...ect Network and Sharing Center 5 Select Change adapter setting 6 Right click Local Area Connection and select Properties 7 Select Properties of Internet Protocol Version 4 TCP IPv4 8 Modify the value within the dashed line indicated in the chart on the right and Click on OK Windows 8 1 Indicate the menu on the right side of the screen 2 Select Setting 3 Select Control Panel 4 Change View by on the...

Страница 12: ...ites on the bottom right of Local intranet 4 Select Advanced on Local intranet screen 5 Enter the Address of this unit initial setting is http 192 168 0 3 in Add the website to the zone In case of modifying IP Address change to http new IP Address then perform settings 6 Click on Add button 7 Check if the Address entered in 6 is added in Websites If so click on Close button 8 Click OK to all the s...

Страница 13: ...nd press Enter Insert a space between hwclock and w 7 Enable Telnet Client Windows 7 1 Select Start 2 Select Control Panel 3 Change View by on the top right in Small Icon 4 Select Program and Features 5 Select Turn Windows features on or off 6 Check Telnet Client 7 Click on OK Windows 8 1 Indicate the menu on the right side of the screen 2 Select Setting 3 Select Control Panel 4 Change View by on ...

Страница 14: ...t Start 2 Select Control panel 3 Change Display on the top right in Small Icon 4 Select Program and Function 5 If Java x Update xx is installed uninstall it Windows 8 1 Indicate the menu on the right side of the screen 2 Select Setting 3 Select Control panel 4 Change Display on the top right in Small Icon 5 Select Program and Function 6 If Java x Update xx is installed uninstall it NOTE The displa...

Страница 15: ...f the PSC A128WEB3 from the client computer Install the software Enter the PSC A128WEB3 s assigned IP address into the address bar of the browser Input the address http 192 168 0 3 csnet download_us html please 2 Select Install Required Software 3 Select Run 4 Select Yes ...

Страница 16: ...14 P5416904 5 Select Install 6 Select Close ...

Страница 17: ...lay on the top right in Small Icon 4 Select Java 5 Select Update 6 Uncheck Check for Updates Automatically 7 Click on Never Check on the Warning Pop up 8 Click on Apply Windows 8 1 Indicate the menu on the right side of the screen 2 Select Setting 3 Select Control panel 4 Change Display on the top right in Small Icon 5 Select Java 6 Select Update 7 Uncheck Check for Updates Automatically 8 Click o...

Страница 18: ...m this publisher then select Run 10 Management application will start NOTICE When using Multi Display Environment display the management environment on the main screen If another screen is displayed the pop up will be indicated in the other screen ...

Страница 19: ... open when the computer is started After accessing the main page of this unit when a pop up is indicated as below 1 Select then Save as and save it where needed 2 Select Start then All Programs then Startup Select Open 3 Copy the file saved in 1 above in the opened folder 4 Re start the computer and check if the management application start automatically ...

Страница 20: ...he added favorite and select copy 3 Select Start then All Programs then Startup Select Open 4 Paste the copied favorite in the opened folder 5 Re start the computer and check if the management application start automatically NOTE If the IP address of this unit is modified perform the setting again for the auto start for Management Application ...

Страница 21: ... plural computers unify all settings of language If choosing to keep registered name data some characters depending on locale and language may not be displayed correctly When choosing to delete registered data the followings will be deleted Names of IDU Schedule operating pattern Specific day Information about RC Group Group and Block 2 Choose to keep registered name data or to delete registered d...

Страница 22: ...ly 00 for this unit 4 External Output No during Signal Output Example of Information Pop up display 2 Display Size Select the size of the screen 3 Modification of Time on the Monitor screen Select the modification time of the monitor When there is a connection other than 1 computer for 1 unit set at 1 minute or more 4 Alarm sound When the alarm is generated select the number of times it will be so...

Страница 23: ...ble disable the password when selecting Control mode page 38 Maintenance mode Only the person in charge of maintenance can use this mode Monitoring Alarm History and Schedule can be used without restriction Select the management and enter the password cs netweb Control mode and operation setting comparative chart Used Not Used Control Mode Operation Setting Monitoring Mode Control Mode Management ...

Страница 24: ...ntrol mode 1 Click on Control mode 2 Select the control mode 3 Click on OK For each of the following sections the configurable mode will be indicated by Maintenance Mode Management Mode Control Mode and Monitoring Mode ...

Страница 25: ...efault gateway 2 Click on Done 3 The notification window will appear asking to re connect 3 minutes or more Click on OK 4 The Management application is completed 5 It reconnects to this unit after 3 minutes or more The initial value of this unit is indicated in the chart on the right NOTICE The Adapter name is written using alphanumeric characters Special characters cannot be used The maximum limi...

Страница 26: ...nge 6 Select the unit icon 7 Click on OK 8 Click on Done NOTE When performing changes or corrections to the structure of the unit or the RC click on Check connection and recheck the unit When checking the connection uninstall the other central controllers and after the checking is completed connect them again Also do not access from a computer other than the one used to check the connection Do not...

Страница 27: ...ange then select the unit icon 9 Click on Done NOTICE The unit name is written using alphanumeric characters Special characters cannot be used The maximum limit for the Adapter name is 16 characters NOTICE Total Heat Exchanger One Refrigerant system is used for 1 Total Heat Exchanger Up to 64 exchangers can be connected to this unit Also this refrigerant system cannot be connected to another air c...

Страница 28: ...units all units within that RC group will be in control of the same command content If a change is made from the system to a unit that belongs to an RC group the change will affect all units in that same RC group To control indoor units the system sends control commands only to a single main unit main control that represents the RC group When the main control registers the RC group this unit is au...

Страница 29: ...eps 1 to 4 5 Click on Done NOTE To cancel the RC Group registration click on Cancel after selecting the unit and then click on Done NOTE Always perform an RC group register for Indoor units connected When the Register content of the RC Group and the actual RC Group do not match because the control is impossible perform wiring properly An indoor unit without a local zone controller is counted as on...

Страница 30: ...gister 1 Group register Unit Facility Unit 1 Select RC Group 2 Click on Edit 3 Select the Group No 4 Enter the Group name 16 characters max 5 Click on Change and select the Group icon 6 Click on OK When registering multiple Groups repeat the steps 1 to 6 7 Click on Done NOTE To cancel the Group registration click on Cancel after selecting the unit and then click on Done NOTE To modify the Group al...

Страница 31: ...he Block name 16 characters max 5 Click on Change and select the Block icon 6 Click on OK When registering multiple Blocks repeat the steps 1 to 6 7 Click on Done NOTE To cancel the Block registration click on Cancel after selecting the unit and then click on Done The Block name is written using alphanumeric characters Special characters cannot be used The maximum limit for the Block name is 16 ch...

Страница 32: ...elect the External input No 1 is for the highest priority and 8 is for the lowest priority 2 Select the unit 3 Click on Edit 4 Modify the setting 5 Click on OK When registering multiple External Input repeat the steps 1 to 5 6 Click on Done NOTE 1 To cancel the setting click on Cancel after selecting the unit and then click on Done 2 When multiple units are selected at the same time the setting va...

Страница 33: ...ses 1 Whenever the external input condition changed while the adapter and AC devices were OFF 2 Whenever the POWER to the adapter or AC device is OFF then ON while in external input processing 3 Whenever the condition of the external input changes during a communication error between the adapter and the AC device alarm 60 61 64 or 65 is activated 4 When a communication error between the adapter an...

Страница 34: ...onsumption is lowered when any subsequent control is manually overriden externally The Mode switch is a function command to stop when it is in Heat mode and to switch over to Fan mode when in any other Operation Mode than Heat The Temp switch is a function used to set Set temp X C when in Heat mode and Y C when in any other Operation Mode than in Heat However the Temperature Switch doesn t operate...

Страница 35: ...nated percent of level of energy consumption The setting takes effect within around 15 minutes after external input is entered Even if the capacity control performs at 0 because the standby power consumption is generated the consumption of power cannot amount to zero 0 The symbol indicates that standby power consumption is a power used when an AC unit has stopped running and to prepare for the nex...

Страница 36: ...er selecting the unit and then click on Done 2 When changing the setting of the system alarm click on Edit without selecting any Indoor unit 3 When multiple units are selected at the same time the setting value of the smallest unit is indicated NOTE Operation Output If it is done during the Operation setting it will be subject to the Output For example even in Alarm state if it is during the Opera...

Страница 37: ...l not function Click on Settings then Indoor unit 1 Indoor unit setting 1 Select the Indoor unit 2 Click on Edit 3 Change the setting 4 Click on OK When checking the content of the function it is available in Function Description When registering multiple Indoor units repeat the steps 1 to 4 5 Click on Done NOTE 1 In case the setting is restored in the Factory state click on Initialization 2 When ...

Страница 38: ...ble AUTO set the mode of the unit selecting a mode other than AUTO NOTE Reset again when the control board or remote controller needs to be replaced When multiple central devices are in use ensure that these items are set from this system When setting item b8 is set AUTO perform the same setting from the Central Controller which is used at the same time When using RC control prohibited do not set ...

Страница 39: ...se function is set also check the box for Capacity Control There is a possibility that the capacity control function will not work correctly if an outdoor unit which cannot support the Lower Noise function is set to Lower noise Both Capacity Control and Lower Noise functions will take effect 15 minutes after being set NOTICE Only Capacity Control and Lower Noise of the Outdoor unit can be set from...

Страница 40: ...ontrol Mode To select the item used in Control from Mode Switch 7 Operation when doing a Filter Sign Reset During this operation it is used to Reset also an Indoor Unit where there is no Filter Sign or Reset only an Indoor Unit where there is a filter Sign Filter sign is what happens when the operation time reaches a certain integration time When performing a reset of an Indoor Unit where there is...

Страница 41: ... and time display format 1 Go to Settings Locale 2 Set temperature display format NOTICE If Fahrenheit is chosen temperature switch external input can not be used 3 Set the date and time display format 4 Click Done when all items are set Set the following items as necessary ...

Страница 42: ... adapter and change the 8 pin of the option DSW SW2 to ON Change the setting from 1 pin only ON to 8 pin ON when in Power ON Setting status at shipping Initial value IP Address 192 168 000 003 Subnet Mask 255 255 255 000 Default Getaway 192 168 000 001 5 The 7 Segment LED is indicated as shown on the right 6 Restart this unit Restore the option DSW SW2 to the status 1 pin only ON before initializi...

Страница 43: ...Designate the Backup folder and click to open it 3 Current_Unit dat is created 4 Restore the RC setting 1 Click on Restore button 2 Designate the Backup folder and click to open it 3 The restored data is reflected Do not access with multiple computers when executing restoration Do not change Current_Unit dat If the range possible to control of the unit is changed when executing the backup the rest...

Страница 44: ...e initialization screen If the Schedule screen and the Initialization screen are displayed there may be a situation where the display is normal but the operation cannot be performed This is why it is necessary to have a computer that can be connected to this unit within the LAN 3 Networking security is critical when configuring local communications devices including routers and switches for extern...

Страница 45: ...h the following procedures Click on Settings Unit register 1 Execute the Check connection Do not execute the Check connection when an Alarm is generated Remove the other central controllers to execute the Check connection When the Check connection is completed connect the other central controllers Also do not access from a computer other than the one used to execute the Check connection ...

Страница 46: ...edures for the Check connection are indicated below Click on Check connection Cancel the Check connection Cancel the Check connection Use the registered data and execute the Check connection Cancel the Check connection Cancel the registered data and execute the Check connection 2 Click on Cancel to interrupt the Check connection 3 After the Check connection is completed the Outdoor unit Thermal St...

Страница 47: ...time In addition concerning the following data even if executing the Check connection the setting content is not changing Setting content of the Schedule screen Alarm History Setting content other than setting screen 1 to 4 NOTE In that case even outside the first Test Run the Check connection is always required 1 If the RC of the Indoor unit or cross wiring is installed or removed 2 If the expans...

Страница 48: ...tween Unit Group or Block Detailed panel Indicates the status of the object currently selected Control mode Select between Monitoring Control or Management Filtering Checks the filtering condition Configure filter details Select all Select all objects on the display Control Panel Sets the operation of the selected objects and the lock unlock status of the zone controllers Icon guide Icon legend Of...

Страница 49: ...ithout a local zone controller Restricted operation Icons No Restriction All ON prohibited All OFF prohibited All Operation prohibited Depending on the setting the Air Intake Temperature icon the Ambiant Temperature icon or no icon will be displayed If multiple units are selected in one panel the air intake temperature or the ambient air temperature of the indoor unit with the smallest refrigerant...

Страница 50: ...s are present within 1 Panel such as Group or Block follow the Priority order as below 1 When there is more than one unit generating an Alarm the color for the Alarm is indicated 2 When an alarm is not generated or when there is more than one unit operating the color for ON is indicated Operation Mode Color Setting ON COOL ON HEAT ON DRY ON FAN ON AUTO ON In Multiple Mode Alarm OFF ON With Color L...

Страница 51: ...me and description of the icons To close the Icon guide and return to the Monitor NOTICE The following Icons are indicated in the big Panel Schedule for 1 day OFF All ON prohibited All OFF prohibited All operation prohibited Air Intake Temperature Ambient Temperature Filter Sign Indoor unit without a local zone controller RC Prohibited The following icons will only display when these sequences of ...

Страница 52: ...6904 4 Filtering Check the conditions to filter multiple selections possible To proceed to the conditions checked No filtering even if there is a condition checked To cancel the filtering and return to Monitor ...

Страница 53: ...Select the Louver with 1 to 7 or Auto Select Indoor Schedule with Enable or 1 day OFF Select the FAN speed from 1 to 4 or Auto Select All Prohibited with None ON OFF or ON OFF Select the Operation ON OFF of the Local Remote with Permit or Prohibit Select the Operation Mode of the Local Remote with Permit or Prohibit Select the Fan Speed of the Local Remote with Permit or Prohibit Set Filter Sign R...

Страница 54: ...stem Up to 64 Refrigerant systems can be connected to one unit Other air conditioning units cannot be connected to the Refrigerant system 2 When the following conditions are met the Control or Monitoring shown below are available If the Air Conditioner and the RC are used connected and also in case Air conditioner Ventilation or Ventilation is set by the RC ...

Страница 55: ...Schedule Group Unit Group Group Block Group Block All Upper Lower Standard Season Mon Sun Spec day 1 Spec day 5 Summer Season Mon Sun Spec day 1 Spec day 5 Winter Season Mon Sun Spec day 1 Spec day 5 㻊 It is possible to set the Schedule in 3 seasons Standard season Summer season Winter season in each Group 㻊 It is possible to set the specific day for 5 days in each season Block Unit Unit Unit Outd...

Страница 56: ...elete Delete the Schedule of the cell Spec day setting Set the period of Specific day The Specific Day can be set to 5 patterns every season Summer Winter setting Set the period of Summer season Winter season Change Modify the Schedule of the cell Done Save the modified setting NOTICE Copying and pasting is a method for duplicating the attributes of one to another cell thereby reducing the program...

Страница 57: ...tes the Time set Indicates the Capacity restriction percentage Indicates the Lower Noise Schedule of the Outdoor unit Color of the Schedule panel When ON OFF is set as ON the panel is shown in Green When ON OFF is set as the panel is shown in White When ON OFF is set as OFF the panel is shown in Grey Color of the Schedule panel The Schedule panel is always shown in White NOTICE The status of Louve...

Страница 58: ...n setting multiple Operation patterns repeat steps 2 to 6 7 Click on Done NOTICE It is not possible to set the Indoor unit and the Outdoor unit in 1 Operation pattern at the same time To modify the setting content set the content to change after deleting the desired Operation pattern The status of Louver is not indicated in the Operation panel To check the status of Louver select Edit after select...

Страница 59: ...tting 2 Select the season to set 3 Select the starting date and the ending date to set It is shown in Red for Summer season and in Blue for Winter season 4 Click on OK 5 Verify the period set and click on OK 6 Click on Done NOTE Always check the setting when entering the following year ...

Страница 60: ... patterns 1 Click on Spec day setting 2 Click on Season 3 Select the Specific day to set 4 Select the date to set Multiple selections possible When setting by period click on Setting by period and execute the setting When changing the Specific day name click on Name edit and enter the name up to 16 characters 5 Click on OK 6 Verify the Specific day then click on OK 7 Click on Done ...

Страница 61: ... on the cell number where to set the schedule 4 Click on Change 5 Select the time to set 6 Click on the Operation pattern 7 Click on OK When setting multiple Schedules repeat steps 2 to 6 8 Click on Done NOTE To prevent unexpected or unintended operation do not establish multiple schedule patterns with the same time of day basis ...

Страница 62: ...60 P5416904 Maintenance Mode Management Mode Control Mode 2 Simple setting 1 Setting 1 Click on Simple setting 2 Select the desired Schedule then click on Next ...

Страница 63: ...ings set the indoor unit without modifying the content of the outdoor unit settings will be automatically displayed for all the outdoor unit settings 2 To modify the outdoor unit settings see the outdoor unit without modifying the content of the indoor unit settings will be automatically displayed for all the indoor unit settings It it not possible to modify the settings for both the indoor unit a...

Страница 64: ...62 P5416904 5 Verify the setting then click on Next 6 When setting another Schedule click on Continue setting then click on Exit to quit 7 Click on Done ...

Страница 65: ...dress will be displayed Mode Switch Used to change the page of the Alarm history UP DOWN Print To print out the Alarm History Update To display the latest alarm generated Status Bar When an alarm is generated the status bar is shown in Red and the Unit name Refrigerant system No and Alarm Code are displayed Delete history Used to delete the entire Alarm History NOTE Even when the history is delete...

Страница 66: ...l controller communication error when no indoor units are operating A communication error has occurred on the H LINK between the adapter for this system and the indoor unit Check if the H LINK is properly connected 64 Central controller Outdoor unit communication error when all Indoor units are not operating A communication error has occurred on the H LINK between the adapter for this system and t...

Страница 67: ... the boxes except Save this website data in the favorite 7 Select Cancel Delete the JavaTM Cache following the procedures below Windows 7 1 Click on Start 2 Select Control Panel 3 Change the Display on the rup right in Small icon 4 Select Java 5 Select tab General 6 Select the Settings of Temporary Internet Files 7 Select Delete files 8 Check all the boxes 9 Click on Close to close Java screen Win...

Страница 68: ... screen each time the Management application is set with Updating interval just after being switched by the Local Remote the screen of the Management application may not switch By modifying setting Updating interval it is possible to reduce the period that modifies the screen 4 Connection evaluation time takes too long Verify that the Indoor units are running System connection evaluation time may ...

Страница 69: ...er of the management software Is Stop Signal depending on the External input in the Indoor unit is ON The halt depending on the External Input Signal inputed in the Indoor unit is taking priority Deactivate the External Input Signal Is there a time setting discrepancy between the Unit and the computer The displayed time in the lower right hand corner of the applications user interface should match...

Страница 70: ... RC for 10 seconds afterward Also in case that Control is performed from the Central device do not execute RC operation for 10 seconds 14 Even if operation is done from the Local Remote the Management application display is not switching Check that the update period is not too long for Settings Display Sound setting Updating interval The shortest period that can be set is 15 seconds Check that the...

Страница 71: ...t will change into Group Check the Alarm History 20 Even modifying the Operation Mode the color of the panel does not change and will stay in green when the AC is running Check if the color for operation mode is modified in Settings Display Sound Check the operation mode color in Settings Display Sound 21 There is a wide temperature discrepancy between what is displayed and the actual temperature ...

Страница 72: ...r season It is not possible to set a Specific Day in normal season when the date is set in Summer or Winter season Check the summer winter season setting 24 When setting a Specific Day in summer or winter is not possible because the entire calendar is displayed in grey Is summer winter season set Click on Summer Winter setting to set the season 25 Even though the entire schedule pattern has been p...

Страница 73: ...edule setting again 29 Even after clicking on Connection individual in the RC Group register screen the RC group number is not put in order from the smallest number Check if there is already a unit which has the RC group number registered Cancel the RC group of the unit which has the RC group number already registered Also after clicking on Cancel All registration click on Connection individual bu...

Страница 74: ...t connection Check if the LAN cable is wired correctly and if the HUB and this unit power is turned ON 36 The screen froze Check that there is no error between the computer and this unit connection Check if the LAN cable is wired correctly and if the HUB and this unit power is turned ON 37 When application starts it is indicated in dual screen Check the settings of Internet Explorer Refer to page ...

Страница 75: ... again after canceling settings for emergency stop The control status will display Stop FAN 28 C 1 fan speed and 1 Louver Perform control again if necessary When the Emergency stop is not available 1 Execute Backup of this unit setting in Settings Back up 2 After three minute s time remove the wire from the H LINK adapter 3 Verify that Central Control display has vanished from the Local Remote 4 S...

Страница 76: ...or details Please use the contact form below for any inquiries about obtaining the relevant software modules http www jci hitachi com contact enquiry enquiry form commercial Entities other than Johnson Controls Hitachi Air Conditioning may hold copyrights for these software modules Because these modules are provided free of charge they are provided as is and there is no warranty express or implied...

Отзывы: