61
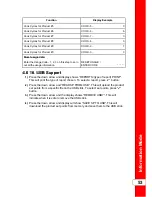
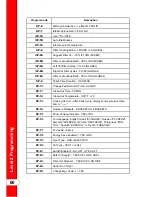
Program Code
Description
S
SP
P--2
26
6
Change Usage Code - 1 = YES
S
SP
P--2
27
7
Dispose Requires Code ? - YES or NO
S
SP
P--2
28
8
Longer Fill Time Enabled - YES or NO
S
SP
P--2
29
9
Let User Exit Fill? - YES or NO
S
SP
P--3
30
0
Skip ‘SKIM’ Prompt? - YES or NO
S
SP
P--3
31
1
2-Stage Wash Enabled? - YES or NO
T
Ta
ab
blle
e 6
6--2
2 S
Sp
pe
ecciia
all P
Prro
og
grra
am
mm
miin
ng
g P
Prro
occe
ed
du
urre
ess
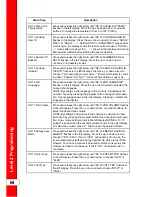
Menu Step
Description
SP-1 Temperature
The left display flashes “SP-1” and “TEMP”, “FORMAT”. Press the up
or down arrow to choose °F or °C.
SP-2 Language
Press and release the right arrow until “SP-2” “LANGUAGE” flashes
on the left display. Press the up or down arrow to select desired
language.
SP-3 System
Initialization
Press and release the right arrow until “SP-3” “DO SYSTEM INTI”
flashes in the display, along with “INIT” on the right display. To reset
the controls to factory default settings, press and hold “✓” button and
controls count down “IN 3”, “IN 2”, “IN 1”. Once the display shows
“-INIT-” and “*DONE*”, the controls are reset to factory defaults.
SP-4 Audio Volume
Press and release the right arrow until “SP-4” “VOLUME” flashes in
the left display. Press the up or down arrow, or product buttons, to ad-
just the speaker volume, 10 being loudest and 1 being the most quiet.
SP-5 Audio Tone
Press and release the right arrow until “SP-5” “TONE” flashes in the
left display. Press the up or down arrow, or product buttons, to adjust
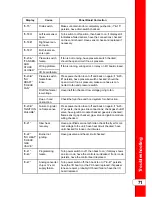
the tone of the speaker, 2000 being the maximum value and 50 being
the minimum.
SP-6 Melt Cycle
Selection
Press and release the right arrow until “SP-6 MELT CYCLE SELECT”
scrolls in the left display. Unless solid oil is being used in the vats, the
right display should show “1.LIQUID”. If solid shortening is used, the
unit must be equipped to handle solid oil. Use the up or down arrow
to change the right display to “2.SOLID”.
SP-7 Idle Mode
Enabled
An Idle Mode allows the oil temperature to drop to a lower tempera-
ture when not in use. This saves on oil and utilities.
Press and release the right arrow until “SP-7” “IDLE MODE EN-
ABLED?” flashes in the left display. Press the up or down arrow to
choose “YES” or “NO”. With “YES” in the display, press the right ar-
row and “SP-7A” “USE ‘0’ FOR IDLE” flashes on the left display.
Press the up or down arrow to select “YES” or “NO”. If “YES” is se-
lected, an Idle Mode can be programmed for product 0. Press the
down arrow and “SP-7B” “AUTOIDLE MINUTES” flashes in the left
display. Press the up or down arrow, or use the product buttons, to
Содержание Wendy's Evolution Elite EEG-251
Страница 2: ......
Страница 5: ...Contents iii...
Страница 14: ...Introduction 2...
Страница 19: ...Installation 7 Figure 2 1 Flexible Gas Line Cable Restraint Installation...
Страница 22: ...Figure 2 2 1 Well Dimensions Figure 2 3 2 Well Dimensions Installation 10...
Страница 23: ...Figure 2 4 3 Well Dimensions Figure 2 5 4 Well Dimensions Installation 11...
Страница 24: ...Installation 12...
Страница 51: ...Operation 37...
Страница 62: ...Operation 48...
Страница 68: ...Information Mode 54...
Страница 72: ...Product Program Mode 58...
Страница 87: ...Troubleshooting 73...
Страница 88: ...Troubleshooting 74...
Страница 89: ...blank page...


