18
PROGRAM PLAY
Program Play
The CDR 2’s advanced programming system
enables you to preset the order in which tracks
are played, to repeat one track or all tracks, or
to repeat any segment of a disc without regard
to track numbers.
Programming Play Lists
To program the order of playback for the tracks
on a disc, insert the disc, let the unit read the
Table of Contents information, and wait until
the disc has stopped and the number of tracks
and total running time is displayed. Next, select
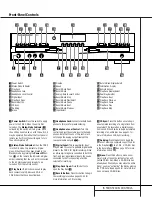
the deck that will be programmed by pressing
the
CDP Select
button
d
on the remote for
the
Play Deck
3
or the
CDR Select
button
on the remote for the
Record Deck
%
.
To begin the programming sequence, press
the
Program
button
e
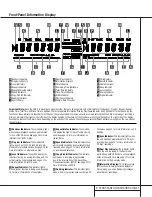
and note that the
PROG
Indicator
B
will illuminate and
the
Information Display
K
will show
00 00
:
00
.
Next, enter the track numbers to be played by
pressing the
Numeric Keys
p
. For two-digit
track numbers, be certain to enter the second
digit within three seconds after the first number
is entered. As each track is entered, the display
will blink three times, alternating between two
displays. The first display will show the track
number just entered on the left side of the
Information Display
K
under the
Track
Indicator
O
, while the right side will flash
the number of steps that have been pro-
grammed. For example, after programming the
first step to be track number 3, the display will
flash
03 P-01
.
Alternating with the track number and program
step will be a display of the track and the total
running time of all tracks that have been
programmed so far. For example, a display of
06 11:25
will indicate that track number
six was the last track programmed, and that the
total time of all tracks so far is 11 minutes and
25 seconds. The
Total Time Indicators
NL
will flash with this display to remind you of the
display’s contents.
These displays will alternate three times, and
then show a steady display of the total time
and last track programmed.
Continue to add tracks in the order you wish to
have them played until the programming ses-
sion is complete. You may add up to 20 tracks,
repeating a track if desired, as long as the total
number does not exceed 20. If you exceed the
20 track limit, the display will read
FULL
.
Tracks may also be added using the
Next
zÓˆ
and
Previous
buttons
iÔ˜
to
locate the track, and the
Program
button
e
to enter that track to the programmed
sequence.
When the complete list of tracks has been
entered, press the
Play
button
j*˘
.
The tracks will then play in the order they have
been entered. Note that a programmed list of
tracks may also be recorded if the disc being
programmed is in the
Play Deck
3
. Follow
the instructions on page 20 for complete
information on recording and dubbing.
Checking, Editing and Clearing
Programmed Play Lists
Once you have entered a program list it will
remain in the unit’s memory until the disc is
removed or the unit is turned off. Thus, if you
play through a program list, simply press the
Play
button
j*˘
again to replay the list.
If you find that you wish to check the list or
make changes, that is also possible by following
a few simple steps.
To scroll through a program list, press the
Program Check
button
h
. Each press of the
button will move through the tracks that have
been programmed. The display will alternate
between the track number of the program step
number (e.g.
12 P-03
tells you that track
12 on the disc is the 3rd program step) and the
track number and the total running time so far
in the program (e.g.
12 16:04
tells you
that at this point you have programmed a total
of 16 minutes and 4 seconds of material).
At any point in the list you may insert a new
track by simply entering the track number using
the
Numeric Keys
p
. Simply press the but-
tons that correspond to the number of the track
you wish to add. Any tracks that are in the pro-
gram will remain.
To remove a step in the program, first use the
Program Check
button
h
to locate the
track you wish to delete. Next, press the
Clear
button
. The information in the display will
blink and the step will be removed from the
program list. Program steps need not be deleted
in any order; as long as you have located a step
in the program list, it may be erased.
To cancel an entire program list while the pro-
gram is playing, press the
Program
button
e
and note that the
Program Indicator
B
will go out. To remove a total program list
when the disc is stopped, simply open and
close the disc drawer. Whenever a disc is
removed or the unit is turned off, the program
list is erased.
Repeat Programmed Play
The CDR 2’s programming system enables you
to repeat either a single track on a disc, the
entire disk, or a specially programmed passage
that you select.
Repeat One Track
To repeat the track you are currently listening
to, press the
Repeat
button
r
and note that
the
Repeat Indicator
D
and the
Repeat-
Status Indicator
E
will both light
1
. If the
track is changed by using the
Next/Previous
Skip
button
izÓÔˆ˜
while the
Repeat 1
mode is active, the new track will
now be repeated.
Once Repeat 1 playback has been started, it
will continue until the unit is stopped by press-
ing the
Stop
button
x&¸
, or the disc
deck is opened by pressing the appropriate
Open/Close
button
7$c
. When
playback is stopped, the Repeat sequence is
erased and must be reentered if you wish to
repeat a track on another disc.
Repeat All Tracks
To repeat all the tracks on a disc in order, press
the
Repeat
button
r
twice while the disc is
playing and note that the
Repeat Indicator
D
and the
ALL
Repeat-Status Indicator
E
will light. Once the
Play
button
j*˘
is pressed, the disc will play through from
beginning to end continually, until the
Stop
button
x&¸
is pressed. The Repeat All
function may be cancelled at any time by press-
ing the
Repeat
button
r
once until both the
Repeat Indicator
D
and
ALL
Repeat-
Status Indicators
E
go out. The Repeat All
Function is also canceled when the disc drawer
is opened.
30
33
29

