background image

45

Hangar 9 F4U-1D Corsair 50 ARF

Note

: Always use threadlock on metal-to-metal 

fasteners to prevent them from vibrating loose.


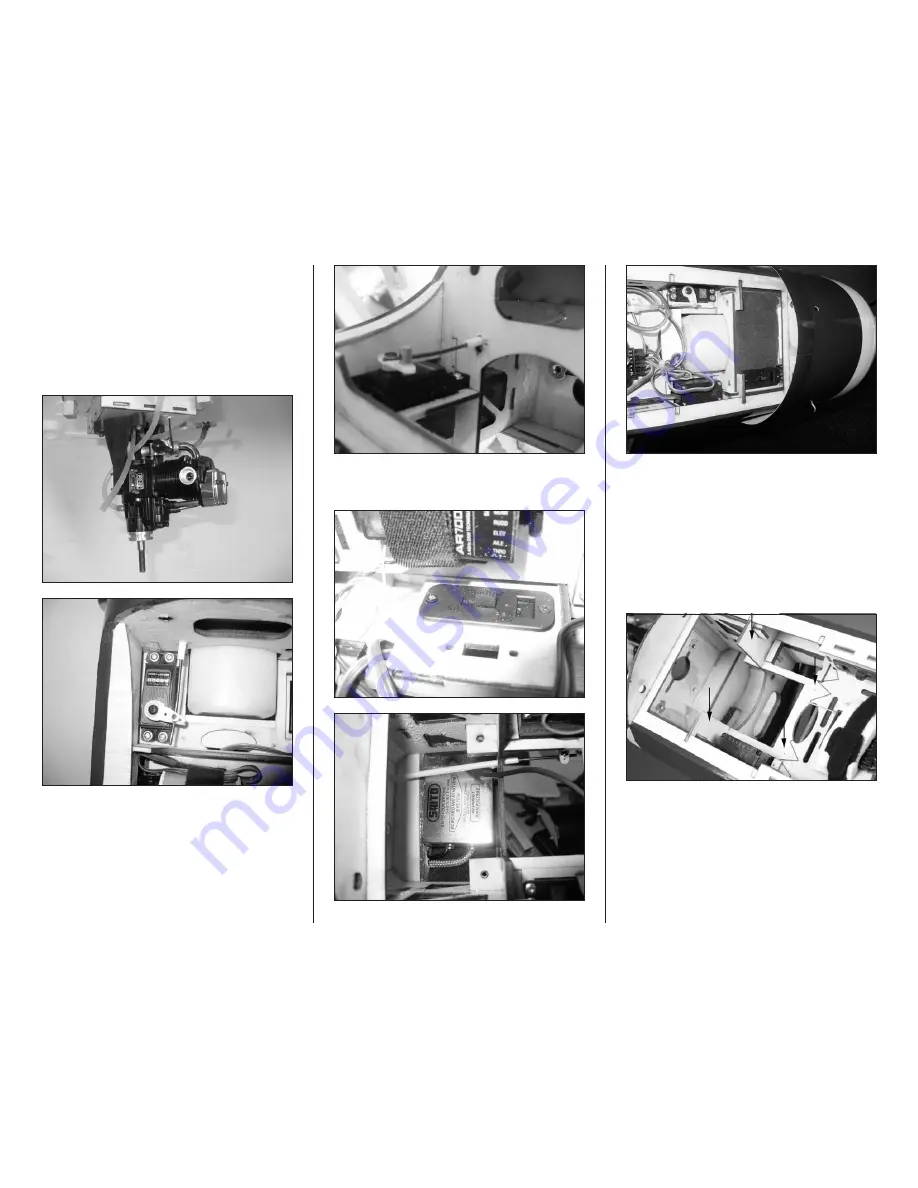
(Four-stroke throttle linkage) When installing a four-

stroke engine, the Z-bend in the pushrod will connect to the 

carburetor arm. Use the included pushrod connector at the 

servo to connect the pushrod at the servo. Use a 1.5mm hex 

wrench to tighten the setscrew that secures the wire to the 

connector.

Note

: Use the following images to aid in the placement 

of the components for the four-stroke gas engine.


16. Check the operation of the throttle. The carburetor 

should be open slightly when the trim is centered, but closed 

if the trim is set to close the throttle. It may be necessary to 

adjust the throw at the radio slightly to operate the throttle 

from fully open to fully closed.


17. Prepare the holes for the fuel tank braces by using 

a #1 Phillips screwdriver to thread a 2mm x 10mm black 

washer head screw into the four pre-drilled holes as shown. 

Apply 2–3 drops of thin CA in each hole to harden the 

surrounding wood.

Содержание F4U-1D Corsair 60cc

Страница 1: ...F4U 1D Corsair 50 ARF Assembly Manual...

Страница 2: ...20 sq in 39 9 sq dm Fuselage Length 45 5 in 115cm Weight Range 6 75 lb 8 00 lb 3 10 3 60 kg Engine Motor Size 2 stroke glow 46 55 4 stroke glow 72 82 4 stroke gas FG 14B EP Power 46 Radio 4 channel wi...

Страница 3: ...1 Elevator Pushrods Quantity Usage 2mm x 505mm pushrod 1 Rudder 2mm x 610mm pushrod 1 Elevator 2mm x 215mm pushrod 1 Throttle 2mm x 53mm pushrod 2 Aileron Pushrod housing 8 inch 200mm 1 Throttle Wing...

Страница 4: ...re volatile than alkaline or Ni Cd Ni MH batteries used in RC applications Always follow the manufacturer s instructions when using and disposing of any batteries Mishandling of Li Po batteries can re...

Страница 5: ...ith T fitting and Overflow HAN116 Optional 3 4 inch spinner nut 7mm x 1mm HAN259023 4 Stroke Gas Saito FG 14B SAIEG14B 14x6 Evolution propeller EVO14060 Fuel Filler with T fitting and Overflow HAN116...

Страница 6: ...in the covering use a heat gun HAN100 and covering glove HAN150 or covering iron HAN101 with a sealing iron sock HAN141 to remove them Use caution while working around areas where the colors overlap t...

Страница 7: ...g from the center panel so the servo leads can pass through the opening Note It is important the joiner and joiner pockets have epoxy at all points where they come in contact with each other 7 Separat...

Страница 8: ...to fully cure 12 Use a covering iron to apply the two strips of covering over the joint between the outer panels and the center panel starting at the trailing edge and wrapping the covering strip arou...

Страница 9: ...he aileron and wing panel 5 Saturate each of the three hinges on both the top and bottom of the hinge Set the assembly aside to cure Important Allow the CA to cure WITHOUT using CA accelerator This is...

Страница 10: ...is also required for this section of the manual 2 Remove the servo cover from the wing by removing the tape holding it in position on the wing 3 Use a hobby knife with a 11 blade to remove the coveri...

Страница 11: ...rframe to be transferred to the servo Use a pencil to mark the location for the screws that will secure the servo to the mounting blocks 9 Use a drill and 1 16 inch 1 5mm drill bit to drill the holes...

Страница 12: ...15 Tie the string inside the wing to the end of the extension The string will be used to pull the extension through the wing 16 Carefully pull the extension through the wing The servo cover can then...

Страница 13: ...ver 1 Ruler Felt tipped pen Low tack tape Drill Hobby knife with 11 blade Drill bit 1 16 inch 1 5mm 1 Locate the hardware to install the aileron linkages The wing assembly is also required for this se...

Страница 14: ...driver to run a 2mm x 10mm wood screw in each of the holes Make sure to remove the screw before proceeding to the next step 7 Apply 2 3 drops of thin CA in each of the holes that will accept the servo...

Страница 15: ...s binding 13 Repeat steps 1 through 12 to install the remaining aileron control horn and linkage 14 Remember to turn off the radio system at this time to avoid running the batteries down Fixed Main La...

Страница 16: ...vering from the mounting holes in the main landing gear 4 Test fit the main gear into the wing There is a left and right and the mounting plate will match the contour of the wing when installed 5 Use...

Страница 17: ...and help prevent them from vibrating loose 10 Attach the main landing gear using two 3mm x 15mm black counter sunk screws and two 3mm x 20mm black counter sunk screws The longer screws are using on t...

Страница 18: ...to use threadlock on the setscrew to prevent it from vibrating loose 16 Snap the hub cap back into position on the wheel 17 Use a T pin to poke through the covering on the gear door for the mounting s...

Страница 19: ...Felt tipped pen String or dental floss Hex wrench 1 5mm included 2 5mm Note If you have installed fixed gear skip to the next section Wing Installation 1 Locate the hardware to install the retracts Th...

Страница 20: ...rails Use a pencil to mark the location for the four mounting screws through the retract frame and onto the rails 7 Place a 5 64 inch 2mm drill bit in the drill Wrap a piece of tape around the drill b...

Страница 21: ...e and hobby scissors to trim the clear plastic template Note that the right and left templates are referenced as if you were the pilot 13 Use low tack tape to secure the template to the bottom of the...

Страница 22: ...need to use a rotary tool and sanding drum to adjust the opening to allow the well to fit It may also be necessary to notch the wheel well to clear the top of the retract chassis Use low tack tape to...

Страница 23: ...23 Use a flat file to make a 1 4 inch 6mm wide flat at the end of the axle 24 Place a drop of light machine oil on the axle so the wheel will rotate freely on the axle Note Always use threadlock on m...

Страница 24: ...ing loose 29 Tighten the screws on the axle so they leave indentations on the wire strut Remove the axle then use a flat file to make flat areas for the screws so the axle does not rotate on the gear...

Страница 25: ...r the wing dowels Also remove the covering at the trailing edge for the wing bolts 3 Use 30 minute epoxy to glue the two 6mm x 30mm dowels in the leading edge of the wing Make sure the dowels are posi...

Страница 26: ...32 x 11 4 inch socket head cap screws and two 8 washers Use a 9 64 inch hex wrench to tighten the screws 9 Position the fiberglass belly pan on the bottom of the fuselage aligning it with the contour...

Страница 27: ...ng a fillet between the belly pan and wing Allow the epoxy to fully cure before disturbing the airframe 14 Remove the waxed paper from the fuselage to complete the belly pan installation Leave the win...

Страница 28: ...ear The wing and stabilizer must be an equal distance from each other to be in alignment If not use medium grit sandpaper to lightly sand the opening in the fuselage to correct any alignment issues Ch...

Страница 29: ...ntact the elevators 13 Place low tack tape 1 16 inch 1 5mm around the outside of the opening in the fuselage for the stabilizer Use tape on both sides of the fuselage 14 Place the joiner wire in the s...

Страница 30: ...tally glued to the stabilizer when the elevators are installed Note Once the epoxy has fully cured the wing can be removed from the fuselage using a 9 64 inch hex wrench Using small 1 4 inch 6mm piece...

Страница 31: ...poxy cures 26 Remove the waxed paper from the stabilizer Remove the T pins from the hinges Position the elevators so there is an equal gap between the tips of the balance tabs on the elevator and stab...

Страница 32: ...vided sequence will yield the best results and alignment for your model 1 Locate the rudder fin and 3mm torque rod You will also need the fuselage for the installation of the fin and rudder 2 Separate...

Страница 33: ...udder will produce the same gap for both when the rudder is hinged to the fin later in this section of the manual 9 Check the position of the rudder on the fin making sure the balance tab of the rudde...

Страница 34: ...n where it contacts the fuselage 14 Remove the rudder assembly from the fuselage Use a hobby knife and a 11 blade to trim the covering 1 16 inch 1 5mm inside the lines drawn in the previous step Remov...

Страница 35: ...the fin in the fuselage Remove the fin and apply more epoxy so there is a fair amount of epoxy oozing out when the fin is inserted in the fuselage 20 Check the alignment of the fin to the stabilizer...

Страница 36: ...e smoothly As well set the clearance for the balsa fairing 27 Use low tack tape to tape the balsa fairing in position on the fuselage Make sure the rudder can move freely and not rub against the fairi...

Страница 37: ...Parts Fuselage assembly Servo with hardware 2 Receiver Receiver battery Switch harness Control horn with backplate Nylon clevis 2 Safety tubing Hook and loop strap Servo extension 6 inch 152mm 3 3mm...

Страница 38: ...he four mounting screws 5 Use a 1 Phillips screwdriver to run a servo mounting screw in each of the four holes Make sure to remove the screw before proceeding to the next step 6 Apply 2 3 drops of thi...

Страница 39: ...rvo and the 2mm x 610mm elevator pushrod in the fuselage 12 Slide the hatch forward then lift it up at the rear There are tabs near the rear edge that must clear the top of the fuselage before lifting...

Страница 40: ...om the safety tubing 19 Slide the safety tubing on the nylon clevis With the radio on and the rudder centered at neutral thread the clevis on the pushrod Place the tail wheel adapter on the rudder tor...

Страница 41: ...to change the position of the flat on the tail gear wire made in step 20 23 Use a hobby knife to remove the backplate from the control horn Place the control horn on the elevator so it aligns with th...

Страница 42: ...washer head screw black 4 4 40 x 1 inch socket head cap screw 4 6 32 x 3 4 inch socket head cap screw 4 Pushrod housing 8 inch 200mm 2mm x 215mm pushrod throttle Required Tools and Adhesives Drill Si...

Страница 43: ...in the hole closest to the end of the mount while the rear bolt is in the first oval hole Use a 3 32 inch hex wrench and 1 4 inch nut driver to tighten the hardware Check that the holes in the mount s...

Страница 44: ...e 2mm x 215mm throttle pushrod through the hole enlarged in the previous step 13 Two stroke Center the throttle stick and trim Slide the pushrod into the tube installed in the fuselage Attach the serv...

Страница 45: ...tor Note Use the following images to aid in the placement of the components for the four stroke gas engine 16 Check the operation of the throttle The carburetor should be open slightly when the trim i...

Страница 46: ...her 2 Propeller adapter Motor with hardware Hook and loop strap Tie wraps not included 6 inch 152mm servo extension Electronic speed control ESC 3mm plywood battery tray support tab Pre assembled plyw...

Страница 47: ...ole in the motor mount box aligns with the hole in the firewall and that the center lines on the box align with those on the firewall CAUTION Cut the top two 6 32 x 3 4 inch socket head caps screws do...

Страница 48: ...Use a drill and rotary tool to cut a hole through the fuselage so the leads from the ESC can pass into the fuselage 14 Use hook and loop tape to secure the ESC to the bottom of the motor box Use a ti...

Страница 49: ...between the battery and battery tray to keep the battery from accidentally moving inside the fuselage Cowling Installation Required Parts Fuselage assembly Cowling Dummy engine Spinner nut Muffler wi...

Страница 50: ...is exposed forward of the dummy engine Note It may be necessary to increase the amount of inlet area around the cylinders as needed for each of the engine applications Too much inlet air will cause p...

Страница 51: ...Do not use a CA accelerator Using an accelerator will not allow the CA to soak into the fibers of the wood hardening the blocks 11 Secure the cowl to the fuselage using four 3mm x 15mm black washer h...

Страница 52: ...nut to tighten it securely to the propeller shaft Note It may be necessary to use a reamer to enlarge the hole in the propeller to fit the motor shaft Always balance your propeller An unbalanced prope...

Страница 53: ...line up with the edge of the fuselage where the headrest is glued Use a felt tipped pen to transfer the outline of the canopy to the fuselage 7 Use medium grit sandpaper to lightly sand a 1 4 inch 6m...

Страница 54: ...he antenna mast is vertical and aligned with the fin There is nothing worse than a crooked mast Radiator and Gun Installation Required Parts Wing assembly Plastic machine gun 2 Plastic radiators right...

Страница 55: ...drill bit to drill a hole in the leading edge of the wing so the indentation of the machine gun can rest in the hole 6 Position the machine gun on the leading edge The inner most gun will rest in the...

Страница 56: ...ray bottle and a drop of dish washing liquid or glass cleaner sprayed in the location of the decal to allow repositioning of the decal Use a paper towel as a squeegee to remove excess water from under...

Страница 57: ...nual If the nose of your aircraft hangs low add weight to the rear of the aircraft If the tail hangs low add weight to the nose of the aircraft Stick on weights are available at your local hobby store...

Страница 58: ...each flying session and especially with a new model it is important to perform a range check It is helpful to have another person available to assist during the range check If you are using a Spektru...

Страница 59: ...fication or misuse no liability shall be assumed nor accepted for any resulting damage or injury By the act of use setup or assembly the user accepts all resulting liability If you as the Purchaser or...

Страница 60: ...electronic equipment The separate collection and recycling of your waste equipment at the time of disposal will help to conserve natural resources and ensure that it is recycled in a manner that prote...

Страница 61: ...ized to operate equipment on Amateur Band frequencies 5 RC model aircraft will not operate within three 3 miles of any pre existing flying site without a frequency management agreement AMA Documents 9...

Страница 62: ...62 Hangar 9 F4U 1D Corsair 50 ARF Building and Flying Notes...

Страница 63: ...63 Hangar 9 F4U 1D Corsair 50 ARF Building and Flying Notes...

Страница 64: ...d 01 2011 2011 Horizon Hobby Inc horizonhobby com Hangar9 com The Spektrum trademark is used with permission of Bachmann Industries Inc All other marks are trademarks or registered trademarks of Horiz...

Отзывы: