background image

www.HandiQuilter.com

Quilt Menu  |  7.3

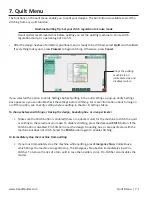
Move the quilting machine with Pro-Stitcher

The Move function moves the quilting machine in any of the eight directions indicated by the on-screen 

arrows.  

To change the speed at which the machine moves

• 

Tap the 

Plus Sign (+)

 to increase the movement speed. Tap the 

Minus Sign (–)

 to decrease the 

movement speed. Or select the number box and enter a value (up to 50) in the number pad that 

appears and then press 

Enter

.

To move the quilting machine from within Pro-Stitcher

• 

Press and hold an arrow button. The selected arrow button changes to a Stop button. The machine 

moves in the selected direction until you stop pressing the arrow key.

• 

Alternately, select 

Continuous

. Then press (and release) an arrow key. The selected arrow button 

changes to a Stop button. The machine moves in the selected direction until you press the 

Stop


button.

To stitch a straight line using the Move buttons

• 

Select the 

Stitch

 button. Press and hold an arrow button. The selected arrow button changes to a 

Stop button. The machine stitches a line in the selected direction until you stop pressing the arrow 

key.

• 

Alternately, select both 

Stitch

 and 

Continuous

. Then press (and release) an arrow key. The selected 

arrow button changes to a Stop button. The machine stitches in the selected direction until you 

press the Stop button.

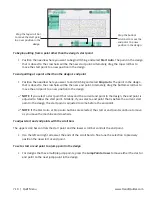
Machine Quilting Tip: Straight-line quilting

Use the Move and Stitch options to stitch straight lines for stitch-in-the-ditch, piano-key 

borders, and cross-hatching.  Use the down arrow with stitch to baste down the right and 

left sides of the quilt. If you also select Continuous, you will be able to use both hands on 

the quilt to ensure that the quilt top and edges lay flat against the batting.

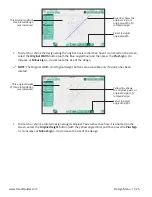
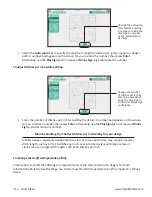
Press and hold one of 

the arrow keys to move 

the machine in that 

direction.

Control the speed by 

pressing either the 

Plus Sign or the Minus 

Sign, or entering a 

value (up to 50) in the 

number box.

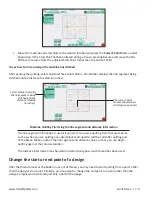
Select Stitch to stitch 

as the machine moves.

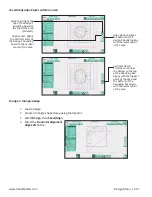
Select 

Continuous

 and select an arrow key 

to move the machine. Press 

Stop

 to end 

movement or stitching.

Содержание Pro-Stitcher QM30010-2

Страница 1: ...HANDI QUILTER DIGITAL QUILTING SYSTEM Designed by a Quilter for Quilters USER MANUAL QM30010 2 MAY 2015...

Страница 2: ...tp www handiquilter com videocatalog Download tutorials for HQ Pro Stitcher http www handiquilter com education pro stitcher Participate in online forums with other Handi Quilter owners http www handi...

Страница 3: ...dio Frame 3 17 Installation of the X Rack and Y Rack 3 17 To install the X Rack 3 17 To install the Y Rack 3 19 Y Encoder Assembly Installation HQ Sixteen only 3 20 Install the power cord retaining cl...

Страница 4: ...5 4 To access recently used designs 5 4 To load a design from the design library 5 4 To save a design 5 5 To save a group as a design or a project 5 5 To save designs or projects to a new folder 5 6...

Страница 5: ...4 Skew Align Menu 5 26 To horizontally align blocks within an area 5 26 To align a triangle design 5 27 To skew a design to fit a convex area 5 28 To skew a design to fit a concave area 5 29 Freehand...

Страница 6: ...p settings while quilting 7 7 To change the pause delay settings while quilting 7 7 Adjust settings while quilting is paused 7 8 To pause quilting 7 8 To see how far into a design the machine has stit...

Страница 7: ...e 8 10 To set your speed profile 8 10 Motor Option 8 10 When to adjust the motor torque limit 8 10 To adjust the motor torque limit 8 11 Logging options 8 11 About 8 11 Shut Down 8 11 To shutdown all...

Страница 8: ...a damaged cord or plug if it is not working properly if it has been dropped or damaged or dropped into water Return the quilting machine to the nearest authorized dealer or service center for examina...

Страница 9: ...ne 1 Do not store this machine in areas exposed to direct sunlight or high humidity Never use or store the machine near a heater an iron a halogen lamp or other hot things 2 Clean the computer monitor...

Страница 10: ...i le cordon ou la fiche est endommag si elle ne fonctionne pas correctement si on l a fait tomber ou endommag ou si elle est tomb e dans l eau Renvoyez la machine quilter au revendeur ou centre de ser...

Страница 11: ...e dans des endroits expos s la lumi re directe du soleil ou une forte humidit Ne jamais utiliser ni ranger la machine proximit d un radiateur d un fer repasser d une lampe halog ne ou d autres objets...

Страница 12: ...ials to help you learn how to use HQ Pro Stitcher Free design downloads News about hardware upgrades or new machines Links to educational information webinars retreats and more Want to be in the know...

Страница 13: ...qualified electrician The green colored rigid ear lug and the like extending from the adapter must be connected to a permanent ground such as a properly grounded outlet box cover Whenever the adapter...

Страница 14: ...er bracket 1 G Y encoder circuit board 1 H Y axis mounting bracket assembly 1 I Power cord assembly I 1 10 foot power cord 1 I 2 2 foot power cord quilting machine to carriage 1 I 3 2 foot power cord...

Страница 15: ...are 1 M USB cable 1 N Computer power cord 1 O Manual engagement disengagement tool 1 P Harness cable Q HQ Pro Stitcher tablet computer NOTE The model of the HQ Pro Stitcher computer may be different f...

Страница 16: ...al engagement disengagement tool see Parts List item O Installation of the X Rack and Y Rack To install the X Rack 1 Remove the blue 12 foot Flexirack see Parts List item A and the Pro Stitcher carria...

Страница 17: ...5 Trim the Flexirack to length using a knife or wire cutters The blue Flexirack does not need to extend the full width of the table and can be a couple of inches shorter on either end 6 At both ends...

Страница 18: ...with the thread tensioner and guides there will be either two screws or two holes If the screws are there use a large flat screwdriver to remove the screws 2 Attach the Y Rack to the bottom of the fro...

Страница 19: ...e Y encoder is blue If the Y encoder has a black circuit board skip ahead to the next section Replace the Y encoder circuit board with the one in the package see Parts List item G if the circuit board...

Страница 20: ...me out 4 Align the new Y Encoder circuit board so the five pins on the encoder fit into the five pin connector on the circuit board and gently push into position The screw hole on the circuit board sh...

Страница 21: ...ble 3 Attach one end of the harness cable see Parts List item P into the connector on the right side of the power supply Tighten the side screws You will plug the other ends to the bracket as part of...

Страница 22: ...he back Attach the cable clips see Parts List item J and route the cable accordingly 7 The small black cable with the black 3 connector clip should be routed underneath the P Pod and snapped into the...

Страница 23: ...screws can be adjusted with the quilting machine on the carriage Pull the machine to the front to access the front screw and to the rear to access the rear screw Pull the quilting machine to the rear...

Страница 24: ...ching the front handlebar cable first remove two of the hex head bolts and loosen the third bolt Then rotate the handlebar slightly to provide easier access to the handlebar cable 2 Make sure the thre...

Страница 25: ...the bottom edge of the black box that is mounted to the back of the computer bracket Attach the two 9 pin serial cables to the appropriate ports on the back of the same box making sure cable connecto...

Страница 26: ...puter power cord see Parts List item N between the computer position B and the black box position C 9 The open USB ports on the black box position F are for plugging in the USB Flash drive to load des...

Страница 27: ...ver one large and one small Knife and or wire cutters Set frame height Determine whether the quilting machine is placed on a Portable Professional Frame or an HQ Studio Frame and follow the appropriat...

Страница 28: ...d to the table with the 3M Command Strips see Parts List item T that have been provided unless the front track is already mounted to the table Use the carriage as a guide to make sure there is no bind...

Страница 29: ...l width of the table and can actually be a couple of inches shorter on either end if desired 7 At the ends of the blue rack use the four small metal clamps see Parts List item B to hold the ends firml...

Страница 30: ...or use the two smallest screws in the Base Plate Repair Kit see Parts List item D if your machine had no screws here If your Y Rack included 1 8 inch shim washers place them between the Y Rack and th...

Страница 31: ...moving the bolt and bracket that attach the wheel to the rear base plate 3 Replace the old encoder assembly with the encoder which is provided with the HQ Pro Stitcher see Parts List item R making sur...

Страница 32: ...od Otherwise use the P Pod that was just removed as you perform the remaining steps 5 Loosen the two screws that mount the power cord receptacle to the plastic P Pod using a Philips screwdriver and if...

Страница 33: ...he HQ Sixteen head by removing the four mounting screws with a Phillips screwdriver 2 Carefully disconnect all cables from the C Pod taking care not to touch the bare circuit board 3 If the new C Pod...

Страница 34: ...efully lift the quilting machine and place it on the carriage so the wheels engage the carriage tracks this is easier to do with two people one at each end of the quilting machine 3 The Y end of the p...

Страница 35: ...crews can be adjusted with the quilting machine on the carriage Pull the machine to the front to access the front screw and to the rear to access the rear screw Pull the quilting machine to the rear o...

Страница 36: ...wn and route the cable accordingly The small black cable with the black 3 connector clip should be routed underneath the P Pod and snapped into the Stitch Regulator Adapter Board see Parts List item R...

Страница 37: ...on the head so the three holes of the bracket line up with the three holes in the head 4 For HQ Sixteen Tilt screen Handlebars Secure the bracket in place by placing the adapter plate on top of the br...

Страница 38: ...the bottom edge of the black box that is mounted to the back of the computer bracket Attach the two 9 pin serial cables to the appropriate ports on the back of the same box making sure cable connecto...

Страница 39: ...puter power cord see Parts List item N between the computer position B and the black box position C 10 The open USB ports on the black box position F are for plugging in the USB Flash drive to load de...

Страница 40: ...hutdown button press the power switch on the tablet computer to continue shutting down the Pro Stitcher computer IMPORTANT If you leave the Pro Stitcher computer powered on with the power cord unplugg...

Страница 41: ...n the Freehand screen to alternate between computerized quilting and free motion quilting Choose Design then Freehand Select the Free Motion button Pro Stitcher automatically raises the quick release...

Страница 42: ...r loading from the drive To use an external keyboard An external keyboard is helpful when using Art Stitch on the Pro Stitcher computer Use a keyboard and mouse wired or wireless by attaching them or...

Страница 43: ...3 32 Installation www HandiQuilter com...

Страница 44: ...ty To get the most from using Pro Stitcher Handi Quilter recommends using the Pro Stitcher computer only as directed to run the Pro Stitcher software the Art Stitch software and other software provide...

Страница 45: ...he button to reestablish communications with the motors Refer to the Troubleshooting section of this manual for further help Overview of the HQ Pro Stitcher screen The Pro Stitcher screen provides qui...

Страница 46: ...d when the carriage is engaged For more information about how to engage the carriage see Freehand Menu in chapter 5 Design Menu The size of the bounding box is the width and height of the widest and h...

Страница 47: ...there may be certain buttons that are grayed out A gray button indicates that this function is not currently available This typically happens because you have started a function that must be complete...

Страница 48: ...or down to form a half stitch The Half Stitch button cycles the needle either to the up or the down position based on the current position of the needle Tap Half Stitch once to cycle the needle a hal...

Страница 49: ...grid lines displayed on screen you ll see the grid lines also shrink or grow as you zoom the design To shrink the view of the design select Zoom and then drag your finger in a downward or right to lef...

Страница 50: ...in the work area that you want to include in a grouped design Then select Group to treat the selected designs as if they were a single design Pro Stitcher gives the group a name and a number and displ...

Страница 51: ...touching the Close X button in the upper right corner Alternately you can drag the name box to a new area on the screen in the same way To change the stitch order of multiple designs Select Stitch Or...

Страница 52: ...d use the calculator to add this measurement Press Ruler to turn it off Continue in this manner until you have the total measurement you need Crosshairs The intersection of the horizontal and vertical...

Страница 53: ...4 10 Overview www HandiQuilter com...

Страница 54: ...screen will appear for entering license information You will not be able to save any changes to the design until you activate the Art Stitch license Follow the instructions in the Art Stitch instructi...

Страница 55: ...into an available USB port wait a minute for Windows to install appropriate drivers and then use the keyboard or mouse A USB hub may be used to expand the number of available USB ports Keyboards mice...

Страница 56: ...er attach a keyboard or press the keyboard icon at the top left hand corner of the screen to open the pop up keyboard Press and hold the Windows key followed by the letter E to open a file browser to...

Страница 57: ...6 4 Art Stitch www HandiQuilter com...

Страница 58: ...ots mark the start of a jump the point where Pro Stitcher stops stitching so you can tie off the thread The purple dashed line shows the jumps not stitched Green dots mark the end of the jump and the...

Страница 59: ...esign process essentially freezing all of your design choices The design isn t saved to the computer but the resize rotation and crop settings are maintained until you change them To baseline a design...

Страница 60: ...ck Clear the Area The design will maintain its size and shape Reposition the design to another block and quilt the design Continue quilting the baselined design on the blocks throughout the quilt Use...

Страница 61: ...e design files To access recently used designs Choose Recent to see a list of the most recent designs you have opened Then select the design you want to use This shortcut enables you to open recent de...

Страница 62: ...gn Pro Stitcher prompts you to save your work when closing the software or closing a design However it is a good idea to save your work regularly Press Save to save the design in its current state The...

Страница 63: ...y use the navigation buttons at the top of the screen to move among folders and drives To duplicate a design Select the design or group you want to copy and choose Duplicate The duplicated design is p...

Страница 64: ...instructions for downloading the latest update save the update file to a USB flash drive and plug the USB flash drive into a USB port on the Pro Stitcher computer Wait for approximately 10 seconds wh...

Страница 65: ...eas or they can be more complex unique shapes created by plotting multiple points multi point areas The area is fixed in position once it is defined and cannot be moved To move or adjust an area first...

Страница 66: ...es the quilting area To override the width or height of an area The width and height of the area appear in the number boxes on the screen You can modify these values to create an area beyond what the...

Страница 67: ...2 Move the machine to a second point along the perimeter of the quilting area and press Multi Point again A purple line joins the two marked points 3 Move the machine to a third point along the perime...

Страница 68: ...otating designs Original design Design rotated 45 clockwise Design rotated 45 counterclockwise Number box Flips the design vertically Flips the design horizontally Resets the rotation back to zero Rot...

Страница 69: ...ting machine to identify a line that represents the rotation angle You ll set a start point and an end point to create a line that represents the angle to which the design will align To rotate a desig...

Страница 70: ...needle along the angled sashing seam line and select 2 Point Start Move the machine s needle to a spot along the same seam line and select 2 Point End The design rotates to match the angle you defined...

Страница 71: ...lly Before rotating select Single Then select one of the rotate buttons Each individual design will be rotated or mirrored or flipped To rotate repeated designs as a group Before rotating select Group...

Страница 72: ...are created from a crop Open or Closed To perform a tieoff at jump points Choose Open to perform a tieoff at the jump points in a cropped design Select Tie Off Start and Tie Off Finish in Settings For...

Страница 73: ...e area To isolate and crop a portion of a design Use Crop Start End in conjunction with New Start End points on the Quilt menu to isolate a part of a design for quilting Pro Stitcher crops any of the...

Страница 74: ...r com Design Menu 5 17 4 Select Design and then Crop 5 Select Start End to crop away the design before the start point and after the end point Save the design to a new file name so you can use it agai...

Страница 75: ...er of repeats that appear on screen press the Minus Sign Alternately tap on the number box and enter the desired number of repeats into the pop up number box Then press Enter NOTE If the repeated desi...

Страница 76: ...Point buttons link the start and end points of repeated designs The following image shows the design before selecting Point 2 Point To join horizontally repeated designs To link designs horizontally...

Страница 77: ...box you must first turn off Point 2 Point Repeat Wrapping Use the wrapping options in conjunction with repeated designs The options enable you to shift rows or columns of repeated designs or offset t...

Страница 78: ...every other column of repeated designs beginning with the second column by half of the height of the design select the 1 2 button Select the up arrow button under Column to shift the columns up by 1...

Страница 79: ...ne inch to the right enter 1 To move all rows by one inch to the left enter 1 When you select Enter the rows all shift accordingly To vertically wrap the design window Choose from several Window optio...

Страница 80: ...ired wrapping position The Drag button remains enabled and displays the word Drop continue to fine tune by dragging the design When you are happy with the wrapping position select Drop Treatment of ju...

Страница 81: ...resize value in the number box Height and Width buttons Returns the design to its original size Ensures the design s aspect ratio remains constant as you adjust height or width Select to adjust the w...

Страница 82: ...To stretch or shrink a rotated design along its original Y axis rather than how it is oriented on the screen select the Original Height button with the yellow angled line and then press the Plus Sign...

Страница 83: ...n options aren t available until you define an area Buttons align the design to the top bottom left or right side of an area or stretch designs horizontally or vertically Returns the design to its ori...

Страница 84: ...igns the bottom of the design s bounding box with the lowest point of the area Vertical Stretch Stretches or shrinks the design so the top of the bounding box aligns with the highest point of the area...

Страница 85: ...Top button To skew a design to fit a convex area 1 Load a design and then create a convex area such as a diamond 2 Rotate the design Design Rotate to fit the area This design was rotated 45 degrees 3...

Страница 86: ...such as a cross or scalloped border 1 Load a design such as the Crosshatch Square Rotate repeat crop or resize the design as desired 2 Use Area Multi Point to create an area that represents the conca...

Страница 87: ...r to free motion quilting Select Design and then Freehand Depending on your Pro Stitcher configuration you will see a different screen If you have the EZ Carriage To switch to free motion quilting Sel...

Страница 88: ...in quilt with Pro Stitcher select Motors Record the movements of your freehand quilting To record freehand motion Select Record Begin quilting the design you want to record When complete select Stop S...

Страница 89: ...k Continue marking along the line stitch the line or save it as a design for future use Machine Quilting Tip Record stitch in the ditch quilting lines Move the quilting machine to the beginning of the...

Страница 90: ...If you want to stitch a skewed design multiple times on the quilt baseline the design select the Baseline button in the lower right corner of the screen and then reposition the design To position a d...

Страница 91: ...gn at intersection of the crosshairs Positions the bottom right corner of the design at the intersection of the crosshairs Positions the bottom left corner of the design at the intersection of the cro...

Страница 92: ...ved to a new location press Reset to bring the design closer to the current crosshair position NOTE The Home button is a repositioning tool Do not select it if the design has already been positioned a...

Страница 93: ...of an inch To nudge the machine in smaller more minute increments change this value to one hundredth 01 of an inch Swap Start End There may be times when you want to switch the quilting start and end...

Страница 94: ...n about turning on or off this option see To verify settings before quilting in chapter 8 Settings Menu To choose between stitching or tracing the design bounding box or area perimeter Make sure the S...

Страница 95: ...ding box on the quilt Select Trace Box and then Run Pro Stitcher moves the machine around the perimeter of the design following the blue bounding box Watch the needle position as the machine traces th...

Страница 96: ...tton Press and hold an arrow button The selected arrow button changes to a Stop button The machine stitches a line in the selected direction until you stop pressing the arrow key Alternately select bo...

Страница 97: ...sition You can then manually use the quilting machine handles to stitch either horizontal or vertical lines Machine Quilting Tip To stitch a plumb line with Pro Stitcher Ensure your quilt top is loade...

Страница 98: ...ag the scroll bar to your desired quilting speed For more information about the quilting speed setting see Control how fast Pro Stitcher operates in chapter 8 Settings Menu To adjust the auto jump thr...

Страница 99: ...itches per inch setting for your design Smaller designs especially designs that have lots of curves and circles may require a shorter stitch length such as 12 to 18 stitches per inch Less intricate de...

Страница 100: ...r more information about the pullup options see Control how Pro Stitcher handles bobbin thread pullups in chapter 8 Settings Menu Choose Pull up On or Pull up Auto to indicate your preference for hand...

Страница 101: ...the Pause button for the machine to come to a gentle stop Pro Stitcher places gold marker at the point in the design where you paused To make changes to settings select Quilt and then select Repositio...

Страница 102: ...f you want to resume quilting from that exact point such as when you are quilting over sized blocks and need to roll the quilt after quilting part of the block Make a note of the line segment and dist...

Страница 103: ...s adjusted to follow the start point Similarly if you select a end point that is before the current start point in the design the start point is adjusted to come before the end point NOTE If the Start...

Страница 104: ...int forward or back in the design use the left or right arrows on the scroll bar until the new start point is exactly where desired Press Start Auto again Use the Half Stitch button to pull up the bob...

Страница 105: ...7 12 Quilt Menu www HandiQuilter com...

Страница 106: ...s across the frame system Select Settings Speed To set the default speed Choose either the Slow Medium or Fast button to set the default speed Alternately use the scroll bar to select a speed between...

Страница 107: ...the jump is longer than the Auto Jump threshold Pro Stitcher pauses before the jump so you can trim the thread NOTE If Tie Off options are turned on Pro Stitcher performs a tie off at the jump start a...

Страница 108: ...press Enter NOTE The number you specify is the number of full stitches that are formed not the number of times the needles cycles For example if the tie off number is set to 2 and you selected the Mic...

Страница 109: ...cted number of tie off stitches to the end of the design This method does not back over itself and is more likely to be pulled loose than the Tack method However it is much less noticeable than the Ta...

Страница 110: ...uses the quilting machine shortly after starting into a design and after each time a pullup is performed This enables you to safely trim the thread tails Select Settings Pause Delay To set the Pause D...

Страница 111: ...Using a simulation license enables you to take the tablet computer or a notebook computer to Pro Stitcher training and use the software functions even though the computer isn t attached to a quilting...

Страница 112: ...be able to run Pro Stitcher in simulation mode Select Yes If you select No Pro Stitcher will not run 5 When you receive this message do not yet select OK 6 Remove the USB drive from the Windows compu...

Страница 113: ...is selected appears dark green at the top right of the screen 2 Use the arrow keys or mouse to simulate moving the quilting machine NOTE Hold the shift key while using the arrow keys for faster cursor...

Страница 114: ...ish communications between the Pro Stitcher computer and the motors If the Pro Stitcher computer cannot communicate with the motors for any reason it will be indicated by a lightning bolt icon at the...

Страница 115: ...itched smoothly We recommend that you use the advanced speed profile options only as advised by a technician Motor Option The Motor Torque Limit enables you to customize the sensitivity of the Pro Sti...

Страница 116: ...otor sensitivity Select the number box and enter the value Typically entering 55 or 60 is sufficient to eliminate the error message except when there is a significant obstruction U U CAUTION Increasin...

Страница 117: ...fering with Pro Stitcher rebooting the computer often will help To exit Pro Stitcher but keep the computer running Select Shutdown from the menu Then select the Exit to Windows button At times it may...

Страница 118: ...of the monitor The stitch regulator cable is not connected properly The Pro Stitcher moves but does not stitch Make sure the gray flat stitch regulator cable is plugged into the back of the C Pod the...

Страница 119: ...een is blank or scrambled and the handlebar screens are stuck on a screen that says Handlebars Version X X The gray flat stitch regulator cable is plugged in upside down to one or both of the stitch r...

Страница 120: ...ws a little motion and the white gear does rotate Monitor the motor assembly while engaged and enabled to determine which gear pulley is slipping It will most likely be either the gear mounted directl...

Страница 121: ...the quilting machine and the Pro Stitcher computer should resolve the issue No patterns or folders show up in the design library The current path is pointing to the wrong drive letter Designs are stor...

Страница 122: ...r If everything is connected properly and power is on press the lightning bolt button to attempt to reestablish communication with the motors The icon will turn to either a red or green motor button o...

Страница 123: ...n stitch out save the pattern and re boot the computer Use the New Start Point function if necessary to resume from where stitching was left off System Restore or System Repair message on boot up If a...

Страница 124: ...e as Upgrades which will incur a fee to the consumer d Two year Electronic Electrical Warranty The electric electronic components are warranted to be free from manufacturing defects for two years from...

Страница 125: ...abuse misuse negligence operator error or 3 use of parts components or accessories not authorized by HQ In no event shall HQ be liable to the purchaser of the Product or to third parties for special...

Страница 126: ...pping Cost Shipping is the responsibility of the customer Product Service and Maintenance Periodically use a small brush to clean all lint and threads from under the carriage track and rack Keep rack...

Страница 127: ...HQ Pro Stitcher User Manual 10 4 Warranty Training Checklist This page intentionally left blank...

Страница 128: ...Card The HQ Pro Stitcher warranty consists of two year electronic electrical three year mechanical and life time software updates see detailed warranty information in HQ Pro Stitcher User Manual Chec...

Страница 129: ...HQ Pro Stitcher User Manual 10 6 Warranty Training Checklist This page intentionally left blank...

Страница 130: ...Baseline Loading and Saving a Design Setting an Area Rotation Mirror Flip 2 Point Group Crop Inside Outside Open Closed Repeat Resize Skew and Align Freehand Record and Mark Reposition by Corner Cente...

Страница 131: ...HQ Pro Stitcher User Manual 10 8 Warranty Training Checklist...

Страница 132: ...Printouts A place for the latest information For news about Pro Stitcher udpates watch www handiquilter com prostitcher download For tips and tutorials watch www handiquilter com education pro stitch...

Страница 133: ...HQ Pro Stitcher User Manual 11 2 HQ Printouts...

Страница 134: ...com education pro stitcher for lessons tips and tutorials for using the latest software updates Print them out and keep them handy in this section of your user manual We write the tutorials with step...

Страница 135: ...www HandiQuilter com 12 2 Tutorials...

Страница 136: ...catalogs and keep them here with your HQ Pro Stitcher user manual HQ Pro Stitcher and Art Stitch designs Use your Art Stitch program to organize and print catalogs of all of the designs in HQ Pro Stit...

Страница 137: ...HQ Pro Stitcher User Manual 13 2 Designs...

Страница 138: ...om My Ideas 14 1 14 My Ideas You know you ll forget if you don t save it here This is a section to keep pictures tearsheets from magazines printouts from the web Anything you find inspirational should...

Страница 139: ...eserved Printed in the U S A PRINTED 05 19 2015 Handi Quilter Inc 501 N 400 W North Salt Lake UT 84054 1 877 MY QUILT 697 8458 www HandiQuilter com HQ Pro Stitcher is part of the family of innovative...

Отзывы: