background image


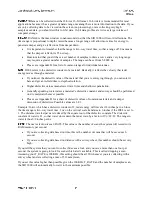
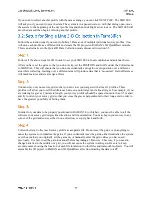
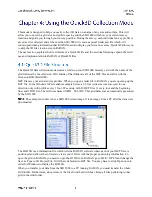
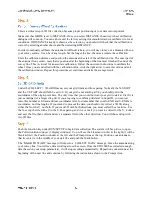
Generally you need a minimum of 10 scans to draw a recognizable hyperbola. The rule of thumb is to 
have 10 scans divided by the depth of the shallowest object. So if you want to image something 10 feet 
deep, 10 scans / 10 feet = 1 scan/foot. For 5 feet, 10 scans / 5 feet = 2 scans/foot.  

For locating structural features in concrete with the 1.5/1.6 GHz antenna, we usually recommend 90/ft. 
For utility and tank location, we usually recommend 6-24/ft. While this is more than the minimum rule of 
thumb, GSSI has found these densities to work well in the widest variety of situations.  

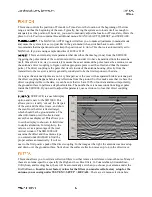
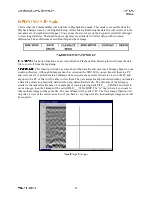
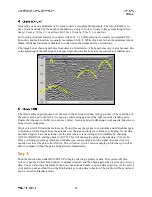
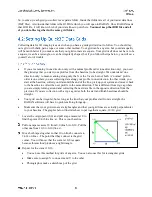
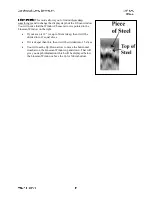
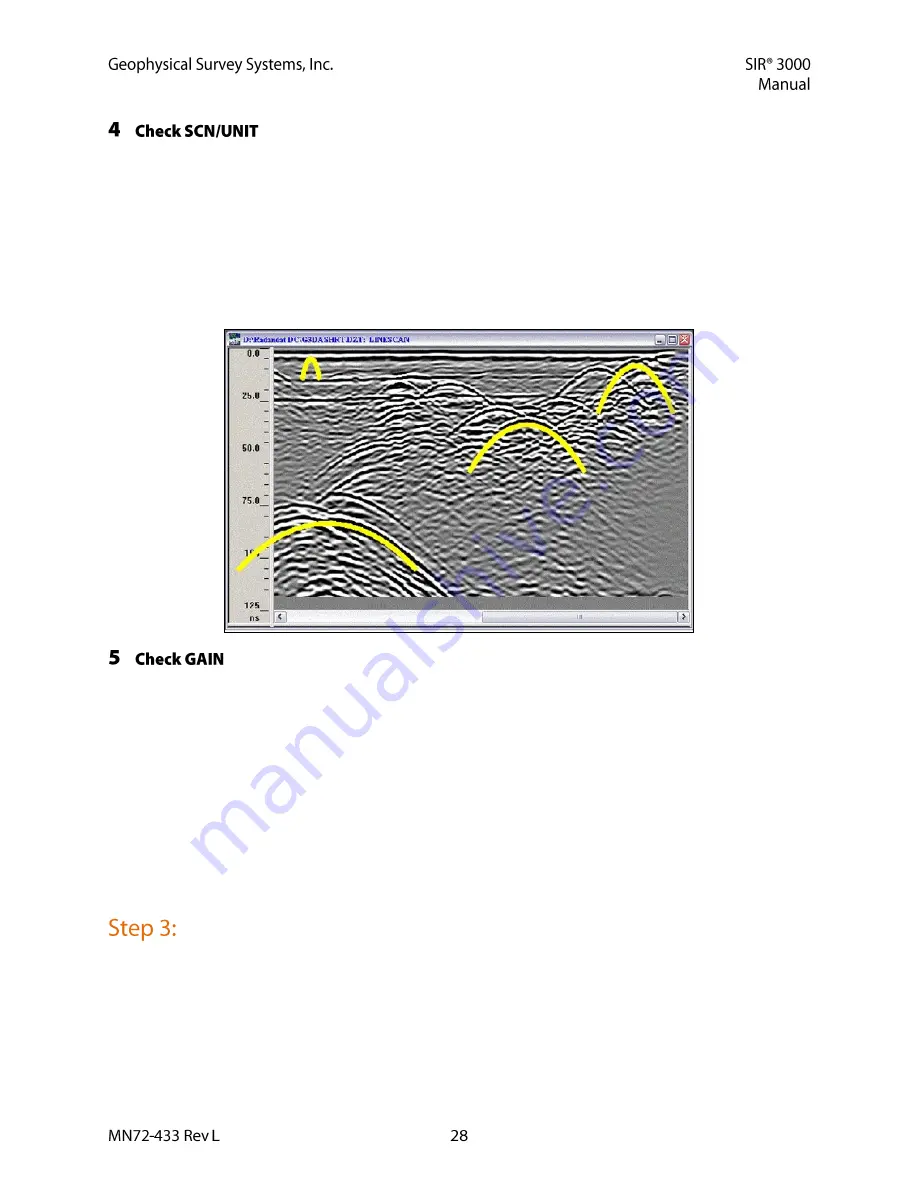
The image below shows hyperbolas from objects of similar size. The hyperbolas vary in size because, due 
to the spreading of the radar signal, a deeper target shows reflections in more scans than a shallow one, 


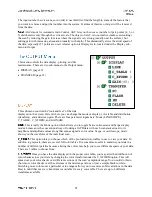
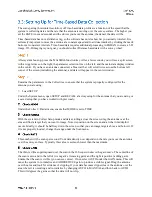
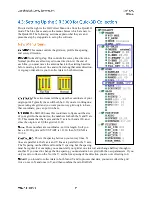
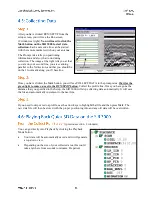
The thin, red line superimposed over the scan in the O-Scope window is the gain curve. The centerline of 
the scan is zero and to the left of it is negative (decreasing gain) and the right is positive (adding gain). 
Ensure that the scan is visible (you can see curves). Gain is applied in dB along an exponential function to 
more closely model loss. 

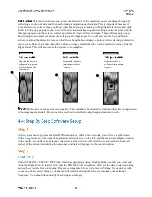
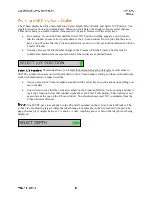
If not, select AUTO under the Gain menu. This will cause the system to re-initialize and add/subtract gain 
to produce a visible signal. Drag the antenna over the area and look for evidence of clipping. If your data 
becomes clipped, leave the antenna over the area where it is occurring and re-initialize by changing 
AUTO to MANUAL and then back to AUTO. This will depress the gains so that the data will not clip. 
Once you find gain settings which are workable (you can see targets and the signal does not clip), it is 
usually best to set the gain to MANUAL. This will allow you to collect multiple profiles that you will be 
able to compare without the gains being altered automatically. 

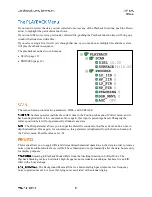
Push the function key under RUN/SETUP to begin collecting a profile of data. The system will beep 
twice to open the Collect Run window (1 display window) and then beep again when it is ready to receive 
data. You can also click the marker button on your antenna handle to open a data collection. At the end of 
your profile, push and hold down the Run/Setup key to stop data collection. The profile will be saved and 
can be viewed in Playback mode.  

Содержание SIR 3000

Страница 1: ......

Страница 2: ...luding the right of reproduction in whole or in part in any form Published by Geophysical Survey Systems Inc 40 Simon Street Nashua New Hampshire 03060 3075 USA Printed in the United States SIR RADAN and UtilityScan are registered trademarks of Geophysical Survey Systems Inc ...

Страница 3: ...s device may not cause harmful interference and 2 this device must accept any interference received including interference that may cause undesired operation Warning Changes or modifications to this unit not expressly approved by the party responsible for compliance could void the user s authority to operate the equipment Note This equipment has been tested and found to comply with the limits for ...

Страница 4: ......

Страница 5: ......

Страница 6: ......

Страница 7: ... Transit Case 2 Batteries 1 Charger 1 AC Adaptor 1 Sunshade 1 Operation Manual Your choice of antenna cables and post processing software is available for an additional purchase The SIR 3000 is a lightweight portable single channel ground penetrating radar system that is ideal for a wide variety of applications The various components of the SIR 3000 are described below The major external features ...

Страница 8: ...urned on the system will save the data profile to its internal system memory and data will have to be transferred with the USB connection or by later inserting a memory card The internal memory capacity is approximately 1 gigabyte Please see Chapter 4 Data Transfer and File Maintenance for additional information on transfer The large protruding 19 pin connector at the back of the system is for the...

Страница 9: ...tween the SIR 3000 and a GPS Please see Chapter 7 Using a GPS with your SIR 3000 for additional information This port is also used to connect the serial lead from the StructureScan Optical barcode reader cart to the SIR 3000 Functionality for this port is not currently available These ports are for connection to a variety of USB peripherals including a keyboard and memory device ...

Страница 10: ...ton while collecting data will cause the system to set a User mark in the data User marks are helpful for noting distance traveled if you are not using a survey wheel and for noting the location of obstacles such as columns trees pits etc User marks will appear as long dashed vertical white lines through the data window This button is located below the Insert Mark button Pushing the Run Stop butto...

Страница 11: ... not hot swappable You must turn off the SIR 3000 before connecting or disconnecting an antenna Failure to remove power may cause damage to the SIR 3000 The SIR 3000 is weather resistant but not weather proof Try to avoid getting the system wet If you believe that water has gotten inside of the system disconnect power open the battery compartment and input connector compartment on the back and all...

Страница 12: ......

Страница 13: ...2 D profiles can later be transferred to a PC for processing in GSSI s RADAN post processing software Hardware setup for the SIR 3000 is very simple We will assume the 400 MHz Model 5103 antenna for this example but the hardware connections are the same for other GSSI antennas and the cable connections are clearly marked Follow the steps below Attach the survey handle between the two vertical moun...

Страница 14: ...the survey wheel encoder faces down Connect power source battery or AC to the SIR 3000 and push the power button to turn on the system If you purchased your SIR 3000 with a cart as in the UtilityScan System or purchased the cart system separately please see Appendix C Mounting your SIR 3000 on a Cart The cart also incorporates a survey wheel that is used in place of the survey wheel pictured earli...

Страница 15: ... re boot For information on other modes please see Chapter 6 On the far right of the screen you will see a window that shows a single radar scan in an oscilloscope style O scope depiction This will show successive single scans as you move your antenna across an area while in Setup mode Time depth increases down the screen At the bottom of the window you will see a color bar This shows you the dist...

Страница 16: ...formation The tree is similar to the basic folder and file browser seen in many Windows based applications Upon setup you will see three choices that indicate the three modes of the SIR 3000 COLLECT PLAYBACK and OUTPUT as well as the SYSTEM menu used to change system parameters The SIR 3000 has four main system menus Collect Playback Output and System We will first look briefly at the System menu ...

Страница 17: ...lecting the last time that it was used Think of this as the location in which your files are stored on the SIR 3000 There are two basic types of paths Common and User defined Each file in the Common path will be named with the word FILE and then a number For example the first data file will be FILE001 then FILE002 and so on The user defined path allows you to change the root name instead of FILE a...

Страница 18: ...r of pre loaded language packs If your native language is not available check the GSSI website periodically to see if the language patch is available for download This allows you to check the current version of the TerraSIRch operating software You should check the GSSI website for updates to the Graphical User Interface GUI software The GUI is listed at the bottom of the Version pop up window Not...

Страница 19: ...th those systems you will notice a lot of similarities here Under COLLECT there are five main sub menus that can each be accessed by pushing the Down arrow to highlight the sub menu then the Right arrow to see additional menus inside the sub menu These are SCAN page 14 GAIN page 16 POSITION page 17 FILTERS page 17 ...

Страница 20: ...e speed that the antenna is moved over the ground The rate scans second is set in the SCAN submenu Distance based collection is performed with a survey wheel The system records a certain number of scans per unit of distance This is the most accurate data collection method and it is strongly recommended that you collect data in this mode if possible Distance based data is required for 3D files This...

Страница 21: ...shallower penetration Generally speaking water raises a material s dielectric constant and surveys should be performed on dry material whenever possible Please see Appendix D for a chart of dielectric values of common materials and a deeper discussion of dielectrics Possible values are 1 81 Example In air which has a dielectric constant of 1 radar energy will travel at 12 inches per ns Since the t...

Страница 22: ...llow you to change the number of gain points and to add strength to the signal at your own discretion This is not recommended for inexperienced users as it is possible to create features in the data by over gaining areas Setting the gain back to Auto will cause the system to re initialize and adjust its gains to the area under the antenna This is useful if you find that your data is clipped over g...

Страница 23: ...re any reflections from the ground So if we make sure that we have the direct coupling visible in the data we can be sure that we have 100 of our data and most importantly the ground surface to perform a depth calculation The number here is nanoseconds from trigger pulse inside the SIR 3000 If you need to adjust this parameter use caution not to lose that direct coupling wave SURFACE is a useful d...

Страница 24: ...quency noise reduction technique It is an IIR filter which operates in the horizontal direction Each new scan has a 1 n influence in the data so this filter has a tendency to smooth high frequency targets and accentuate low frequency horizontal features such as layers As the number of scans you stack n increases the influence of each new scan drops If you put in a very high number you will filter ...

Страница 25: ... based Changing the surface position here will not permanently eliminate any data The Diel parameter allows you to input the dielectric constant so that the system can do a time to depth calculation Once again for convenience this parameter is duplicated from the Scan sub menu of the Collect menu Possible values are 1 81 This menu allows you to apply different filters and mathematical operations t...

Страница 26: ...C_TABLE C_XFORM and GAIN dB This is really the Mode option which allows you to toggle between Linescan and Scope display modes Linescan is the conventional way of looking at GPR data with each scan stacked next to its neighbor and amplitude values along that scan assigned a color value Scope or oscilloscope mode shows you the waveform of the individual scan This option lets you choose which of the...

Страница 27: ...ft If you only see a single data screen and no parameter selection tree you are in Run mode You can only collect data in Run mode In Setup mode the Command Bar will look like this This button stops the transmitter The green light to the right of the Run Stop button will turn off If you are in Setup mode 3 display windows this will stop data from continuously scrolling across the screen If you are ...

Страница 28: ...l open the Playback Run mode 1 window The data file you selected in the Open File window will scroll to the end then stop Crosshairs will come up Pushing this again will take you back to the Playback Setup 3 windows Pushing this key will allow you to scroll through the 5 available color tables The TerraSIRch will redraw the data from the beginning of the display buffer in that new color You can al...

Страница 29: ... This will update the vertical scale and the dielectric and give you a more accurate depth calculation than simply guessing dielectric or soil type Scan over your area and find a target Once you do do not stop data collection but just move the system away from that area Drill or dig down and measure the depth Back at the system click Run Stop to bring up crosshairs After the crosshairs come up tar...

Страница 30: ...nd save it as a bitmap bmp in your working directory Although bitmaps cannot be viewed on the SIR 3000 you can transfer them to a PC and view email or print them later Bitmaps do not require any special software to view on the PC and anyone with a PC or Mac will be able to view them They are automatically transferred when you transfer a data file and are automatically deleted when you delete that ...

Страница 31: ...stem and restart it If you collect more than 70 without restarting the system the SIR 3000 will hang up and you will lose that data profile that you are collecting and will need to restart the system Remember to reload any saved setups and recheck your collection parameters to be sure that they are the same as they were before you powered down This may also corrupt your setup file After system boo...

Страница 32: ...t the start of the calibration line The exact part of the antenna front center rear that is positioned at the beginning of the line must finish at the end of the survey line This is critical for an accurate calibration Follow the onscreen instructions to calibrate the wheel Once you are satisfied with the calibration value click the right arrow to save this value and exit the calibration window Re...

Страница 33: ...wheel until the total number of ticks is equal to 10 times the default value With the system in Collect Setup mode and data scrolling across the screen drag the antenna over the area and find a target that you want to image Note its position on the screen and at what time depth it occurs Ideally it should be halfway down the screen so that you can image targets above and below it If it is not prop...

Страница 34: ...you can see curves Gain is applied in dB along an exponential function to more closely model loss If not select AUTO under the Gain menu This will cause the system to re initialize and add subtract gain to produce a visible signal Drag the antenna over the area and look for evidence of clipping If your data becomes clipped leave the antenna over the area where it is occurring and re initialize by ...

Страница 35: ... least 3 profiles Three profiles will allow you to tell the difference between a point target and a linear target For example if you are looking for graves 2 meters in length your survey profiles should be spaced no more than 0 5 m apart and try to orient your survey grid so that you cross the graves perpendicular to their long axis in order to have the greatest possibility of hitting them In orde...

Страница 36: ...ad SETUP Under the System menu open SETUP and RECALL a factory setup for the antenna that you are using or a saved setup that you have worked with previously Under the Collect Radar menu ensure that MODE is set to TIME With the system in Collect Setup mode and data scrolling across the screen drag the antenna over the area and find a target that you want to image Note its position on the screen an...

Страница 37: ...the system is properly configured for the antenna you are using Load SETUP Under the System menu open SETUP and RECALL a factory setup for the antenna that you are using or a saved setup that you have worked with previously Under the Collect Radar menu ensure that MODE is set to POINT With the system in Collect Setup mode and data scrolling across the screen drag the antenna over the area and find...

Страница 38: ... press Run Setup You will see the blank 1 pane Run screen Press Run Stop to collect a point of data The blue wait bar will scroll at the bottom left of the screen while the system is busy recording and stacking your data When it is finished the collected scan number will appear above the Command Bar Re position your antenna at the next collection point and push Run Stop to collect another point Wh...

Страница 39: ... actual survey profiles When you open a radar file in RADAN you are opening up the DZT file In the Windows XP screenshot example below a 25 foot wide area was surveyed in one direction only with profiles every 1 foot We end up with 26 DZT files 1 every foot and the beginning line and 1 B3D file The Grid was named GRID__006 3DS This grid name was automatically generated by the SIR 3000 The example ...

Страница 40: ...u start at the baseline collect your data until the end of the line pick up your system and move it back to the baseline to collect the next profile in the same direction This is different from zig zag where you are simply turning around and collecting the next data file in the opposite direction from the previous If you are collection with a zig zag order both the start and finish baselines shoul...

Страница 41: ...rdinate you can put it in here The SIR 3000 uses this coordinate to figure out the size of your grid In the menu tree the numbers for both the X and Y are 20 This means that the X axis and the Y axis both end at 20 and since the origin is at 0 0 the grid is 20 20 These numbers are coordinates not line length So if you have a 20 20 grid and X Y START is 10 10 then X Y END is 30 30 This is the spaci...

Страница 42: ...o find the dielectric in engineered or homogenous materials Do not use this method to establish a depth approximation in soils After system boot up press the Quick3D function key After a few seconds you will see a split screen with a wiggle trace on the right the parameter selection tree on the left and the main data display window in the center If you have an antenna connected a blue wait bar wil...

Страница 43: ...starting at 0 0 you should put in the coordinates of the origin point here The only time that you would not want your grid to start at 0 is if it is just a small part of a larger site grid If you are going to combine grids later in Super3D you can just leave this number at 0 0 and add real coordinates later Just remember that your X END and Y END are coordinates not line lengths If you intend to p...

Страница 44: ...ECT DATA in the prompt area Wait for the green light to come on next to the RUN STOP button Collect the profile line Once you have gone the distance that you specified in the Setup the SIR 3000 will stop collecting data automatically It will save the file and automatically increment to the next line If you need to skip or redo a profile use the arrow keys to highlight that file and then press Mark...

Страница 45: ...specified the hyperbolas will turn into smiles If you have too high a number they will remain hyperbolas The SIR 3000 is only performing a constant velocity migration Once you get to this display you can toggle to different color tables or transforms by using the Command Bar buttons or go back to the Setup 3 windows screen by clicking Run Setup The C scan top down display window is split into 3 im...

Страница 46: ...This mode allows you to find the horizontal location of targets or clear areas to drill The window chooser arrow will point down to the C Scan window telling you that you should only work with this window to make decisions You can move the C Scan crosshairs around with the arrow keys to get locations on anything you see in the data You will also notice that the vertical crosshair on the Linescan W...

Страница 47: ...Window on the right If your scan is 12 or up to 50 cm deep then it will be divided into 12 equal slices If it is deeper than this then it will be divided into 15 slices You will use the Up Down arrow to move the horizontal crosshair on the Linescan Window up and down That will give you depth information which will be displayed below the Linescan Window above the Color Xform button ...

Страница 48: ...an will then change to show the new slice data and the Z0 and Z1 will update to give you the new depth range The accuracy of the depth reading is 100 dependent on your accurate guess of the dielectric Remember that dielectrics in soils often change with depth and since the SIR 3000 is performing a constant velocity migration then it will not take those changes into account This mode lets you displ...

Страница 49: ......

Страница 50: ...you will see the mobile device explorer You are now accessing the SIR 3000 s memory Navigate to My Computer Storage Card and go to the folder containing your projects You will now be able to copy from one location on the storage card to the external storage card or to a folder on the PC by drag and drop When transfer is complete wait a couple of seconds after completion disconnect USB cable from S...

Страница 51: ... Drive from the SIR 3000 and insert it into a USB port on your computer You can now access the data as if you had another disk drive on your computer While it is always advisable to keep the data on your system until you have downloaded it if desired and checked the integrity of the data eventually the memory may fill up or you may simply want to do some housecleaning GSSI suggests that you downlo...

Страница 52: ...on the survey surface prior to any cutting coring or drilling It works with the 2 6 GHz 1 6 GHz 1 5 GHz 1 0 GHz and 900 MHz antennas First choose English or Metric units and then click on the ConcreteScan button You will then see the data display screen and if an antenna is connected it will initialize and data will start to scroll across ConcreteScan includes the backup cursor function This allow...

Страница 53: ...ocations for coring and cutting You must use the scan pad for this mode and collect data in a prescribed fashion Consult the StructureScan QuickStart guide for more details Under the Scan submenu choose your maximum penetration depth from a number of presets 6 12 or 18 inches or 20 30 50 cm Also set your concrete type from a number of presets ranging from Dry to Wet This sets the dielectric consta...

Страница 54: ...kup line in the data is the location of the midpoint of the antenna Choose your antenna by selecting the proper center frequency from the list under the Radar submenu Select DISTANCE based or TIME based data collection under MODE Remember to check the survey wheel calibration Choose 512 recommended or 256 samples scan under the SAMPLES submenu and then choose 16 default or 8 bit data collection un...

Страница 55: ... start to scroll across There is no QuickStart Guide available for GeologyScan Choose your antenna by selecting the proper center frequency from the list under the RADAR submenu Select DISTANCE based or TIME based data collection under MODE Remember to check the survey wheel calibration Choose 1024 recommended 512 or 256 samples scan under the Samples submenu and then choose 16 default or 8 bit da...

Страница 56: ...ites Setup and power up your SIR 3000 as normal Under COLLECT RADAR highlight the GPS menu choice and click Enter Toggle to G30L for the GSSI provided receiver or to CUSTOM for any other receiver and click the Right arrow The Enable GPS dialogue box will pop up Follow the instructions in the window to connect your GPS You should ensure that your receiver is tracking at least 4 satellites If you ar...

Страница 57: ...lanche you have already covered or even where you were in the middle of a lake And of course if you actually need expensive survey grade GPS accuracy we want to give you the hooks you need to place our RADAR data correctly Increasingly GPS is claiming a legitimate place in the ever increasing size and variety of GPR applications GPS works by triangulating the distance from satellites in space Like...

Страница 58: ...s WAAS is now available even in the less expensive GPS units and is recommended The National Marine Electronics Association pronounced NEE ma has generated a standard set of messages for communicating GPS information We use the NMEA 0183 version 2 1 protocol We have chosen to go with a GPS Datalogger mostly because it is so simple No buttons nothing to control and everything is handled automatical...

Страница 59: ...atched up with the Mark positions in RADAN 6 0 and are stored in the new database Microsoft Access compatible First Collect the GPS GPR Data Turn on your SIR 3000 Plug your GPS unit in the serial port Enable GPS in the RADAR Menu always off on Startup Set your GPS to output NMEA the standard 0183 version 2 1 at 4800 baud Set your GPS to start logging track data On the Garmin units this means going...

Страница 60: ...time with records in the GPS log The scan rate is used to time tag individual scans For based data acquisition or data with user marks Match GPS Start Stop position time and file filename TMF see Addendum B to synchronize marked scans with the time position records from the GPS log Interpolate time distance data between the marked scans as necessary Please see the protocols listed below in the fol...

Страница 61: ... 2107 struct tagRFCoords Start End position float rh_fstart float rh_fend struct RGPS GPS record system time SYNC char RecordType 4 GGA DWORD TickCount CPU tick count double PositionGPS 4 Latitude positive if N Longitude positive if E Altitude FIXUTC constants const int MINHEADSIZE 1024 const int PARAREASIZE 128 const int GPSAREASIZE 2 sizeof RGPS const int INFOAREASIZE MINHEADSIZE PARAREASIZE GPS...

Страница 62: ...c offset to processing history 48 short rh_nproc size of processing history 50 short rh_nchan number of channels 52 FLOATBYTE rhf_epsr average dielectric constant 54 FLOATBYTE rhf_top position in meters 58 FLOATBYTE rhf_depth range in meters 62 COORDBYTE rh_coordX X coordinates 66 FLOATBYTE rhf_servo_level gain servo level 74 char reserved 3 reserved 78 BYTE rh_accomp Ant Conf component 81 short r...

Страница 63: ...can number DWORD TickCount 32 bit internal clock tick count in mS constants const int GPSAREASIZE 2 sizeof RGPS struct RGPS startGPSpos the same as in RADAN file header struct RDMT markTime nMarks one record for every distance or user mark struct RGPS endGPSpos the same as in RADAN file header Minimum file size is GPSAREASIZE Header and footer only file has no marks nMarks can be calculated from f...

Страница 64: ...na input control cable DC power Ethernet I O RS232 Serial I O GPS port Compact Flash memory USB master USB slave Dimensions 31 5 cm 22 cm 10 5 cm 2 4 8 7 4 1 Weight 4 1 kg 9 lbs including battery Temperature 10 C to 40 C Charging Power Requirements 15 V DC 4 amps Battery 10 8 V DC internal Transmit Rate Up to 100 KHz The SIR 3000 will not work with the short orange attenuated control cable that wa...

Страница 65: ...e 256 512 1024 2048 4096 8192 Free Run Survey Wheel Point Collection 5 8000 nanoseconds full scale user selectable Manual or automatic gain 1 5 points 20 to 80 dB Vertical Low Pass and High Pass IIR and FIR Horizontal Stacking Background Removal SIR 3000 control unit Transit case AC adaptor User manual 2 batteries Sun shade ...

Страница 66: ...ey area is the topography In the first place you need to be able to physically move the antenna over the ground surface in a fairly smooth fashion Areas that are full of trenches or extreme slopes are not ideal You can still survey an area of broken terrain but it may require collecting point data rather than continuous data profiles Radar energy travels into the ground perpendicular to the surfac...

Страница 67: ...ly put can you feasibly work in the proposed area Is the site in the middle of a dense thicket of trees or is it the outside of a tall building or a tight elevator shaft Remember that GPR and geophysics depends on your ability to see contrasts in the data The area has to be large enough for you to collect enough data to be able to make an interpretation For example if you need to survey an area in...

Страница 68: ...rget altogether Generally you need a minimum of 10 scans to draw a recognizable hyperbola The rule of thumb is to have 10 scans divided by the depth of the shallowest object So if you want to image something 10 feet deep 10 scans 10 feet 1 scan foot For 5 feet 10 scans 5 feet 2 scans foot For locating structural features in concrete with the 1 6 GHz antenna we usually recommend 60 90 ft For utilit...

Страница 69: ... the material that most governs dielectric Even though concrete and grade are qualitatively very different they are made of similar materials and react to radar energy similarly It is usually extremely difficult to tell the top of grade from the bottom of the slab You should practice trying to image different materials so that you can build up a body of experience See Appendix D for a chart of the...

Страница 70: ...really only three main reasons a complicated area prospecting or dangerous targets in the subsurface A complicated area might be a city street with many different types of pipes running in different directions In a situation like that the best option is usually to do 3D data collection so that you are able to visually track targets as they twist and turn around other targets Prospecting is mainly ...

Страница 71: ......

Страница 72: ...1 The cart can accommodate the 400 MHz 900 MHz 1 5 1 6 GHz and 2 6 GHz antennas It also incorporates a survey wheel for high precision distance measurements If you have purchased a 643 cart please see the assembly instruction cart shipped with it Unfolding the cart and attaching the wheels Mounting the antenna Attaching the SIR 3000 Optional mounting of the 400MHz on the front of the cart ...

Страница 73: ...y in and lock securely To remove wheels squeeze the wheel lock clamp again and pull the wheel straight out Note The wheels are foam filled and do not require inflation Slide the front wheel onto the front wheel fork and tighten clamp When the clamp is slightly tight turn the handle to the locked position shown This will further tighten the clamp Exercise care not to over tighten the front wheel as...

Страница 74: ...l 5100 antennas place the antenna in the tub and then sandwich it between the bottom of the tub and the white plastic Velcro plate Fix the straps over the top of the plate to secure With the arrows on the top of the antenna housing pointing toward the front of the cart place the tub under the cart so that the tub handles face the front and the back of the cart Lift the tub to fit the brackets unde...

Страница 75: ...heel 4 pin to the SURVEY port These leads should only be hand tightened Hold the SIR 3000 in the mounting bracket so that all of the holes line up Beginning with the top 2 holes attach the SIR 3000 with the thumb screws Pivot the SIR 3000 back and forth to get the most comfortable viewing position and screw in the bottom 2 thumb screws Be sure to only hand tighten the screws If you purchased the o...

Страница 76: ...ontrol cable to the antenna port on the back of the SIR 3000 Be sure to only hand tighten this connection as over tightening may cause system damage Collect the front mount kit parts Attach the kit to the 400 MHz antenna as shown ...

Страница 77: ...ont axel release Attach the front fork of the cart to the antenna as shown Tighten down the clamp at the rear of the antenna All screws should be lightly snugged down Completed mount This configuration allows you to scan much closer to a curbside or building ...

Страница 78: ...6 110 Clay soil dry 3 173 Marsh 12 86 Agricultural land 15 77 Pastoral land 13 83 Average soil 16 75 Granite 5 8 106 120 Limestone 7 9 100 113 Dolomite 6 8 8 106 115 Basalt wet 8 106 Shale wet 7 113 Sandstone wet 6 112 Coal 4 5 134 150 Quartz 4 3 145 Concrete 5 8 55 120 Asphalt 3 5 134 173 PVC 3 173 Meter to English conversion factor 2 54 cm in 1 inch Table of Dielectric values adapted from Reynol...

Страница 79: ......

Страница 80: ... or on the GSSI Support Website www support geophysical com 2 6 GHz ground coupled antenna Depth of viewing window is approximately 10 inches in concrete Setting is optimized for scanning of structural features in concrete Range 8 ns Samples per Scan 512 Resolution 16 bits Number of gain points 2 Vertical High Pass Filter 400 MHz Vertical Low Pass Filter 5000 MHz Scans per second 100 Vertical IIR ...

Страница 81: ...2 HP or 3102 DP Data Collection Mode Continuous Range 60ns Samples per Scan 512 Resolution 16 bits Number of gain points 3 Vertical High Pass Filter 125 MHz Vertical Low Pass Filter 1000 MHz Scans per second 120 Transmit Rate 100 KHz 400 MHz ground coupled antenna Depth of viewing window is approximately 3m assuming a dielectric constant of 5 Range 50 ns Samples per Scan 512 Resolution 16 bits Num...

Страница 82: ...nd coupled antenna Lower frequency antenna optimized for mid range profiling Range 100ns Samples per Scan 512 Resolution 16 bits Number of gain points 5 Vertical High Pass Filter 50 MHz Vertical Low Pass Filter 600 MHz Scans per second 64 Transmit Rate 100 KHz 100 MHz ground coupled antenna Low frequency for deeper profiling Range 500ns Samples per Scan 512 Resolution 16 bits Number of gain points...

Страница 83: ...he rate that the antenna was tested and rated at It may function correctly at a higher transmit rate and allow you to collect data faster but you must pay careful attention to your data to decide if the antenna is functioning correctly at the different rate If your system is beeping it indicates that your T_RATE is too high for this antenna Old 300 MHz antenna Data Collection Mode Continuous Range...

Страница 84: ...Filter 25 MHz Vertical Low Pass Filter 200 MHz Scans per second 16 Horizontal Smoothing 5 scans Transmit Rate 12 KHz 100 MHz antenna with very high power transmitter Data Collection Mode Continuous Range 500ns Samples per Scan 512 Resolution 16 bits Number of gain points 5 Vertical High Pass Filter 25 MHz Vertical Low Pass Filter 200 MHz Scans per second 16 Horizontal Smoothing 5 scans Transmit Ra...

Страница 85: ...of gain points 5 Vertical High Pass Filter 15 MHz Vertical Low Pass Filter 90 MHz Scans per second 32 Stacking 32 scans Transmit Rate 12 KHz Low Frequency antenna length 3 6m Data Collection Mode Point Range 750ns Samples per Scan 512 Resolution 16 bits Number of gain points 5 Vertical High Pass Filter 10 Vertical Low Pass Filter 60 Scans per second 32 Stacking 32 scans Transmit Rate 12 KHz Low Fr...

Страница 86: ...tical High Pass Filter 30 MHz Vertical Low Pass Filter 240 MHz Scans per second 32 Stacking 32 scans Transmit Rate 64 KHz Borehole antenna frequency 300 MHz Data Collection Mode Point Range 300ns Samples per Scan 512 Resolution 16 bits Number of gain points 5 Vertical High Pass Filter 38 MHz Vertical Low Pass Filter 600 MHz Scans per second 32 Stacking 32 scans Transmit Rate 64 KHz ...

Страница 87: ...10ns 10ns 10ns 8ns 8ns DIEL 8 8 8 8 6 25 6 25 6 25 6 25 6 25 6 25 6 25 6 25 RATE 120 120 120 120 120 120 120 120 120 120 120 120 SCN UNIT 50 m 12 ft 50 m 18 ft 100 m 30 ft 200 m 60 ft 200 m 60 ft 200 m 60 ft GAIN auto auto auto auto auto auto manual manual manual manual manual manual POINTS 3 3 3 3 2 2 1 6 1 6 1 6 1 6 1 6 1 6 LP_IIR 600 600 800 800 2500 2500 0 0 0 0 0 0 HP_IIR 50 50 100 100 225 22...

Страница 88: ...ed if you want the SIR 3000 to do a time to depth calculation during data collect This is also used for the auto migrate display during data collection and playback This has no bearing over depth of investigation The number of scans second that the system is able to collect The recommended number is 120 per second at 512 samples scan A higher sample density will slow this down automatically The nu...

Страница 89: ......

Страница 90: ...munications Commission The United States governmental body that oversees the UWB industry of which GPR is a part amplifying the signal to certain section of a radar pulse in order to counteract the effects of attenuation and make features more visible Acronym for Gigahertz A measurement of frequency equal to one billion cycles per second Acronym for Ground Penetrating Radar the initial entry of a ...

Страница 91: ... attribute position is assigned by the user Under sampling will produce a scan wave that does not contain enough information to draw a smooth curve It may miss features Over sampling will produce a larger data file the number of samples recorded from an individual radar scan Commonly set to 512 one complete reflected wave from transmission to reception sometimes called a trace wheel attached to an...

Страница 92: ...ems Prentice Hall Reynolds John M 1997 An Introduction to Applied and Environmental Geophysics Wiley and Sons Roberts R L Daniels J J 1996 Analysis of GPR Polarization Phenomena JEEG 1 2 139 157 Sheriff R E and Geldart L P 1985 Exploration Seismology Volume 1 History Theory and Data Acquisition Cambridge University Press New York 253 p Sheriff R E and Geldart L P 1985 Exploration Seismology Volume...

Страница 93: ...e Soils Website USDA Natural Resources Conservation Service Ground Penetrating Radar Program USDA Natural Resources Conservation Service GPR Soil Suitability USDA Natural Resources Conservation Service Web Soil Survey North American Database of Archaeological Geophysics ...

Страница 94: ...e SIR 3000 software downloads Download the SIR 3000 USB transfer software file ASUSBwoMSASYNC exe and extract it to the root directory typically C Please note the location where you extracted it You will need this information for a later step With both PC and SIR 3000 running but not collecting or playing back data Plug Master rectangular end of USB cable into PC Plug Slave square end of USB cable...

Страница 95: ...At the Found New Hardware Wizard click Next At the Install Hardware Device Drivers dialog select Search for a suitable driver for my device and click Next ...

Страница 96: ...nsert the manufacturer s installation disk click Browse Find the directory you extracted the ASUSBwoMSAS drivers to earlier either C ASUSB or C ASUSBwoMSAS directory by default and select wceusbsh inf Click OK If you selected the correct directory you get the following dialog Click Next The installation is complete Click Finish ...

Страница 97: ... best driver in these locations and Include this location in the search Click Browse Find the directory you extracted the ASUSBwoMSAS drivers to earlier either C ASUSB or C ASUSBwoMSAS directory by default and select wceusbsh inf Click OK Finish the driver installation by following the onscreen instructions You will see the following dialog Select Continue Anyway ...

Страница 98: ... ActiveSync setup Use the default folder if possible It is likely that the installation will appear to hang at approx 91 for a few minutes Allow it to continue After completion you may see the New Partnership dialog In order to successfully transfer SIR 3000 data via USB you will need to set up a guest connection with the SIR 3000 Select No at this dialog each time you connect your SIR 3000 as you...

Страница 99: ...ce Guest Only connections and click okay Double click on Microsoft ActiveSync icon Go to File Connection Settings Make the selections shown below Click Next At this point you should disconnect the USB cable from the SIR 3000 and reboot the SIR 3000 After the SIR 3000 starts reconnect the USB cable You should see the ActiveSync symbol turn green in the system tray at this point you can right click ...

Отзывы: