


Mini-X Installation, Setup & User Manual GRT Avionics
Revision A9 22
Section 3: Mechanical Installation
3.1 Placement of the Mini on the Instrument Panel
The Mini is permanently mounted on the instrument panel face. The main consideration in choosing
a location is the ability to view the display unit and reach its controls. The Mini includes user settings
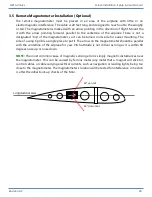
that allow it to be mounted in a wide range of orientations, including instrument panels with a
high degree of tilt (pitch), sub-panels or even wing roots, that angle the Mini toward the pilot in
yaw, and roll offset. These settings, which are explained in Section 4, allow the internal AHRS to
function with full accuracy regardless of its orientation.
Since the display is fully sunlight-readable, shielding the display unit from sunlight is not required.
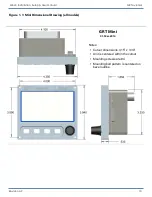
See Section 1 of this manual for instrument and panel cutout dimensions.
3.2 Mounting Hardware
The use of nut plates behind the instrument panel greatly simplifies the task of installing and
removing the 4 screws used to retain the display unit in the panel. #4 socket cap stainless steel
screws are recommended.
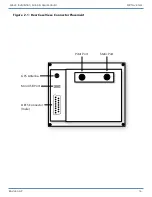
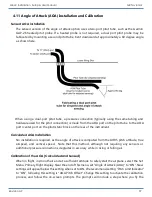
3.3 Pitot/Static Connections
The pitot-static connections on the back of the Mini are labeled P (pitot) and S (static) and take a
1/8 – 27 NPT male fitting. To facilitate installation and removal of the Mini unit, quick disconnect
fittings may be helpful. Refer to FAA Advisory Circular 43.13-2B for approved methods to tee off
existing pitot/static lines and make the whole system leak tight. Thread sealant or tape is optional.
You may carefully wrap the fittings with teflon tape for a better seal, provided the tape cannot
block the port. Loctite 567 thread sealant paste has also been used successfully in GRT EFIS
installations.
Consider placing a water trap or drain in the lowest part of the pitot-static system to prevent water
from getting into the electronics. Make sure the drain is of a high enough quality that it seals
completely airtight when closed.
3.4 Cooling Considerations
The Mini draws very low amounts of power and does not require external cooling. However, as
with all electronic equipment, lower operating temperatures extend equipment life. If you do
choose to supplement your Mini and other avionics with cooling air, be certain that cooling air
does not contain water – a problem often encountered when using external forced air cooling air.
A few small openings in the glare shield are usually enough to allow natural air circulation.


