


-56-
Model G0899 (Mfd. Since 10/20)
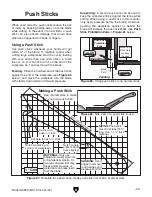
Using Auxiliary Fence & Push Block
1. Place auxiliary fence on table and clamp
it to fence at both ends, then adjust dis-
tance between auxiliary fence and blade—
this determines how wide workpiece will be
ripped (see
Figure 94).
2. Install blade guard, then secure spreader
pawls in upright position, as shown in
Figure
56 on Page 37, so they do not interfere with
push block lip.
Keep the blade guard installed and in the
down position. Failure to do this could
result in serious personal injury or death.
3. Place workpiece 1" behind blade and evenly
against table and auxiliary fence.
Workpiece
Cutting Width
Blade
Auxilliary Fence
Figure 94. Adjusting ripping distance between
blade and auxiliary fence.
Auxilliary Fence
Blade
Workpiece
Push Stick
for Side
Support
Blade Path
Push
Block
Figure 95. Push block in position to push
workpiece through blade.
4. Turn saw ON, then begin ripping workpiece
using a push stick for side support.
5. As workpiece nears end of cut, place push
block on auxiliary fence with lip directly
behind workpiece, then release push stick
just before blade.
6. Guide workpiece rest of way through cut with
push block, as shown in
Figure 96.
Push
Block
Lip
Release
Push Stick
Before Blade
Blade Path
Figure 96. Ripping with push block.
Turn OFF the saw and allow blade to come
to a complete stop before removing cut-off
piece. Failure to follow this warning could
result in serious personal injury.
Содержание G0899
Страница 92: ......