


Model G0899 (Mfd. Since 10/20)
-23-
6. Inspect extension wings and main table mat-
ing surfaces for burrs or foreign materials that
may inhibit assembly.
For a correct fit, mating edges of table and
wings must be clean, smooth, and flat. If nec-
essary, use a wire brush or file to remove any
flashing, dings, or high spots.
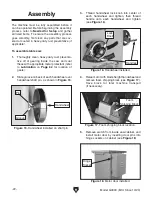
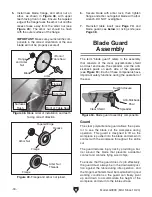
7. While an assistant holds wings in place,
attach each extension wing to main table
with (3) M10-1.5 x 30 cap screws, 10mm lock
washers, and 10mm flat washers (see
Figure
19).
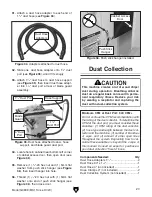
— If outside end of extension wing tilts up,
place strip of masking tape along top edge
of main table to shim end of extension
wing down (see
Figure 21).
Note: After re-installing wings, remove all
excess masking tape with a razor blade.
Figure 21. Masking tape location for adjusting
the extension wing down.
9. Attach front rail to table with (2) M10-1.5 x 25
hex bolts, (2) 10mm lock washers, and (2)
10mm flat washers, as shown in
Figure 22.
Finger tighten fasteners for now.
x 3
8. Place straightedge across extension wings
and main table to make sure that combined
table surface is flat.
— If combined table surface is flat, skip to
next step.
— If outside end of extension wing tilts down,
place a strip of masking tape along bottom
edge of main table to shim end of exten-
sion wing up (see
Figure 20).
Figure 20. Masking tape location for tilting
extension wing up.
Figure 19. Extension wings installed.
Main Table
Extension
Wing
(1 of 2)
Figure 22. Front rail attached to table.
Front Rail
x 2
Содержание G0899
Страница 92: ......