


-26-
Model G0899 (Mfd. Since 10/20)
24. Peel tape from fence scale label and carefully
align "0" mark on scale with pencil mark on
fence tube, then make sure tape is parallel
to fence tube along its length before placing
label.
25. Re-install fence, move it over to just touch
blade, and verify that indicator line is directly
over "0" mark.
—If you need to correct position of indica-
tor line, loosen Phillips head screws on
pointer window, adjust pointer window so
line is over "0" mark on tape (see
Figure
30), then tighten screws.
Figure 30. Rail tape aligned with scale pointer.
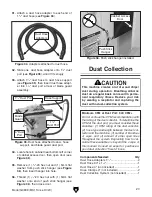
28. Attach dust port to cabinet using (4) M5-.8 x
12 button head cap screws and (4) 6mm flat
washers, as shown in
Figure 32.
x 4
Figure 32. Dust port installed.
29. Place 3
1
⁄
4
" hose clamps over each end of
3" dust hose, then attach 3" dust hose to
dust chute and dust port inside cabinet (see
Figure 33).
30. Install blade guard as outlined on Page 34.
Figure 33. Dust hose connected inside cabinet.
3
1
⁄
4
"
Hose
Clamp
26. Attach cabinet access door to hinges (see
Figure 31) and secure with hinge pins.
27. Remove (2) hex bolts and flat washers (see
Figure 31) from right-hand side of cabinet.
Close access door and secure with bolts and
flat washers.
Figure 31. Cabinet access door installed.
Hinges
x 2
Содержание G0899
Страница 92: ......