


Model G0899 (Mfd. Since 10/20)
-47-
Components Needed:
Flat Head Cap Screws M6-1 x (Auxiliary Fence
Width + Fence Tube Width) ........................3
Wood*
3
⁄
4
" x 4" x Length of Fence ......................1
*Only use furniture-grade plywood, kiln-dried
hardwood, or HDPE plastic to prevent warping.
Fence
Auxiliary Fence
M6-1 Flat
Head Cap Screw
Assembled Auxiliary Fence
Figure 76. Example auxiliary fence attached to
included fence.
3. Place auxiliary fence board against fence
tube. Place a thin metal shim (such as a
ruler) between table and bottom of auxiliary
fence board to ensure adequate clearance
between fence board and table. Clamp in
position.
4. Mark location of three mounting holes on
auxiliary fence and remove auxiliary fence
board from fence tube.
5. Using
7
⁄
32
" drill bit, drill mounting holes in
auxiliary fence board. Countersink holes
1
⁄
16
"
deep so head of flat head cap screws sits
slightly beneath face of auxiliary fence board.
6. Insert (3) flat head cap screws through holes
in auxiliary fence board (see
Figure 74) and
secure with knobs and flat washers removed
earlier. The end result should be similar to
Figure 76.
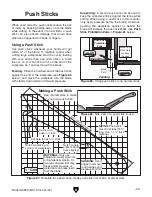
To build an auxiliary fence:
1. Cut auxiliary fence board to size. If you are
using hardwood, cut board oversize, then
joint and plane board to correct size to make
sure board is square and flat.
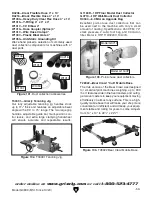
2. Unthread (3) knobs and (3) flat washers
securing fence face to fence tube shown in
Figure 75, then remove fence.
Figure 75. Location of knobs and flat washers
securing fence to fence tube.
Flat Washer
Knob
(1 of 3
Содержание G0899
Страница 92: ......