


Model G0899 (Mfd. Since 10/20)
-37-
Enabling Pawls
To enable the pawls, lift up on each pawl and
move them outward and down until they both
touch the table surface, as shown in
Figure 55
on
Page 36.
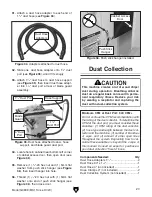
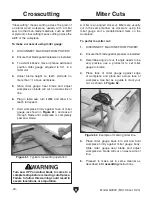
When to Use the Blade Guard
The blade guard assembly MUST always be
installed on the saw for all normal through cuts
(those where the blade cuts all the way through
the thickness of the workpiece). If the blade
guard is removed for specific operations, always
immediately replace it after those operations are
complete.
When Not to Use the Blade Guard
The blade guard cannot be used on any non-
through cuts (those in which the blade does
not cut all the way through the thickness of the
workpiece).
IMPORTANT: Whenever the blade guard cannot
be used, the riving knife must be installed.
Sometimes the blade guard or its components
can get in the way when cutting very narrow
workpieces or other specialized cuts. Because
the blade guard is provided to decrease your risk
of injury, it should not be used if it gets in the way
of making a safe cut. Use good judgment!
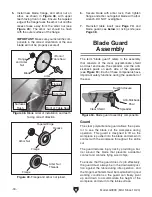
Disabling Pawls
You might disable the pawls if you are concerned
about them scratching a delicate workpiece, or
if you believe that they will obstruct a narrow
workpiece and cause feeding difficulty or loss of
control. Use your best judgment before retracting
the pawls, as they are provided for your safety.
To disable pawls:
1. DISCONNECT MACHINE FROM POWER!
2. Rotate one or both arresting hooks down-
ward, then place pawls on each of the hooks,
as shown in
Figure 56.
We do not recommend disabling pawls dur-
ing normal operations unless absolutely
necessary. In most situations, disabling
pawls will increase your risk of serious per-
sonal injury in event of a kickback. Do not
remove pawls from spreader.
The pawls are sharp and can lacerate fingers
or hands. Use caution, and wear leather
gloves when handling the pawls to reduce
risk of injury.
Figure 56. Pawls disabled.
Pawl
Arresting Hooks
(1 of 2)
Содержание G0899
Страница 92: ......