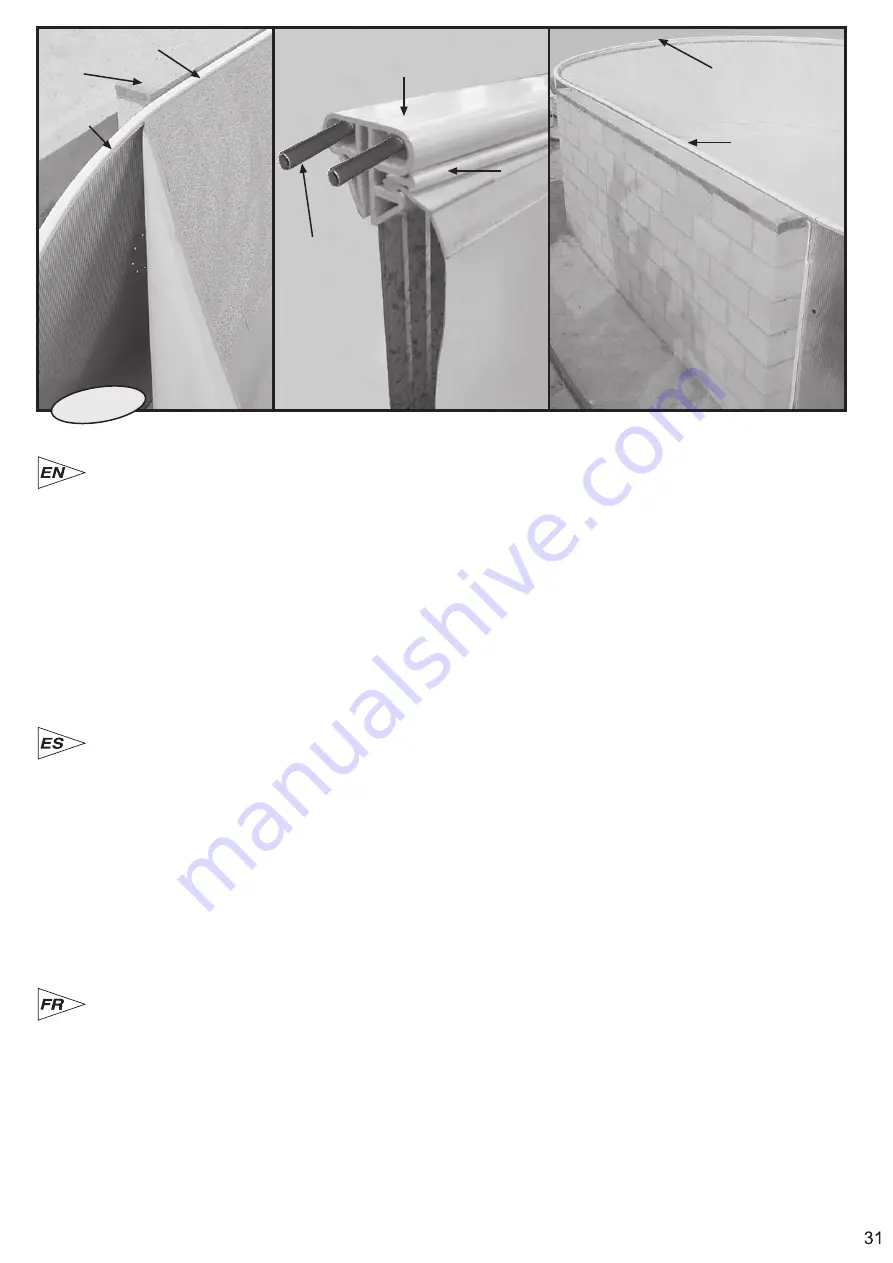
Instalación del Liner ( L ):
Introducir el lateral del liner en la ra
n
ura del perfil de extrusión (
PIG
CURVO
y PIG
RECTO
).
Si al final del proceso parece que falta o no llega el lateral, estirar poco a poco todo el lateral del liner hasta conseguir introducir
lo
en la ra
n
ura del perfil en todo el perímetro de la piscina. En el caso de que sobre lateral, recoger el diferencial entre todo el
perímetro de la piscina. Nunca intentar recuperar o recoger el lateral sobrante ó faltante en 2 ó 3 metros del perímetro la
distancia, sino repartir el material entre la semicircunferencia en la que falte ó sobre el material, verificando con anterioridad
que las
marcas
estén correctamente situadas. Cuando tenga todo el liner colgado fíjelo por medio del
Perfil de fijación del
liner
(
PF
) encajándolo y presionándolo contra el liner en la ra
n
ura del perfil de extrusión (
PIG
CURVO
y
PIG
RECTO
) a lo largo de
todo el perímetr
o
.
Una vez colocado el liner puede iniciar el llenado del agua (vigilando que no queden pliegues en el fondo antes de tener más
de 3 - 4 cm de agua).
Controle el llenado del agua hasta 4 cm del troquel destinado a la valvula de retor
no
VR para su colocación.
Installation du Liner (L) :
Introduire le latéral du liner dans la rainure du profil d’extrusion
(
PIG
CURVO
et
PIG
RECTO
).
Si à la fin du processus il semble qu’il manque le latéral du liner où que celui-ci n’arrive pas sur les côtés, l´étirer peu à peu
tout le latéral du liner jusqu’à que l’on puisse l’introduire dans la rainure du profil sur tout le périmètre de la piscine. Dans le
Au cas où le latéral dépasserait, enlever la différence sur tout le périmètre de la piscine. Ne jamais pas essayer de
récupérer ou d’enlever le latéral sur plus ou moins sur 2 ou 3 mètres du périmètre ; il faudra plutôt distribuer le matériel
entre la semi-circonférence là où il y a du matériel est en plus ou en moins, en vérifiant si les
marques
sont correctement
situées.
Lorsque tout le liner sera accroché, il faudra le fixer avec le
Profil de fixation du liner
(
PF
) en l’emboîtant et en appuyant
dans la rainure du profil d’extrusion
(
PIG
CURVO
ou
PIG
RECTO
) sur tout le périmètre.
Après avoir posé le liner vous pouvez commencer à remplir la piscine. Il faudra veiller à ce qu’il n’y ait pas de plis au fond
avant d’arriver à une hauteur de 3 - 4 cm d’eau.
Le remplissage ne doit pas aller au-delà de 4 cm des pièces percées destinées aux soupape de refoulement VR pour
pouvoir installer ces dispositifs.
Installing the liner (L):
Insert the sidepiece of the liner in the groove of the top track formed by wall plate guide section
pieces (
PIG
CURVO
and
PIG
RECTO
).
If, when the process is finished, there does not seem to be enough sidepiece, stretch the sidepiece of the liner slowly until
it can be inserted into the groove of the top track along the entire perimeter of the pool. If there is too much sidepiece,
collect the difference along the entire perimeter of the pool. Under no circumstances should you try to even out an excess
or lack of sidepiece along 2 or 3 metres of the perimeter. It is best to distribute the material between the
semi-circumference where there is an excess or lack of material, first checking that the
marks
are correctly positioned.
When the entire liner is in position, snap-fit it in place by using the
liner fastening section (PF),
pressing it against the
liner in the groove in the guide section pieces
(
PIG
CURVO
and
PIG
RECTO
) all along the perimeter.
Once the liner is in position, you can start to fill the pool (making sure that there are no creases on the bottom before the
water level reaches higher than 3-4 cm.
Fill the water up to 4 cm from the perforation mark for the return valve (VR) and ensure said level to enable the fitting of the
corresponding elements.
PF
PIG
L
10
PIG
CURVO
PIG
RECTO
L
M
PIG
CURVO
PIG
RECTO
PU
Содержание K3000PNE
Страница 3: ......
Страница 8: ...l echelle...
Страница 9: ......
Страница 11: ...7 x 3 2 m 9 x 5 2 m 7 x 3 2 m 9 x 5 2 m 7 x 3 2 m 9 x 5 2 m 7 x 3 2 m 9 x 5 2 m...
Страница 43: ...41 41...
Страница 44: ......
Страница 45: ...43...
Страница 46: ...44 ACCESSORIES ACCESORIOS ACCESSOIRES ZUBEH R ACCESSORI ACCESSOIRES ACESS RIOS INSTRUCTIONS PA R T E 6...


