background image

4-9

  4 

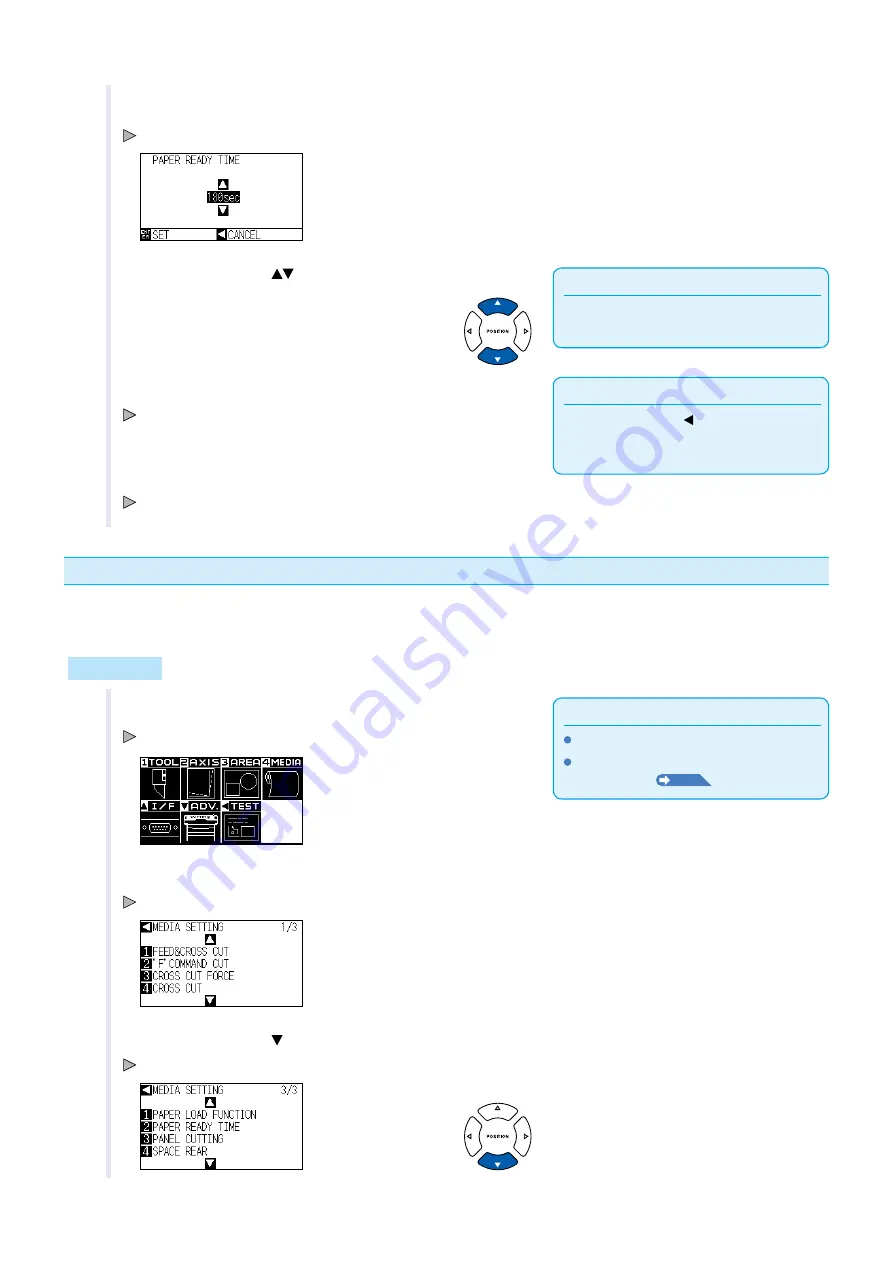
Press the [2] key (PAPER READY TIME).

 PAPER REDY TIME settng screen s dsplayed.

Supplement

Paper exposure tme can be set to 0, 60, 120, 
180, 300, 420, or 600 seconds.

  5 

Press the POSITION (

) key and ncrease or decrease the 

settng value.

Supplement

Press the POSITION ( ) (CANCEL) key to 
return to the MEDIA SETTING screen (3/3) 
wthout changng any settngs.

  6 

Confirm the setting and press the [ENTER] key (SET).

 Settng wll be set, and t wll return to MEDIA SETTING screen (3/3).

  7 

Press the [PAUSE/MENU] key.

 It wll return to default screen.

Setting the space rear

Ths settng allows a cross cut to be made from the maxmum value of the cut along the X axs based on the rear 

margn settng durng tme out or when makng a cross cut across a separator.

Operation

Supplement

 Perform the settngs n Normal menu.
 For the READY status, see "How to Use 

Control Panel" 

P.2-21

.

  1 

Press the [PAUSE/MENU] key n READY status.

 MENU screen s dsplayed.

  2 

Press the [4] key (MEDIA).

 MEDIA SETTING screen (1/3) s dsplayed.

  3 

Press the POSITION ( ) key.

 MEDIA SETTING screen (3/3) s dsplayed.


Содержание CE6000-120AP

Страница 1: ...USER S MANUAL MANUAL NO CE60AP UM 153 CUTTING PLOTTER CE6000 120AP...

Страница 2: ...ore reading the Manual DANGER This category provides information that if ignored is highly likely to cause fatal or serious injury to the operator WARNING This category provides information that if ig...

Страница 3: ...No disassembly Do not connect the plotter to a non rated power supply Such action may cause electric shock or a fire hazard due to current leakage Prohibited Do not use the plotter in a location where...

Страница 4: ...he plotter Prohibited Do not place any receptacle containing water or other fluid on top of the plotter Fluid falling inside the plotter may cause electric shock or a fire hazard due to current leakag...

Страница 5: ...pt to lubricate the cutting plotter mechanisms Such action may cause it to break down Prohibited Provide sufficient space around the plotter so that it does not strike any objects in its vicinity duri...

Страница 6: ...e subject to change without notice 3 While every effort has been made to provide complete and accurate information please contact your sales representative or nearest Graphtec vendor if you find any u...

Страница 7: ...s or other parts of your body Promptly return used blades to the cutter case provided Blade tip When the case is completely filled discard the used blades together with the case Cutter Pens The tip co...

Страница 8: ...objects to become entangled with the tool carriage or loaded media while the plotter is operating During a plotting or cutting operation do not touch the gears rollers or other moving parts Please be...

Страница 9: ...utting or plotting may differ depending on how the roll media ended or how the paper roll was stopped About the paper roll This machine uses rolls with an internal diameter of 3 inches or 76 2 mm Mis...

Страница 10: ...COMMISSION RADIO FREQUENCY INTERFERENCE STATEMENT NOTE This equipment has been tested and found to comply with the limits for a Class A digital device pursuant to part 15 of the FCC Rules These limits...

Страница 11: ...ween 2 mm and 8 mm from the right edge of the grit roller Push roller Grit roller 8 mm or more Media Push roller Grit roller 2 mm to 8 mm Media OK NG Notes on the crosscut When setting the push roller...

Страница 12: ...0 A Table 2 200 V to 240 V Power Supply Voltage Range Plug Configuration Plug Type Supply Voltage Selector Settings Reference Standards Power Cable Europe 250 V 10 A 200 V CEE 7 VII IEC320 CEE13 TYPE...

Страница 13: ...DIO FREQUENCY INTERFERENCE STATEMENT V USE SHIELDED CABLES V To use a media wider than 1 119 mm VI Selecting a Power Cable VII Chapter 1 Product Summary 1 1 Checking the Accessories 1 2 Accessories 1...

Страница 14: ...uto media transfer and cross cut 2 28 2 10 Selecting Tool Condition 2 29 Selecting Tool Condition 2 29 Setting the Tool Condition 2 30 Setting the Tool 2 31 Setting Condition No 1 Pen plunger specific...

Страница 15: ...g Cutting Area 4 2 Setting Cutting Width EXPAND 4 4 Setting Length of the Page 4 5 Setting the number of pre feeds 4 7 Setting paper Ready time 4 8 Setting the space rear 4 9 4 2 Copy Duplicate Cuttin...

Страница 16: ...1 Setting Interface 8 2 USB Interface 8 2 RS 232C Interface 8 2 Interface Setting Menu 8 2 Connecting with RS 232C 8 3 Setting user selection 8 3 Switching the user selection setting 8 4 Changing and...

Страница 17: ...Troubleshooting 12 1 Troubleshooting 12 2 When the Plotter Does Not Operate After Turning the Power On 12 2 When It Does Not Work Right 12 3 When the Cutting Result is Not Good 12 5 Error Messages in...

Страница 18: ...1 1 Chapter 1 Product Summary This chapter explains how to connect this device your computer PRODUCT SUMMARY 1 1 Checking the Accessories 1 2 Nomenclature 1 3 Assembling 1 4 Connecting to the Computer...

Страница 19: ...SAFE AND CORRECT USE Cutter Blade Manual 1 of each Cutter holder PHP33 CB09N HS 1 pc Cutter blades 1 pc Oil based ballpoint pen plunger PHP34 BALL 1 set Oil based ballpoint pen KB700 BK 1P 1 pc Media...

Страница 20: ...ensor is used to sense the trailing edge of the media Tool carriage Moves the cutter pen or plotting pen across the media during cutting or plotting Cutter holder Holds the cutter in position while mo...

Страница 21: ...haft A roller that takes in roll media Media flange Fixes the paper roll media in place as per settings Media guide Guides the paper media during the plotting cutting process Rear View Stand Media sto...

Страница 22: ...ar L 1 with media stocker Center bar 1 Allen wrench for M5 cap screw 1 Socket head cap screw M5 22 Base assembly 2 Stand side bar R 1 with media stocker Media guide 1 Components of basket Joint 4 Shee...

Страница 23: ...eft and right stand sides 1 Assemble the left and right stand sides Attach both the left and right sides of the base assembly Fasten a stand foot to each of the stand side bars with two socket head ca...

Страница 24: ...h two socket head cap screws using the Allen wrench Media guide bar Socket head cap screw Socket head cap screw Media stocker 4 Fasten the supporting pipe plate to the left and right of the stand side...

Страница 25: ...rom the front end of the main assembly End plug Joint Joint Sheet supporting pipe short End plug End plug End plug Sheet supporting pipe short Sheet supporting pipe short Supporting pipe plate Joint J...

Страница 26: ...then attach the joints from the assembly from step 5 to the long sheet supporting pipe from step 6 The middle of the basket should pass over the back end of the center bar Basket Center bar Sheet supp...

Страница 27: ...er make sure that there are no objects in its vicinity Leave a clear space of at least 300 mm around the plotter 8 Mount the plotter on the stand by inserting the positioning pins on the stand into th...

Страница 28: ...he media guide onto the components of the positioning pins at the bottom end of the main assembly Attach both sides of the media guide using the 2 socket head cap screw Socket head cap screw Socket he...

Страница 29: ...he port used use either the USB cable the RS 232C cable CB0023C HS sold separately to connect Use the cables specified by Graphtec matching the computer that is to be connected Connection 1 Check that...

Страница 30: ...g to the Power 2 7 How to Use Control Panel 2 8 Setting Feeding Method 2 9 Auto media transfer and cross cut 2 10 Selecting Tool Condition 2 11 Setting Cut Line Pattern 2 12 Running Cutting Tests 2 13...

Страница 31: ...de length adjustment knob Blade length adjustment knob Plunger cap blue Plunger cap red Hole Hole Adjusting the Blade Length Blade length needs to be adjusted to perform optimal cut Perform few test c...

Страница 32: ...2 3 Blade Application and Features Select the optimal cutter blade and medium to be cut Refer to the Cutter Blade Manual CAUTION To avoid bodily injury handle cutter blades with care...

Страница 33: ...the cutting plotter is turned on or whenever the cutter plunger is moving The cutter holder is suitable only for use with the cutter plunger Please refrain from attaching the plotting pen to it Pen h...

Страница 34: ...cutter holder Flange Bracket to hold tool This cutter holder is not set backward Cutter holder Forward Flange 3 Make sure that the tool bracket is engaged on the cutter plunger s flange and then tigh...

Страница 35: ...henever the pen is moving Operation 1 1 You can attach the pen by opening up the holder on the pen station with your finger Holder Supplement Make sure to check that the top part of any tools mounted...

Страница 36: ...dia P 2 14 Loading Sheet Media CAUTION Notes when using roll media Make sure to reduce the maximum feed rate if there is any trouble with paper feed not using the basket Take all cut plotted paper out...

Страница 37: ...using paper of a different width loosens the flange screw adjust the position of the grit roller then re tighten the flange screw Groove Flange screw Media flange Media Approx 100 mm Grooved portion...

Страница 38: ...shaft is misaligned when plotting begins Align the receiving end of the media shaft with the grooves on the roller and push down firmly to set it in place Stock shaft Lever Roller Lever Please make s...

Страница 39: ...sh rollers 6 Put the roll media on the roll media tray and then push the tip of the roll media forward from the back of the machine Make sure to pull it so that there is no slackening across the roll...

Страница 40: ...are on top of the grit rollers Use the grit roller position guide to make sure the push rollers are set on top of the grit rollers You can adjust the center push roller s hold down force Grit roller...

Страница 41: ...t 5 mm inside the edges of the media Push roller Media 5 mm 5 mm CAUTION During a plotting or cutting operation be sure to keep your hands hair and so forth away from the media stocker gears and rolle...

Страница 42: ...fter confirming that the route the roll paper passes through is taut and not slackening The push roller position and the roll paper will stay in place Media set lever CAUTION During a plotting or cutt...

Страница 43: ...Loading Sheet Media Operation 1 Lower the media set lever to raise the push rollers Push roller Media set lever Media sensor 2 Make sure that the sheet media completely covers the media sensor Media s...

Страница 44: ...r position guide to make sure the push rollers are set on top of the grit rollers You can adjust the center push roller s hold down force Grit roller position guide Media sensor Push roller Grit rolle...

Страница 45: ...n t on the grit roller It isn t on the grit roller CAUTION To move the push rollers the media set lever must be in the lowered position Supplement If a confirming push roller point message appears aft...

Страница 46: ...ere is a stopper Push roller Grit roller 2 mm to 8 mm Media CAUTION Notes on the left grit roller The left grit roller is not available in all locations It s not possible to set the right edge of the...

Страница 47: ...l Low OFF Low OFF Switching 1 Lower the media set lever to raise the push rollers 2 Use the push roller hold down force switching lever on the back of the push roller to adjust the center push roller...

Страница 48: ...the switch a message will be displayed after the version is displayed Here PLEASE DISPLAY LANGUAGE setting screen is displayed 2 Use the POSITION keys to select the language This manual assumes you ch...

Страница 49: ...3 Turn on the CE6000 120AP by pressing the side of the switch LCD on the control panel is lit Supplement The Default Screen will appear after purchasing the machine See 2 5 About the Default Screen P...

Страница 50: ...d tool carriage position ORIGIN It will set the current position as an origin point On the default screen pressing the ENTER and ORIGIN keys at the same time will allow you to reset the machine Only i...

Страница 51: ...lt screen This instruction manual will use Normal menu screens to demonstrate everything Display of setting condition Command GP GL GP GL Command HP GL HP GL Command Step size 0 1 0 1 mm 0 05 0 05 mm...

Страница 52: ...COND TEST CONDITION screen Simple menu Menu screen Simple menu CONDITION screen Normal menu Menu screen Normal menu Page number is displayed in the upper right corner of the screen if there are too m...

Страница 53: ...FAST Displays the position key screen When media is set the tool point can be moved P A 5 See the Menu Tree for list of the descriptions about each settings Normal menu In Normal mode 1 2 3 4 and keys...

Страница 54: ...e Tool conditions are set in the setting screens displayed by the COND TEST key Up to 8 CONDITION settings can be saved with different settings in numbers 1 through 8 COND TEST This will clear the CON...

Страница 55: ...dia type on the media set setting screen Lever Lowering the lever releases the stopper lock Supplement When selecting 1 or 2 key Please confirm on the confirmation screen that the lever lock has been...

Страница 56: ...e currently detecting media 3 After the media is detected the plotter is ready to receive data for cutting or plotting This status is called READY status of the default screen When setting is finished...

Страница 57: ...IA in Simple menu MEDIA SETING screen is displayed MEDIA SETING screen Simple menu MEDIA SETING screen Normal menu 3 Press the 1 key FEED CROSS CUT Auto media transfer and cross cut screen is displaye...

Страница 58: ...can also be changed from READY status See Changing CONDITION No P 3 6 1 Press the COND TEST key in the default screen CONDITION setting screen 1 3 is displayed 2 Press the 1 key Condition No CONDITION...

Страница 59: ...Part no Force Speed cm s Acceleration Oil based ballpoint pen KB700 series 12 to 31 60 or under 2 or under Water based fiber tip pen KF700 series 10 to 12 20 or under 2 or under To prolong the pen lif...

Страница 60: ...8 when setting up the tool conditions for the cutter plunger For more information see 2 10 Selecting Tool Condition P 2 29 1 Press the COND TEST key in the default screen CONDITION setting screen 1 3...

Страница 61: ...2 to Condition No 8 when setting up the tool conditions for the cutter plunger For more information see 2 10 Selecting Tool Condition P 2 29 1 Press the COND TEST key in the default screen CONDITION...

Страница 62: ...des Fine adjustment will be made to that standard values here Adjustment will be made with standard value as 0 It is not necessary to set the offset if PEN was selected in the tool settings not displa...

Страница 63: ...ST key in the default screen CONDITION setting screen 1 3 is displayed Supplement It will return to CONDITION screen 1 3 without changing the settings when you press the 4 key CANCEL 2 Press the 3 key...

Страница 64: ...2 29 1 Press the COND TEST key in the default screen CONDITION setting screen 1 3 is displayed Supplement It will return to CONDITION screen 1 3 without changing the settings when you press the 4 key...

Страница 65: ...3 is displayed 2 Press the POSITION key CONDITION setting screen 2 3 is displayed Supplement It will return to CONDITION screen 2 3 without changing the settings when you press the 4 key CANCEL 3 Pres...

Страница 66: ...and make it touch the surface of the media Media Blade Supplement Blade length can be changed by spinning the adjustor on the blade Spinning it in the A direction pushes it out while spinning it in t...

Страница 67: ...for each condition number Supplement Use the holder forward Flange Bracket to hold tool This cutter holder is not set backward Cutter holder Forward Flange Damaged marking mats can be replaced at the...

Страница 68: ...INE PATTERN setting screen is displayed 4 Press the 1 key Condition No CONDITION No selection screen is displayed 5 Press the POSITION key and select the CONDITION No 6 Confirm the setting value and p...

Страница 69: ...POSITION key PREVIOUS It will return to UP MODE CUT LINE PATTERN setting screen Supplement If the TYPE No 0 to 7 is selected in step 8 CUT L and UP L is only displayed and not possible to change Skip...

Страница 70: ...rom Condition No 2 to Condition No 8 under Selecting the Tool Condition For more information see 2 10 Selecting Tool Condition P 2 29 2 Press the COND TEST key in the default screen In Normal mode CON...

Страница 71: ...e Optimal offset value Too much adjustment Decrease the offset value Check the UP length when cutting When the UP length is not enough those that are cut during cutting may come off UP length Adjustme...

Страница 72: ...e following settings on Simple mode s default screen P 2 21 See How to Use Control Panel for detailed information COND TEST Set Tool Conditions See P 2 29 Selecting Tool Condition COPY Make a copy See...

Страница 73: ...et the both push rollers at least 15mm inside the edge of media The paper needs to be reset after cutting 5 consecutive pages Each page should be removed from the basket after it has been cut When set...

Страница 74: ...than 500cm After confirming press the ENTER key 4 Press the POSITION keys to change the current setting Supplement Press the POSITION key to return to the MEDIA setting screen without changing any se...

Страница 75: ...n You can also be set it on the Normal menu Operation 1 Press PAUSE MENU key MENU screen is displayed 2 Press 1 key MEDIA MEDIA SETTING screen is displayed 3 Press 3 key PAPER LOAD FUNCTION PAPER LOAD...

Страница 76: ...me out 0 0 120 120 1 10 0 0 Page length mm 1500 3000 1500 5000 3000 1500 5000 5000 Transfer conditions 9600N81X 9600N81X 9600N81X 9600N81X 9600N81X 19200N81X 9600N81X 9600N81X Step pass 0 Tool up spee...

Страница 77: ...Supplement There are 8 different setting numbers 4 Press the POSITION keys to select the setting number Supplement Press the POSITION key CANCEL to return to the INTERFACE setting screen without chan...

Страница 78: ...ce can be set from the control panel The transfer condition should be set to the same in the software used and in the CE6000 120AP If there is a mistake in the settings an error may display in the mac...

Страница 79: ...POSITION key PREVIOUS to return to the RS 232C setting screen without changing any settings 8 Press 1 key 8 BIT or 2 key 7 BIT Data length is set and it will return to RS 232C setting screen 9 Press...

Страница 80: ...are available for HP GL Even if Enq Ack is set for GP GL it is set to HARDWIRE 12 Press 1 key HARDWIRE 2 key X on off or 3 key Enq Ack The handshake is selected and it will return to RS 232C setting s...

Страница 81: ...default screen press PAUSE MENU key MENU screen is displayed 2 Press 3 key ADV ADVANCE setting screen is displayed 3 Press 1 key LENGTH UNIT LENGTH UNIT setting screen is displayed 4 Press 1 key METR...

Страница 82: ...is to start from the READY status media is set as a general condition Perform the operation described in this chapter after making the plotter in READY status referring to previous chapter PRODUCT SUM...

Страница 83: ...ngs in Normal menu 1 Press the PAUSE MENU key MENU screen is displayed 2 Press the 1 key TOOL TOOL SETTING 1 3 screen is displayed 3 Tool is raised or lowered every time the 1 key TOOL UP DOWN is pres...

Страница 84: ...POSITION keys once to move in the desired direction Tool carriage or the media will move toward the direction of the pressed POSITION key for 1 step Continuously Move Manually It can manually move co...

Страница 85: ...2 is displayed 3 Press the 1 key MOVE STEP MOVE STEP screen is displayed Supplement Value chosen here will be the movement distance for the step movement 4 Press the 1 key 1 0mm or the 2 key 0 1mm Su...

Страница 86: ...ea machine origin point Standby position of the pen carriage When using Sheet Media Seen from above To the top of the maximum cutting area Bottom of the operation area machine origin point Operation S...

Страница 87: ...1 key No 1 the 2 key No 2 the 3 key No 3 the 4 key No 4 the key No 5 the key No 6 the key No 7 or the key No 8 while simultaneously pressing the ENTER key Setting will be set and it will return to def...

Страница 88: ...in point by pressing the POSITION key when it is in READY status Supplement An Initial feed will be performed when initial feed is set to ON and the ORIGIN key is pressed For more information on media...

Страница 89: ...t The origin point will be initialized as shown below if the coordinate is rotated after moving the origin point Distance a will be maintained but distance b will be initialized New origin point Origi...

Страница 90: ...settings in Normal menu 1 Press the PAUSE MENU key MENU screen is displayed 2 Press the POSITION key INTERFACE screen 1 3 is displayed 3 Press the 3 key HP GL ORIGIN POINT HP GL ORIGIN POINT setting s...

Страница 91: ...ation settings on Coordinate axes rotation settings off Operation Supplement Perform the settings in Normal menu 1 Press the PAUSE MENU key MENU screen is displayed 2 Press the 3 key AREA AREA PARAMET...

Страница 92: ...e settings when you press the POSITION key CANCEL 5 Confirm the setting and press the ENTER key SET Setting will be set and it will return to AREA PARAMETERS screen 1 1 6 Press the PAUSE MENU key The...

Страница 93: ...ing Operation 1 Press the PAUSE MENU key Cutting will stop and following screen is displayed Supplement There is no effect on the selection of media type when the media set lever is moved up and down...

Страница 94: ...rn to operation stop screen without clearing buffer memory when 2 key CANCEL is pressed In the case that the operation is interrupted and the buffer is cleared make sure that the data transfer is stop...

Страница 95: ...pter describes about the convenient functions of the plotter PRODUCT SUMMARY 4 1 Settings for Cutting 4 2 Copy Duplicate Cutting 4 3 Panel Cutting 4 4 Setting a cross cut 4 5 Setting a cut F_CUT for F...

Страница 96: ...elected Move the origin point to change the cutting position Upper right set position Image already cut Origin point It will only cut within this range Operation Supplement Perform the settings in Nor...

Страница 97: ...sage will appear for areas that are too small You will need to reset the settings for the upper right and lower left points 6 Press the POSITION key and move the tool carriage to the upper right posit...

Страница 98: ...g an expand setting 0 Default 10 mm Left hand Right hand Left hand Right hand 1201 mm to 1220 mm 0 0 0 10 mm CAUTION Do not set the INITIAL BLADE CONTROL POSITION of the tool setting to OUTSIDE when t...

Страница 99: ...described below is used Be sure to use the basket Media genuine Graphtec brand products Setting Conditions Speed under 30 acceleration under 2 Perform pre feed for the amount to be used before cutting...

Страница 100: ...PAGE LENGTH screen is displayed Supplement Digits of settings can be changed by pressing the FAST key Setting range is from 20 0 cm to 5000 0 cm The following screen will display if using a setting gr...

Страница 101: ...he settings in Normal menu 1 Press the PAUSE MENU key MENU screen is displayed MENU screen Simple menu MENU screen Normal menu 2 Press the 4 key MEDIA in Normal menu or press the 1 key MEDIA in Simple...

Страница 102: ...his function sets the time the paper media is acclimated to the operating environment after being pulled off the paper roll to minimize media expansion or contraction and prevent it from adversely eff...

Страница 103: ...t will return to MEDIA SETTING screen 3 3 7 Press the PAUSE MENU key It will return to default screen Setting the space rear This setting allows a cross cut to be made from the maximum value of the cu...

Страница 104: ...mm to 30 0 mm 5 Press the POSITION key and increase or decrease the setting value Supplement Press the POSITION CANCEL key to return to the MEDIA SETTING screen 3 3 without changing any settings 6 Con...

Страница 105: ...eed to copy cutting with large data See Sorting the Cutting Data P 7 2 for data sort Watch out that it does not fall out of media when cutting with copy function If the original cutting data to be cop...

Страница 106: ...is displayed 4 Press the 1 key MEDIA CHANGE MODE MEDIA CHANGE MODE setting screen is displayed 5 Press the 1 key OFF Confirm the settings and return to the COPY MODE screen 6 Press the 2 key NUMBER OF...

Страница 107: ...ease or decrease the setting value 11 Confirm the setting and press the POSITION key PREVIOUS Copy space will be selected and it will return to COPY MODE screen Supplement Cutting data is stored even...

Страница 108: ...edia selection will be chosen from what was selected before copying If there is no data in the buffer memory There is no data for copying in the buffer will be displayed Please send cutting data If to...

Страница 109: ...Supplement Cutting data is stored even if the media is exchanged It can be copied as many times until the buffer memory is cleared It can be copied again after exchanging the media by pressing COPY ke...

Страница 110: ...en when numerous pieces of partition pastern data are in the plotter buffer When partition pastern is on the machine works with priority of partition length plus something minutes ago with footprints...

Страница 111: ...y to change the setting digits The partition length can be set from 1 0 to 2000 0 cm 7 Press the 2 key DIVIDE LENGHT DIVIDE LENGHT setting screen is displayed 8 Press the POSITION key and increase or...

Страница 112: ...ormal menu 1 Press the PAUSE MENU key MENU screen is displayed 2 Press the 4 key MEDIA MEDIA SETTING screen 1 3 is displayed 3 Press 4 key CROSS CUT CROSS CUT screen is displayed 4 Press 1 key ON or 2...

Страница 113: ...upplement Perform the settings in Normal menu 1 Press the PAUSE MENU key MENU screen is displayed 2 Press the 4 key MEDIA MEDIA SETTING screen 1 3 is displayed 3 Press 2 key F COMMAND CUT F COMMAND CU...

Страница 114: ...Press the PAUSE MENU key MENU screen is displayed 2 Press the 4 key MEDIA MEDIA SETTING screen 1 3 is displayed 3 Press 3 key CROSS CUT FORCE CROSS CUT FORCE screen is displayed Supplement You can set...

Страница 115: ...in how to match up points while manually confirming the media and tool cutter pen or plotting pen points The ARMS function cannot be used for accurately matching up points PRODUCT SUMMARY 5 1 Outline...

Страница 116: ...marks The position of each alignment mark is shown in the next figure 2POINTS First point or origin point Second point Example of axis adjustment The pre and post adjustment grid appears as follows Me...

Страница 117: ...so that it will be easier to tell where the Origin point and the coordinate axes are Please make sure to plot inside of the area parameters so that the machine can determine the line of the X axis and...

Страница 118: ...ey to check the tool position Supplement Tool carriage will move faster when the FAST key is pressed simultaneously with the POSITION key 8 Press the POSITION keys to move the tip of the tool to the a...

Страница 119: ...N key match the tool tip and move to the mark position This will now measure the degree of the tilt on the X axis and make the necessary adjustments Once the adjustments are complete it will return yo...

Страница 120: ...ndition of the blade Adjust the movement speed and the pressure on the tool and the control method in order to avoid this problem This chapter explains the settings for the quality of these types of p...

Страница 121: ...precisely cut corners where two straight lines meet See below With the tangential mode the blade is advanced so it will overcut at the corners before raising the tool Then it will be lowered at the po...

Страница 122: ...ON setting screen 1 3 is displayed 2 Press the POSITION key CONDITION setting screen 2 3 is displayed 3 Press the 3 key TANGENTIAL MODE TANGENTIAL MODE setting screen is displayed 4 Press the POSITION...

Страница 123: ...ation see 2 10 Selecting Tool Condition P 2 29 1 Press the COND TEST key CONDITION setting screen 1 3 is displayed 2 Press the POSITION key CONDITION setting screen 2 3 is displayed 3 Press the 4 key...

Страница 124: ...nt Setting range is from 0 0 mm to 0 9 mm 11 Press the POSITION key and increase or decrease the setting value 12 Confirm the setting value and press the POSITION key PREVIOUS Length for overcut END i...

Страница 125: ...lowered will be 29 The upper limit for added value is 39 Operation Supplement Condition No 1 is pen specific When setting up tool conditions for the cutter plunger please choose from Condition No 2 t...

Страница 126: ...be what you intended if the set value is too large It is recommended to set to 1 for normal use Operation Supplement Perform the settings in Normal menu 1 Press the PAUSE MENU key MENU screen is displ...

Страница 127: ...is set too large there will be not enough angle control of the blade and the cut result may differ from what was expected Set the reference angle in good balance Supplement This setting is maintained...

Страница 128: ...n 2 3 without changing the settings when you press the POSITION key CANCEL 6 Confirm the setting and press the ENTER key SET Setting will be set and it will return to TOOLS SETTING screen 2 3 7 Press...

Страница 129: ...ven if the power is shut off Operation Supplement Perform the settings in Normal menu 1 Press the COND TEST key CONDITION setting screen 1 3 is displayed 2 Press 3 key AREA AREA PARAMETERS setting scr...

Страница 130: ...ss the POSITION key and increase or decrease the Y DISTANCE ADJUST value 9 Confirm the setting value and press the POSITION key PREVIOUS Y DISTANCE ADJUST will be set and it will return to DISTANCE AD...

Страница 131: ...f the range of the cutting area Feed direction of media Feed direction of media 2mm Push roller Initial Blade Control Position Setting Point Set as OUTSIDE Cut Start Point Cutting Origin Point Initial...

Страница 132: ...or the 2 key 2mm BELOW Supplement It will return to TOOLS SETTING screen 3 3 without changing the settings when you press the POSITION key CANCEL 6 Confirm the setting and press the ENTER key SET Sett...

Страница 133: ...l menu 1 Press the PAUSE MENU key TOOL setting screen 1 3 is displayed 2 Press the 1 key TOOL TOOLS SETTING screen 1 3 is displayed 3 Press the 4 key OFFSET FORCE OFFSET FORCE setting screen is displa...

Страница 134: ...stance will be calculated as the total for each condition Furthermore the weighted coefficient applied to each condition can be changed to adapt to the different wear rates associated with the type of...

Страница 135: ...E WEAR SETUP BLADE WEAR SETUP screen is displayed 4 Press 1 key BLADE WEAR DETECT BLADE WEAR DETECT screen is displayed Supplement Press 2 key to clear the blade wear 5 Press the 1 key ON or the 2 key...

Страница 136: ...key SET BLADE GROUP The Blade Group settings screen is displayed Display may vary depending on the selected tool condition number 5 Press the POSITION keys to select the tool condition number CONDITIO...

Страница 137: ...fiber tip pen 500 m 2 0 As shown above the plotting distance of the water based fiber tip pen is half of the oil based ballpoint pen so please use 2 0 as a reference for the coefficient Also in case...

Страница 138: ...mber 5 Press the POSITION keys to select the tool condition number CONDITION No Supplement You can set the range between 0 1 and 3 0 6 Press the POSITION key and increase or decrease the setting value...

Страница 139: ...ey MENU screen is displayed 2 Press 1 key TOOL TOOL SETTING screen 1 3 is displayed 3 Press 2 key BLADE WEAR SETUP BLADE WEAR SETUP screen is displayed 4 Press 4 key CLEAR B WEAR VALUE CLEAR B WEAR VA...

Страница 140: ...ES CLEAR When not clearing it select 2 key CANCEL CLEAR B WEAR VALUE screen is displayed 8 Confirm the settings and press the key CANCEL It will return to BLADE WEAR SETUP screen 9 Press the PAUSE MEN...

Страница 141: ...en plunger is used for Condition No 1 and the cutter plunger is used for Condition No 2 For setting the pen plunger see Attaching a Tool P 2 4 For changing the tool conditions see Selecting Tool Condi...

Страница 142: ...inside of a plotting range greater than 50 mm on both the X and Y axes 9 Confirm the position of tool and then press ENTER key Plot a sign with the pen plunger tool 1 Next plot a sign with the cutter...

Страница 143: ...yed Supplement You can set between 3 0mm and 3 0mm 15 Press POSITION keys to increase or decrease the parameters 16 Confirm the settings and press the POSITION key PREVIOUS Adjust the space between to...

Страница 144: ...e characteristics of the media and tools and the contents of the cutting data This chapter describes the settings affecting the cutting time In addition to this chapter there are setting affecting the...

Страница 145: ...me to start the cutting Sorting might not be effective for the data that is created efficiently Process may be faster to turn off the sorting on the plotter if the data is already sorted using the sof...

Страница 146: ...SITION key CANCEL 6 Confirm the setting and press the ENTER key SET Setting will be set and it will return to TOOLS SETTING screen 2 3 Supplement mark is displayed at the right of the screen when SORT...

Страница 147: ...power is turned off Setting of the AUTO PRE FEED length is not linked to the setting of the page length Change the setting for the page length if the cutting area is to be long If data is received an...

Страница 148: ...ey to change the setting digits 8 Press the POSITION key and increase or decrease the setting value 9 Confirm the setting value and press the POSITION key CANCEL FEED LENGTH is selected and return to...

Страница 149: ...is Received P 7 8 Setting Feed Speed for Media Set Supplement This setting will be saved even if the power is shut off Operation Supplement Perform the settings in Normal menu 1 Press the PAUSE MENU...

Страница 150: ...creen 2 3 without changing the settings when you press the POSITION key 6 Confirm the setting and press the ENTER key SET Setting will be set and it will return to MEDIA SETTING screen 2 3 7 Press the...

Страница 151: ...d When Media is Set Initial Feed P 7 4 Perform Automatic Pre Feed When Cut Data is Received Supplement This setting will be saved even if the power is shut off Operation Supplement Perform the setting...

Страница 152: ...n 2 3 without changing the settings when you press the POSITION key CANCEL 6 Confirm the setting and press the ENTER key SET Setting will be set and it will return to MEDIA SETTING screen 2 3 7 Press...

Страница 153: ...ff Operation Supplement Perform the settings in Normal menu 1 Press the PAUSE MENU key MENU screen is displayed 2 Press the 1 key TOOL TOOLS SETTING screen 1 3 is displayed 3 Press the POSITION key TO...

Страница 154: ...en 2 3 without changing the settings when you press the POSITION key CANCEL 6 Confirm the setting and press the ENTER key SET Setting will be set and it will return to TOOLS SETTING screen 2 3 7 Press...

Страница 155: ...uously it will directly move to the last coordinate received Cutting time can be reduced if it is set to DISABLED if the time to move the tool in raised status is wasteful Supplement This setting will...

Страница 156: ...en 3 3 without changing the settings when you press the POSITION key CANCEL 6 Confirm the setting and press the ENTER key SET Setting will be set and it will return to TOOLS SETTING screen 3 3 7 Press...

Страница 157: ...8 1 Chapter 8 Setting Regarding Interface This chapter describes setting regarding interface PRODUCT SUMMARY 8 1 Setting Interface 8 2 Setting a separator 8 3 Setting a timeout...

Страница 158: ...he computer or the plotter is performing an initialization routine Do not disconnect the USB cable within a 5 second period of connecting it Do not connect multiple plotters to a single computer using...

Страница 159: ...0 025 0 025 0 025 0 025 0 025 0 025 Origin point LOWER LEFT CENTER LOWER LEFT LOWER LEFT LOWER LEFT CENTER CENTER CENTER Separator PG NR J0 SP PG SP None None Time out 0 0 120 120 1 10 0 0 Page lengt...

Страница 160: ...TERFACE setting screen Simple menu INTERFACE setting screen Normal menu 3 Press the 1 key SELECT USER ELECT USER setting screen is displayed Supplement You can select the set number between 1 and 8 4...

Страница 161: ...SETTING screen is displayed INTERFACE setting screen Simple menu INTERFACE setting screen Normal menu 3 Press POSITION key I F in Normal menu INTERFACE setting screen 2 3 is displayed INTERFACE settin...

Страница 162: ...232C setting screen without changing the settings when you press POSITION key PREVIOUS 9 Press the 1 key 8 BIT or the 2 key 7 BIT DATA BIT will be set and it will return to RS 232C setting screen 10 P...

Страница 163: ...is set to HP GL It will be set to HARDWIRE even if Enq Ack is selected when it is set to GP GL 13 Press the 1 key HARDWIRE the 2 key Xon off or the 3 key Enq Ack HANDSHAKE will be selected and it wil...

Страница 164: ...tting will be saved even if the power is shut off Operation Supplement Perform the settings in Normal menu 1 Press the PAUSE MENU key MENU screen is displayed 2 Press the POSITION key I F INTERFACE se...

Страница 165: ...NU key It will return to default screen HP GL Separatorr Set the separator when using HP GL Reference This setting will be saved even if the power is shut off Operation Supplement Perform the settings...

Страница 166: ...tting Supplement It will return to INTERFACE setting 2 3 screen without changing the settings when you press the POSITION key CANCEL 6 Confirm the setting and press the ENTER key SET Setting will be s...

Страница 167: ...the power is shut off Operation Supplement Perform the settings in Normal menu 1 Press the PAUSE MENU key MENU screen is displayed 2 Press the POSITION key I F INTERFACE setting screen 1 3 is display...

Страница 168: ...screen without changing the settings when you press the POSITION key CANCEL 6 Confirm the setting and press the ENTER key SET Setting will be set and it will return to INTERFACE setting screen 3 3 7 P...

Страница 169: ...9 1 Chapter 9 Settings Regarding Operation Environment This chapter describes setting regarding the operation environment...

Страница 170: ...ress the PAUSE MENU key in the default screen MENU screen is displayed 2 Press POSITION key ADV ADVANCE setting screen 1 2 is displayed 3 Press 2 key LANGUAGE SELECTION LANGUAGE SELECTION screen is di...

Страница 171: ...POSITION key ADV in Normal menu or press the 3 key ADV in Simple menu ADVANCE setting screen is displayed ADVANCE setting screen Simple menu ADVANCE setting screen Normal menu 3 Press the 3 key LENGT...

Страница 172: ...d Please be sure to configure the area Operation Supplement Perform the settings in Normal menu 1 Press the PAUSE MENU key in the default screen MENU screen is displayed 2 Press the POSITION key ADV A...

Страница 173: ...screen is displayed Supplement If DISABLED is selected push roller detection is not performed It will not generate error even if the inner push rollers are not on the grit rollers when the INSIDE DIS...

Страница 174: ...SE MENU key in the default screen MENU screen is displayed 2 Press the POSITION key ADV ADVANCE setting screen 1 2 is displayed 3 Press the POSITION key ADVANCE setting screen 2 2 is displayed 4 Press...

Страница 175: ...reen MENU screen is displayed 2 Press the POSITION key ADV ADVANCE setting screen 1 2 is displayed 3 Press the POSITION key ADVANCE setting screen 2 2 is displayed 4 Press the 3 key BEEP FOR KEY OPE B...

Страница 176: ...10 1 Chapter 10 Settings of Controls from Computer This chapter describes setting regarding the controls from the computer...

Страница 177: ...gment has been made in Simple menu please use Normal menu where commands can be set 1 Press the PAUSE MENU key in the default screen MENU screen is displayed 2 Press the POSITION key I F INTERFACE set...

Страница 178: ...e when PROGRAM is selected The values set from the control panel is maintained and the values set from the software is erased when the power is turned off Operation Supplement Perform the settings in...

Страница 179: ...screen MENU screen is displayed 2 Press the POSITION key I F INTERFACE setting screen 1 3 is displayed 3 Press POSITION key INTERFACE setting screen 2 3 is displayed 4 Press the 1 key GP GL STEP SIZE...

Страница 180: ...NU key in the default screen MENU screen is displayed 2 Press the POSITION key I F INTERFACE setting screen 1 3 is displayed 3 Press the POSITION key INTERFACE setting screen 3 3 is displayed 4 Press...

Страница 181: ...n in the lowered status when it is set to TOOL DOWN Supplement This only has an effect on the cutter tool Operation Supplement Perform the settings in Normal menu 1 Press the PAUSE MENU key in the def...

Страница 182: ...erform the settings in Normal menu 1 Press the PAUSE MENU key in the default screen MENU screen is displayed 2 Press the POSITION key I F INTERFACE setting screen 1 3 is displayed 3 Press the 4 key HP...

Страница 183: ...ENU key in the default screen MENU screen is displayed 2 Press the POSITION key I F INTERFACE setting screen 1 32 is displayed 3 Press the POSITION key INTERFACE setting screen 3 3 is displayed 4 Pres...

Страница 184: ...Chapter 11 Maintenance This chapter describes the settings for the maintenance PRODUCT SUMMARY 11 1 Daily Maintenance 11 2 Replacing Cutter Blade 11 3 Cleaning the Cutter Pen 11 4 Cutter Plunger Exch...

Страница 185: ...otter s paper sensors using a cloth moistened in a neutral detergent diluted with water Never use thinner benzene alcohol or similar solvents to clean the sensors cleaners such as these will damage th...

Страница 186: ...ob in the direction of the B arrow and pull the blade into the plunger One scale unit approximately 0 1 mm Graduation Graduation 2 Turn the plunger cap in the counter clockwise direction to remove it...

Страница 187: ...move build up CAUTION To avoid bodily injury handle cutter blades with care Cleaning 1 Please clean off paper dust and media build up from the blade After cleaning it return it to its proper place Spi...

Страница 188: ...down due to friction with the media When the tip of the cutter plunger gets worn down cut quality suffers When the tip of the plunger cap gets worn down it is recommended that you exchange the cutter...

Страница 189: ...rk right It also describes the settings of the plotter confirming the cutting data and method to create test patterns PRODUCT SUMMARY 12 1 Troubleshooting 12 2 Printing the Setting of the Plotter 12 3...

Страница 190: ...heck that the power cord is securely connected to the plotter s AC line inlet and the electrical outlet Check that the power is supplied to the electrical outlet Contact your Graphtec customer center...

Страница 191: ...H ROLLER SENSOR The plotter stops with POSITION ALARM displayed during initialization or cutting CONDITION setting for the media is invalid Slow down the speed or lower the FORCE P2 30 Setting the Too...

Страница 192: ...a media suitable for changing the hold down force P2 18 Changing the Hold down Force It does not become specified length Slight distance error Media is slipping Make the speed slower Increase the tool...

Страница 193: ...s The blade falls out of the tool plunger The blade is too small for the tool plunger Use a blade that fits securely in the tool plunger Abnormal noise generated from the tool carriage during cutting...

Страница 194: ...figure to drive the plotter from the menu of the software The software configuration regarding the output device has been changed Reset the interface settings of the software The plotter s interface c...

Страница 195: ...ommand with the correct number of parameters E03003 Error 3 An unusable parameter was executed Execute a recognizable parameter E03005 Error 5 An unusable character set was specified Specify usable ch...

Страница 196: ...many parameters in the I O related command Check the program E03015 Error 15 Framing error parity error or overrun error has occurred Set the RS 232C transmission condition E03016 Error 16 Interface...

Страница 197: ...12 9 AXIS Error Messages Symptom LCD Display Possible Cause Solution E04001 Tilt to adjust with AXIS ALIGNMENT is too large Reload the media...

Страница 198: ...nter E01010 The plotter is defective Contact your sales representative or the Graphtec call center E01011 The plotter is defective Contact your sales representative or the Graphtec call center E01012...

Страница 199: ...w please contact the store where you bought the product or our Customer Center E05001 Data larger than the buffer size cannot be copied Perform normal cutting not using the copy mode E05002 There is n...

Страница 200: ...12 12 Caution Message Symptom LCD Display Description W06002 When panel cutting is on copy cannot be changed...

Страница 201: ...size Supplement Please choose Condition No 2 when selecting the tool conditions for operating with the pen plunger For setting the pen plunger see Attaching a Tool P 2 4 For changing the tool conditio...

Страница 202: ...not place you hand around the moving areas The tool carriage will start moving so there is a chance of injury 8 Confirm that movable parts of the tool and media can safely operate and press the ENTER...

Страница 203: ...No 2 when selecting the tool conditions for operating with the pen plunger For setting the pen plunger see Attaching a Tool P 2 4 For changing the tool conditions see Selecting Tool Condition P 2 29 a...

Страница 204: ...that operation area of tool and media is safe Supplement It will return to TEST menu screen without printing by pressing the 2 key CANCEL SELF TEST 8 Press the 1 key DONE Plotting of the test pattern...

Страница 205: ...ondition and the command Please set the command to GP GL or HP GL Operation Supplement See Loading Media Paper P 2 7 for loading the media 1 Set a media larger than A1 size Supplement Please choose Co...

Страница 206: ...ere is a chance of injury 7 Confirm that operation area of tool and media is safe Supplement It will return to TEST menu screen without printing by pressing the 2 key CANCEL DATA DUMP 8 Press the 1 ke...

Страница 207: ...conditions for operating with the pen plunger For setting the pen plunger see Attaching a Tool P 2 4 For changing the tool conditions see Selecting Tool Condition P 2 29 and for tool settings see Set...

Страница 208: ...s safe Supplement Press 2 key CANCEL to return to the TEST screen without outputting the CUT DEMO 8 Press 1 key DONE CUT DEMO is started Supplement During operation the keys on the control panel do no...

Страница 209: ...operation such as loading media is performed Operation 1 Confirm that the power is turned off 2 Turn the power on without loading the media Supplement Perform the settings in Normal menu 3 Press the P...

Страница 210: ...will return to TEST menu screen once all the test items are completed Test items are as following 1 Set lever sensor 2 Home sensor 3 Push roller sensor 4 X media sensor 5 X media sensor 6 X motor sig...

Страница 211: ...A 1 Appendix This chapter describes the specification of the plotter PRODUCT SUMMARY A 1 Main Specifications A 2 Supplies A 3 External Dimensions A 4 Menu Tree A 5 Initial Setting...

Страница 212: ...r of cutters pens 2 Usable pen type Water based fiber tip and oil based ballpoint Interface RS 232C USB2 0 Full Speed Buffer memory 2 MB Resident command sets GP GL HP GL 4 Control panel switching LCD...

Страница 213: ...tip pen set of 1 Water based fiber tip pen KF700 BK 1 set 10 pcs Black KF700 RD 1 set 10 pcs Red KF700 BL 1 set 10 pcs Blue Oil based ballpoint pen plunger PHP34 BALL Plunger for oil based ballpoint p...

Страница 214: ...A 4 CE6000 120AP 1575 1250 1200 Unit mm Dimensional accuracy 5mm A 3 External Dimensions...

Страница 215: ...ple Menu MENU screen PAUSE MENU MEDIA SETTING 1 1 1 INTERFACE 1 1 2 ADVANCE 1 1 COPY CONDITION setting 1 3 CONDITION setting 2 3 CONDITION setting 3 3 COND TEST Default screen ENTER CUT TESTS 3 A 4 Me...

Страница 216: ...A 6 Normal Menu Default screen ENTER COPY Continued CONDITION setting 1 3 CONDITION setting 2 3 CONDITION setting 3 3 COND TEST CUT TESTS...

Страница 217: ...MENU screen TOOLS SETTING 1 3 TOOLS SETTING 2 3 TOOLS SETTING 3 3 AXIS ALIGNMENT 1 1 PAUSE MENU MENU screen PAUSE MENU 1 2 Continued Default screen Continued AREA PARAMETERS 1 1 MENU screen PAUSE MEN...

Страница 218: ...A 8 Default screen Continued MENU screen 4 PAUSE MENU MEDIA SETTING 1 3 MEDIA SETTING 2 3 MEDIA SETTING 3 3 Continued...

Страница 219: ...A 9 INTERFACE 1 3 INTERFACE 2 3 MENU screen PAUSE MENU Continued Default screen Continued INTERFACE 3 3...

Страница 220: ...A 10 MENU screen ADVANCE 1 2 ADVANCE 2 2 TEST 1 2 TEST 2 2 PAUSE MENU MENU screen PAUSE MENU Default screen Continued Default screen Finish...

Страница 221: ...ON 2 mm BELOW TOOL UP MOVE DISABLED AXIS ALIGNMENT AXIS ALIGNMENT OFF AREA PARAMETER SETTINGS EXPAND DEFAULT ROTATE OFF AREA LOWER LEFT DEFAULT AREA UPPER RIGHT DEFAULT DISTANCE ADJUST X 0 00 DISTANCE...

Страница 222: ...n tangential mode and wear degree coefficient is same as Condition 2 CONDITION NO 4 TOOL CONDITION NO CONDITION NO 4 TOOL CB09U SPEED FORCE ACCELERATION 20 6 2 CUT LINE PATTERN 1 The range between tan...

Страница 223: ...IORITY 10 3 Condition setting 12 13 Connecting to the Power 2 20 Connecting with RS 232C 8 3 Contents of Operation from COND TEST Key 2 25 Continuously Move Manually 3 3 Control key 2 21 Control panel...

Страница 224: ...DIA SENSOR 9 4 Media sensors 1 3 9 4 Media set lever 1 3 Media stocker 1 4 Media stopper 1 4 Menu Display 9 2 Menu Keys 2 21 MENU lamp 2 22 Menu Screen 2 24 Menu Tree A 5 Model ID Response 10 7 Move A...

Страница 225: ...ey 2 21 SIMPLE lamp 2 22 Simple menu 2 24 2 43 Sorting the Cutting Data 7 2 Space between tools 1 and 2 6 22 Space rear 4 9 Specifications A 2 Speed 2 34 Stand 1 2 1 4 Step Movement Distance 3 4 Step...

Страница 226: ...Specifications are subject to change without notice CE6000 120AP User s Manual CE60AP UM 153 DECEMBER 20 2013 1st edition GRAPHTEC CORPORATION...

Страница 227: ......

Отзывы: