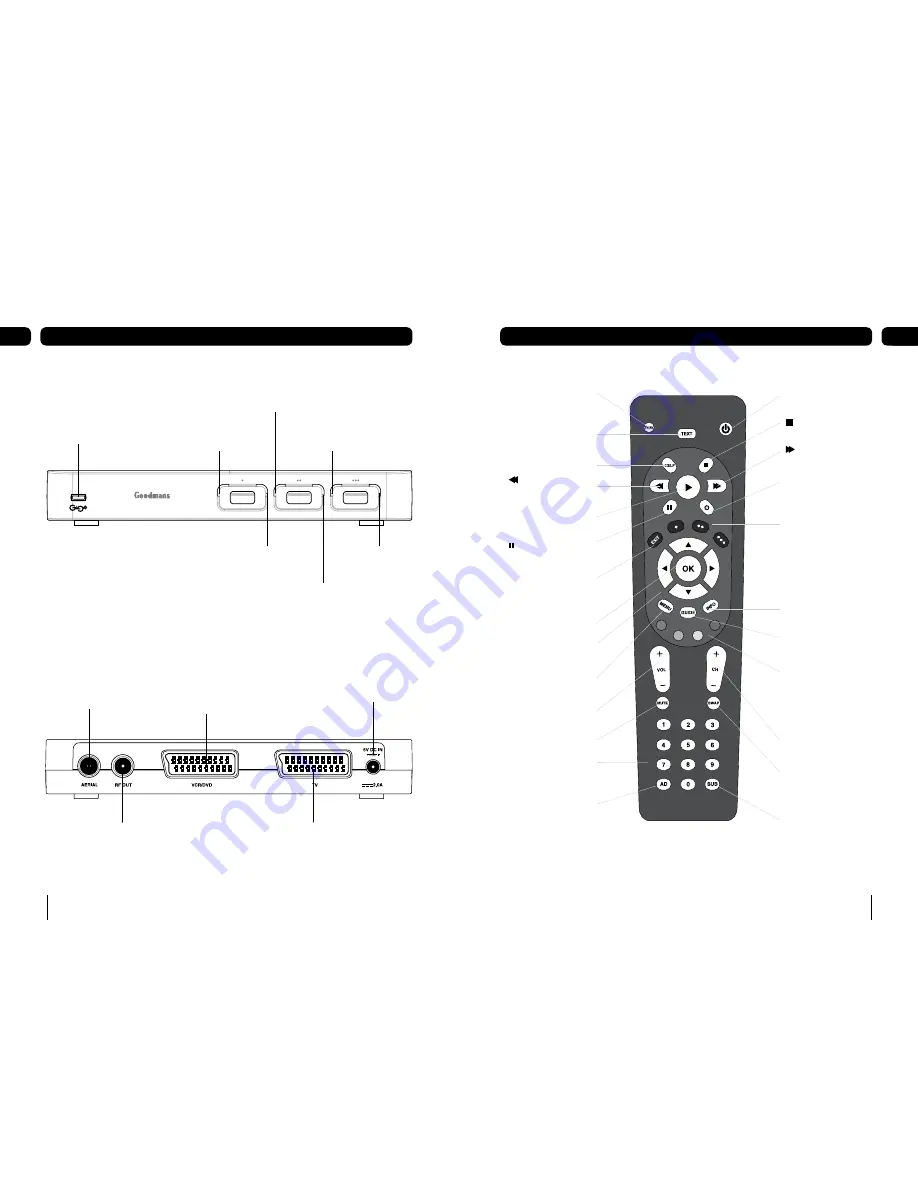
background image

4

Your digital box

01

5

Your remote control

02

Front panel

Rear panel

Aerial Input.
Connect the aerial 
to this socket

RF output.
Connect the supplied 
RF cable to the TV.

TV Scart
Connection to TV

AUX Scart
for connection to a VCR
or a DVD Recorder

5 Volt DC Input

Power On/Off LED 
flashes green and red 
when remote control 
is activated

USB • Green LED 
On when ready, 
flashes when playing

USB ••• Green LED 
On when ready, 
flashes when playing

USB ••• Red LED 
On when recording, 
flashes when copying

USB •• Green LED 
On when ready, 
flashes when playing

USB • Red LED 
On when recording, 
flashes when copying

USB •• Red LED 
On when recording, 
flashes when copying

[

]

 Switches the receiver on 

and off (into standby).

[TV/AV]

 Selects the TV input 

channels.

[TEXT]

 Gives digital teletext, 

where available.

[HELP]

 Enters and exits the 

help screen.

[

®

] [RECORD]

 Opens the 

‘select device’ menu to record 
current programme.

[ ] [STOP]

 Stops a 

recording or playback.

[ ] [FAST FORWARD]


Forward search through a 
recorded programme.

[ ] [REWIND]

 Backward 

search through a recorded 
programme.

[

u

] [PLAY]

 Opens the 

recorded programmes list.

[ ] [PAUSE]

 Pauses live TV 

and starts recording. Pauses a 
recording or playback.

[EXIT]

 Exits the menu system 

and goes back to the last 
programme you were watching.

[•]

 Selects USB1 port. Instant 

record to USB device in port 1. 

[••]

 Selects USB2 port. 

Instant record to USB device 
in port 2.

[•••]

 Selects USB3 port. 

Instant record to USB device 
in port 3.

[OK]

 Selects the options on 

the on-screen menu.

[

pqtu

]

 Moves 

around the on-screen menus.

[MENU]

 Enters and exits the 

main menu screen.

[GUIDE]

 Shows the TV 

guide, also called electronic 
Programme guide (EPG).

[INFO]

 Gives programme 

information on the TV screen.

RGYB BUTTONS]

 The red, 

green, yellow and blue buttons 
change or go to different 
options when on the digital 
text pages. Also used for menu 
navigation.

[VOL + –]

 Increases or 

lowers the digital box volume.

[CH + –]

 Goes up and 

down the channel list.

[MUTE]

 Turns the digital box 

volume off and on.

[SWAP]

 Switches between 

the channel you’re watching 
and the channel you were 
previously watching.

[0 to 9]

 Selects channels 

and enters your PIN.

AD]

 Switches audio 

description on and off. If AD is 
not available it shows the time 
and date.

[SUB]

 Switches subtitles on 

and off.

Содержание GDB20USB3

Страница 1: ...IMPORTANT Please read all instructions carefully before use and keep for future reference GDB20USB3 Digital Box Instruction Manual...

Страница 2: ...g television A FREEVIEW Digital Box gives you up to 48 digital TV channels and up to 24 digital radio stations without a subscription or contract For more information on FREEVIEW and to check receptio...

Страница 3: ...ough a recorded programme u PLAY Opens the recorded programmes list PAUSE Pauses live TV and starts recording Pauses a recording or playback EXIT Exits the menu system and goes back to the last progra...

Страница 4: ...SCART cable SCART cable Aerial lead 1 2 Plug in and switch on Insert the Digital Box mains plug into a mains socket The standby light on the front will come on Switch your TV on 3 Using your digital b...

Страница 5: ...ositioned over a stable and even surface Insert the flash device into one of the USB ports labelled and Look at the image below for guidance After a few seconds the green light next to the port should...

Страница 6: ...are available for the next eight days Using the programme guide Press the guide button Press p or q to move through the list of channels To move through the programmes press t and u To move forwards o...

Страница 7: ...the recording unless another recording follows immediately after in case the programme being recorded over runs slightly Record using the programme guide The easiest way to schedule a recording is by...

Страница 8: ...cording you can skip forward through adverts for example in 30 second 1 2 3 5 and 10 minute blocks To set the Skip duration Press MENU highlight System set up and press OK Highlight Recorded programme...

Страница 9: ...digital text Your digital box gives you access to digital text and teletext Digital text and teletext services vary depending on the country and channel Check with your retailer or TV guide for more...

Страница 10: ...e a channel from your favourites list Highlight the favourites list and then press the yellow button Use u to select the stored favourite channels and p and q to highlight the channel you want to dele...

Страница 11: ...cument Accessibility set up Accessibility set up lets you select and change the settings of subtitles and the audio language or the current programme To change audio language Press menu Press 4 or use...

Страница 12: ...the Programme guide If you schedule daily weekly etc the recording will be highlighted in orange in the Programme guide To return to the previous menu press RED To exit to TV press EXIT Press and hold...

Страница 13: ...e Press GREEN to cancel copying Press EXIT to watch TV Copying will continue To return to the Copy progress screen at any time Press PLAY to enter the recorded library Press RED to view progress scree...

Страница 14: ...will be marked DEL and you should delete them To delete a channel see the channel set up and channel organiser sections TV set up Television type Television type lets you tell the digital box whether...

Страница 15: ...ted the message Please insert a device will appear Formatting Formatting erases all the contents from a UBS device and leaves it in ready status To format a device on the Device management menu Use p...

Страница 16: ...ll flash Retune Channels If you are missing channels channel information or would like to search for new channels available you should scan at any time To retune channels Press menu Press 5 or use q t...

Страница 17: ...ue with the copy due to the device being removed The device was removed during the copy process Re insert the device and start copy again Unable to copy any more due to the device running out of space...

Страница 18: ...performance or damaged aerial or the cable between your aerial and TV may be damaged Check for any obvious damage to the aerial and cables and make sure that the connectors are properly fitted If this...

Страница 19: ...view scheduled recordings in periods of 24 hrs 1 week 2 weeks or 4 weeks Make sure you have USB devices with enough free space inserted when a recording is scheduled The green light is not turned when...

Страница 20: ...Put your Digital Box in a well ventilated area away from high humidity Do not expose this Digital Box to rain or moisture dripping or splashing For stubborn stains use a damp not dripping cloth Do no...

Страница 21: ...x in order to continue receiving your existing TV channels and also to pick up new ones Digital UK the body leading the digital TV switchover will advise you when you need to re tune during the switch...

Отзывы: