background image

Garmin G5 User's Manual

190-02072-00  Rev. B

78

Installation Manual

Installation Manual

Pilot's Guide

Index

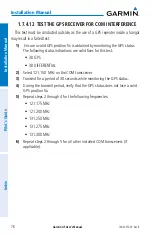
1.7.4.12  TEST THE GPS RECEIVER FOR COM INTERFERENCE

This test must be conducted outside, as the use of a GPS repeater inside a hangar 

may result in a failed test. 

1) 

 Ensure a valid GPS position fix is obtained by monitoring the GPS status.  
The following status indications are valid fixes for this test.


•  3D GPS 


•  3D DIFFERENTIAL 

2) 

Select 121.150 MHz on the COM transceiver.

3) 

Transmit for a period of 30 seconds while monitoring the GPS status.

4) 

During the transmit period, verify that the GPS status does not lose a valid 
GPS position fix.

5) 

Repeat steps 2 through 4 for the following frequencies:


•  121.175 MHz


•  121.200 MHz


•  131.250 MHz


•  131.275 MHz


•  131.300 MHz

6) 

Repeat steps 2 through 5 for all other installed COM transceivers (if 
applicable).

Содержание Approach G5 - GPS-Enabled Golf Handheld

Страница 1: ...G5 User s Manual...

Страница 2: ...INSTALLATION MANUAL PILOT S GUIDE INDEX...

Страница 3: ...Xizhi District New Taipei City Taiwan Tel 34 93 357 2608 Fax 34 93 429 4484 Web Site Address www garmin com Except as expressly provided herein no part of this manual may be reproduced copied transmi...

Страница 4: ...in website Contact your local waste disposal department to dispose of the device and battery in accordance with applicable local laws and regulations WARNING To reduce the risk of unsafe operation car...

Страница 5: ...cloth and a cleaner that is specified as safe for anti reflective coatings Avoid any chemical cleaners or solvents that can damage plastic components CAUTION The G5 does not contain any user serviceab...

Страница 6: ...ble for erroneous operation to occur without a fault indication shown by the G5 It is thus the responsibility of the pilot to detect such an occurrence by means of cross checking with all redundant or...

Страница 7: ...munications However there is no guarantee that interference will not occur in a particular installation If this equipment does cause harmful interference to radio or television reception which can be...

Страница 8: ...n G5 and other G3X LRUs are warranted to be free from defects in materials or workmanship for two years from the date of purchase Within the applicable period Garmin will at its sole option repair or...

Страница 9: ...oducts purchased through online auctions are not eligible for warranty coverage Online auction confirmations are not accepted for warranty verification To obtain warranty service an original or copy o...

Страница 10: ...rmin G5 User s Manual 190 02072 00 Rev B Part Number Change Summary 190 02072 00 Initial release Rev Date Description A April 2016 Production Release B April 2016 Updates to Installation Manual sectio...

Страница 11: ...nnas 18 1 3 6 Mounting Instructions 19 1 3 7 Outline and Installation Drawings 23 1 4 GPS Antenna Installation 27 1 4 1 Non Garmin Antennas 28 1 4 2 Garmin Antennas 29 1 5 G5 Pinout 30 1 5 1 J51 30 1...

Страница 12: ...Vertical Speed Indicator VSI 105 2 6 7 PFD Pitch Attitude Offset 105 2 6 8 Battery Status Indicator 106 2 7 HSI Page 107 2 7 1 Horizontal Situation Indicator HSI 108 2 7 2 Heading Ground Track HSI Pag...

Страница 13: ...attery backup sustains the G5 flight display with up to 4 hours of emergency power Two G5 units installed in the same aircraft will communicate with one another and with the G3X system 1 1 2 INVENTORY...

Страница 14: ...original shipping containers for storage If the original containers are not available a separate cardboard container should be prepared that is large enough to accommodate sufficient packing material...

Страница 15: ...AD 29 ARINC 429 Adapter GMC 305 Mode Controller GMC 307 Mode Controller GSA 28 Servo Actuator 1 1 5 REQUIRED NON GARMIN EQUIPMENT 1 1 5 1 WIRING CABLING CONSIDERATIONS The installer will provide all w...

Страница 16: ...gging Garmin recommends SanDisk brand SD cards up to 32 GB 1 1 5 6 PNEUMATIC HOSES AND CONNECTORS Air hoses and fittings are required to connect pitot and static air to the G5 The G5 has a female 1 8...

Страница 17: ...n In general terms the below steps are recommended to be followed in order 1 Inventory of all needed parts 2 Planning layout of the installation 3 Installation of LRUs antennas and sensors 4 Construct...

Страница 18: ...NG CABLING CONSIDERATIONS Section 1 5 lists the pin information for the G5 and Section 1 6 contains interconnect drawings It is recommended that all LRUs be installed prior to constructing the wiring...

Страница 19: ...ence sources power sources e g 400 Hz generators trim motors etc or near power for fluorescent lighting Route the GPS antenna cable as far as possible away from all COM transceivers and other antenna...

Страница 20: ...must be terminated by a 120 resistor Each node length distance from CAN bus backbone to each LRU must be 0 3 meters or less in length keeping the node lengths as short as practicable is recommended T...

Страница 21: ...rovided with each GSA 28 connector kit that can be used when a GSA 28 is removed The adapter keeps that node on the CAN bus in the same state as when the servo was connected either terminated or un te...

Страница 22: ...r manufacturer s instructions for cable preparation 1 2 3 MECHANICAL CONSIDERATIONS This section presents all information required for planning the physical layout of the G5 installation 1 2 3 1 PHYSI...

Страница 23: ...ill air than in moving air Fans or some other means of moving the air around electronic equipment are usually a worthwhile investment NOTE Avoid installing LRUs near heat sources If this is not possib...

Страница 24: ...3X system This section contains general information as well as installation information for the G5 Figure 1 4 G5 Unit View 1 3 1 PRIMARY FUNCTIONS Attitude roll pitch and yaw Air data altitude and air...

Страница 25: ...he installation kit to mount the G5 to the aircraft panel and to reinforce the panel cutout in thin panel installations The installation kit is not included with the G5 Table 1 5 Contents of the G5 In...

Страница 26: ...ate aircraft fittings to connect to pitot and static system lines 1 3 4 UNIT INSTALLATION Fabrication of a wiring harness is required Sound mechanical and electrical methods and practices are recommen...

Страница 27: ...avity In cases where the longitudinal distance from the CG is planned to be greater than 6 5 feet 2 0 meters it is preferable to mount the G5 forward of the aircraft CG if possible to improve autopilo...

Страница 28: ...matic hoses and connector 4 Connect the CAN terminator if required see Section 1 2 2 3 5 Connect the backshell connector and hoses 1 3 4 3 PNEUMATIC PLUMBING The G5 has two ports that are connected to...

Страница 29: ...ng at or near the unit Ensure that no deformations of the airframe surface have been made that would affect the relationship between static air pressure and true ambient static air pressure for any fl...

Страница 30: ...he internal airspeed sensor NOTE Use of different colored tubing is recommended for static and pitot plumbing to avoid plumbing connection errors Incorrect plumbing connections will result in erroneou...

Страница 31: ...offsets and pitch offsets up to 30 can be corrected for during calibration 1 3 6 1 PANEL CUTOUT TEMPLATE The G5 Mounting Ring 115 02251 03 or Figure 1 13 can be used as a template when marking the pan...

Страница 32: ...mounting ring pushing the unit flush with the instrument panel and fastening the captive 3 32 hex socket head screw to the mounting ring as shown in Figure 1 7 To fasten the captive screw to the moun...

Страница 33: ...Garmin G5 User s Manual 190 02072 00 Rev B 21 Installation Manual Installation Manual Pilot s Guide Index 3 32 HEX DRIVER Figure 1 8 G5 Hex Driver Insertion...

Страница 34: ...4 40 flat head Phillips mount plate screws the G5 screw mount plate and the captive screw as shown in Figure 1 9 Reverse this process to install the longer 6 32 hex socket head screw Ensure correct or...

Страница 35: ...BATTERY 1 30 CENTER OF GRAVITY 32 9 33 6 1 32 5 3 03 76 9 BATTERY PACK 46 1 8 CENTER OF GRAVITY 1 6 41 CENTER OF GRAVITY NOTES 1 1 DIMENSIONS INCHES mm METRIC VALUES ARE FOR REFERENCE ONLY 1 2 DIMENS...

Страница 36: ...INSTALL MANUAL FOR SPECIFIC GUIDANCE ON CAN BUS WIRING 2 2 ALL RED PLUGS MUST BE REMOVED AND DISCARDED THEY ARE NOT TO BE USED FOR CAPPING AND SEALING UNUSED PORTS 9 PIN BACKSHELL w CAN TERM G5 BATTER...

Страница 37: ...ual Installation Manual Pilot s Guide Index 0 0 3X 150 003 3 81 0 08 3 155 3 125 80 14 79 38 2X 1 237 005 31 4 0 13 1 237 005 31 4 0 13 1 237 005 31 4 0 13 2X 1 237 005 31 4 0 13 Cut out panel to insi...

Страница 38: ...ge Verify dimensions of printed template are accurate before cutting panel For mounting holes drill out with 25 drill bit and use Garmin mounting ring P N 115 02251 03 For panel cutout drill out with...

Страница 39: ...PS information with any connected GDU 37X or GDU 4XX The G5 can additionally receive GPS position information from a GPS 20A GDU 37X or GDU 4XX A minimum of one GPS antenna is required for G5 installa...

Страница 40: ...tion instructions It is the installer s responsibility to ensure that their choice of antenna meets FAA standards according to the specific installation Table 1 7 Supported Non Garmin Antennas Model M...

Страница 41: ...the specific installation Table 1 8 Supported Garmin Antennas Model Part Number Install Manual Mounting Configuration GA26C 011 00149 04 190 00082 00 Flange Magnetic or Suction Cup Mounts in cabin GA3...

Страница 42: ...e 1 10 J51 Pin Descriptions Pin Pin Name I O 1 CAN H I O 2 CAN L I O 3 UNIT ID In 4 RS 232 RX 1 In 5 RS 232 TX 1 Out 6 SIGNAL GROUND 7 AIRCRAFT POWER 1 In 8 AIRCRAFT POWER 2 In 9 POWER GROUND 1 5 1 1...

Страница 43: ...11898 See Section 1 2 2 3 for details The CAN bus connection on the G5 can be used for the following Connection to the G3X system G5 G5 interconnect non G3X system G5 GSA 28 interconnect non G3X syst...

Страница 44: ...Garmin G5 User s Manual 190 02072 00 Rev B 32 Installation Manual Installation Manual Pilot s Guide Index 1 6 G5 INTERCONNECT DRAWINGS Figure 1 15 G5 Interconnect Notes...

Страница 45: ...190 02072 00 Rev B 33 Installation Manual Installation Manual Pilot s Guide Index NOTE CAN BUS IS USED WHEN INSTALLED IN G3X SYSTEM OR WITH GSA 28 SERVOS OR WITH GAD 29 ARINC 429 ADAPTER Figure 1 16...

Страница 46: ...Garmin G5 User s Manual 190 02072 00 Rev B 34 Installation Manual Installation Manual Pilot s Guide Index Figure 1 17 G5 with Autopilot Interconnect Diagram...

Страница 47: ...quipment defined in this section NOTE See Section 2 Pilot s Guide for G5 operational instructions NOTE Some procedures in this section require that the GPS receiver is receiving sufficient satellite s...

Страница 48: ...nter configuration mode hold down the knob while powering on the G5 1 7 3 SOFTWARE LOADING PROCEDURE G5 software loading can be performed in either normal or configuration mode Manuallly loading softw...

Страница 49: ...rsions of devices connected to the G5 The devices listed on this page are dependent upon the installation type G3X System Backup or Standalone Instrument Faults are indicated by a red X next to the af...

Страница 50: ...is required for all installations C Air Data Static Pressure Calibration Altitude re calibration Procedure C is only used when the G5 has failed a periodic altimeter test 1 7 4 2 2 Calibration Procedu...

Страница 51: ...tiple G5 units if the pitch roll offset procedure is performed for one unit it should be performed on all other G3X AHRS units or G5 units before moving the aircraft 1 7 4 2 3 Calibration Procedure B...

Страница 52: ...4 1 for applicable mounting requirements and instructions b Vibration or motion of the G5 caused by neighboring equipment and or supports c Mounting of the G5 in a location that is subject to severe...

Страница 53: ...and optionally to 30 000 ft The operator is allowed to finish the calibration at the end of the 20 000 ft calibration if the 30 000 ft calibration is not desired CAUTION To avoid damaging the G5 pres...

Страница 54: ...roll angle follow a desired heading or follow the lateral component of a flight plan During the flight test phase of the autopilot checkout the roll servo aggressiveness will be adjusted to get the d...

Страница 55: ...y to null the lateral acceleration center the ball over the long term The ball centering portion of the yaw damper is not a replacement for proper rudder trim NOTE Yaw damper functionality requires a...

Страница 56: ...ot is engaged in the air the servos can adjust the trim control to minimize the force on the primary controls This helps ensure the aircraft will be properly trimmed when the autopilot is later diseng...

Страница 57: ...ng through its full range of motion 2 Verify that the travel of the flight controls is being limited by the airplane s primary stops and not the secondary stops provided by the GSA 28 stop bracket 3 E...

Страница 58: ...next to it 5 Select the Autopilot Roll Servo configuration page and verify the proper trim activity with the servo connected to an auxiliary trim motor a Center the aileron trim switch to input no tri...

Страница 59: ...ot moving Verify the yaw servo is properly indicating no trim activity b Use the rudder trim switch to input a yaw right trim command Verify the rudder trim switch properly moves for yaw left trim Ver...

Страница 60: ...move clockwise to cause a nose right rudder movement and the servo arm should move counterclockwise to cause a nose left rudder movement 11 Set the Trim Motor Control to Disabled using the Autopilot R...

Страница 61: ...GMC 30X c Push the knob on the G5 to access the menu d Select Track from the menu on the G5 e Push and hold the knob on the G5 to center the HDG bug g Rotate the knob on the G5 counterclockwise to com...

Страница 62: ...he HDG button on the GMC 30X c Push the knob on the G5 to access the menu d Select Track from the menu on the G5 e Push and hold the knob on the G5 to center the HDG bug f Rotate the knob on the G5 co...

Страница 63: ...he GMC 30X 4 Verify the rudder properly moves to the correct direction by standing by the tail of the aircraft facing the vertical stabilizer and pushing on the fuselage The rudder should move AWAY fr...

Страница 64: ...m please follow the following safety guidelines before the initial autopilot engagement Quick access to autopilot disconnect Safe altitude above and away from all terrain and obstacles No air traffic...

Страница 65: ...L PIT mode with the aircraft approximately level i Press the AP button on the GMC 30X to engage the AP ii Press the YD button on the GMC 30X to disengage the YD b Press the knob on the G5 to access th...

Страница 66: ...ce from the flight director 1 Overpower the autopilot to fly away from the current flight director commanded vertical speed 2 Release the controls and monitor the autopilot response and closure back t...

Страница 67: ...A 28 autopilot servos to manipulate the flight control surfaces of the aircraft Extreme caution should be used during the initial engagement of the autopilot system The pilot should always have easy a...

Страница 68: ...dder to swing the ball left 2 Use the left foot rudder to swing ball back right 3 Engage the YD by pressing the YD button on the GMC 30X as the ball swings through the center 4 Set the servo gain so t...

Страница 69: ...nfiguration of a time limit for use with a manual electric trim When the manual trim input switch is pressed the electric trim motor will stop running after the time limit expires and will not run aga...

Страница 70: ...ol of the aircraft at anytime At a minimum please follow the following safety guidelines before the initial autopilot engagement Quick access to autopilot disconnect Safe altitude above and away from...

Страница 71: ...as a combined Autopilot Disconnect Control Wheel Steering AP CWS button Regardless of configuration a short press and release of the AP DISC or AP CWS button will disengage the autopilot if it is enga...

Страница 72: ...abled pressing the AP CWS button while the autopilot is not engaged has no effect In this state the autopilot can only be engaged using the GMC 30X AP button Trim Airspeed Thresholds The GSA 28 servos...

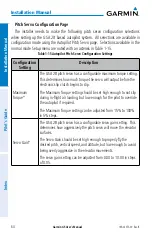
Страница 73: ...lot to override the autopilot if required The Maximum Torque setting can be adjusted from 15 to 100 in 5 steps Servo Gain The GSA 28 roll servo has a configurable servo gain setting This determines ho...

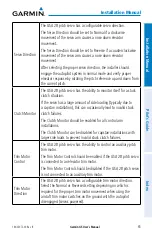
Страница 74: ...ld be enabled if the GSA 28 roll servo is connected to an auxiliary trim motor The Trim Motor Control should be disabled if the GSA 28 roll servo is not connected to an auxiliary trim motor Trim Motor...

Страница 75: ...electric trim input is detected If the maximum time is exceeded the pilot will need to release the Manual Electric Trim MET control and then reassert it to continue running trim Fine Adjust Amount exp...

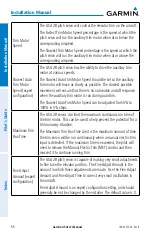
Страница 76: ...a configurable maximum torque setting This determines how much torque the servo will output before the electronic slip clutch begins to slip The Maximum Torque setting should be set high enough to no...

Страница 77: ...he servo has a large amount of side loading typically due to a capstan installation this can occasionally lead to invalid stuck clutch failures The Clutch Monitor should be enabled for all control arm...

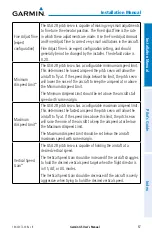
Страница 78: ...hen the auxiliary trim motor is run during autotrim The Slowest Auto Trim Motor Speed can be adjusted from 5 to 100 in 5 steps Maximum Trim Run Time The GSA 28 servos can limit the maximum continuous...

Страница 79: ...the nose of the aircraft to keep the airspeed at or above the Minimum Airspeed Limit The Minimum Airspeed Limit should be set above the aircraft stall speed with some margin Maximum Airspeed Limit The...

Страница 80: ...he Airspeed Gain should be decreased if the aircraft is overly aggressive when trying to hold the desired airspeed target Airspeed Acceleration Gain expert configuration The GSA 28 pitch servo is capa...

Страница 81: ...low enough for the pilot to override the autopilot if required The Maximum Torque setting can be adjusted from 15 to 100 in 5 steps Servo Gain The GSA 28 yaw damper has a configurable servo gain sett...

Страница 82: ...hould be enabled if the GSA 28 yaw damper is connected to an elevator trim motor The Trim Motor Control should be disabled if the GSA 28 yaw damper is not connected to an auxiliary trim motor Trim Mot...

Страница 83: ...aximum time is exceeded the pilot will need to release the Manual Electric Trim MET control and then reassert it to continue running trim Ball Centering Gain expert configuration The GSA 28 yaw damper...

Страница 84: ...ert configuration The GSA 28 yaw damper is capable of zeroing the lateral acceleration of the aircraft The Yaw Acceleration Filter Constant is used to filter the aircraft lateral acceleration Yaw Acce...

Страница 85: ...the default climb and descent vertical speeds are displayed ALT Mode User Select Action Select Normal or Sync Selected Altitude This setting controls the actions that occur when the user selects altit...

Страница 86: ...e speed field 2 Rotate the knob counterclockwise until a blank field is displayed 1 7 4 6 UNITS CONFIGURATION PAGE This page allows for configuration of the displayed units for the items listed in the...

Страница 87: ...directly Manual brightness control is available at any time by pressing the power button Default Mode Used to set the backlight mode that will be active each time the unit is powered on Photocell Inp...

Страница 88: ...Used for connecting to compatible Garmin LRUs e g GMC 30X NMEA Supports the input and output of standard NMEA 0183 version 3 01 data at a configurable baud rate of either 4800 or 9600 The G5 outputs...

Страница 89: ...t ID Table 1 21 ARINC 429 Inputs Configuration Setting Description Garmin GPS SDI 1 Receives GPS labels from a GNS 400 500 GNS 480 or GTN 600 700 series unit Garmin VOR ILS SDI 1 Receives VOR ILS labe...

Страница 90: ...nitoring the GPS status The following status indications are valid fixes for this test 3D GPS 3D DIFFERENTIAL 2 Select 121 150 MHz on the COM transceiver 3 Transmit for a period of 30 seconds while mo...

Страница 91: ...repeat steps 3 through 5 for the following frequencies 121 185 MHz 121 190 MHz 130 285 MHz 131 290 MHz 8 Repeat step 7 for all other installed COM transceivers supporting 8 33 MHz channel spacing if a...

Страница 92: ...ecently that may have contributed to the failure 2 Check for loose wire terminals on the circuit breaker connections on the power wire s causing intermittent power connections Also check for intermitt...

Страница 93: ...p If the condition is not resolved by following the preceding instructions contact Garmin Product Support for additional assistance A Garmin Field Service Engineer may ask the technician to download t...

Страница 94: ...be helpful to the installer pilot the avionics dealer or to Garmin Aviation Product Support in troubleshooting the failure 1 What specifically was the nature of the failure Was it a Red X of only head...

Страница 95: ...ered from the G5 during flight or on ground and is stored in csv log files on the microSD card To enable logging on the G5 in configuration mode navigate to Device Information Diagnostics Data Log and...

Страница 96: ...annual or periodic aircraft inspection For more general inspection guidance please refer to the applicable sections of CFR Part 43 Appendix D and Chapter 12 of AC 43 13 1B 1 9 1 2 G5 AIR DATA PERIODI...

Страница 97: ...en 1 9 2 1 ORIGINAL G5 IS REINSTALLED No software or calibration is required if the original G5 is reinstalled in its original mounting location 1 9 2 2 NEW G5 IS INSTALLED Any time a new G5 is instal...

Страница 98: ...s Less than 5 seconds b Cold Start position known to 300 nm time known to 10 minutes with valid almanac Less than 45 seconds c AlwaysLocate with almanac without initial position or time Less than 60 s...

Страница 99: ...000 feet Vertical Speed Range 20 000 feet per minute Airspeed Range 300 knots indicated Mach Range 1 00 mach Pitch Roll Range 360 Pitch Roll Accuracy 2 straight and level flight 3 5 normal dynamic ma...

Страница 100: ...Garmin G5 User s Manual 190 02072 00 Rev B 88 Installation Manual Installation Manual Pilot s Guide Index Blank Page...

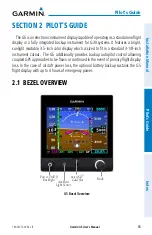
Страница 101: ...sunlight readable 3 5 inch color display which is sized to fit in a standard 3 1 8 inch instrument cutout The G5 additionally provides backup autopilot control allowing coupled GPS approaches to be fl...

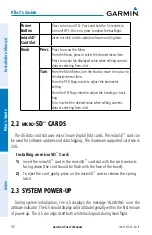
Страница 102: ...e rotate to adjust the heading or track bug Turn to select the desired value when editing numeric data or selecting from a list 2 2 micro SD CARDS The G5 data card slot uses micro Secure Digital SD ca...

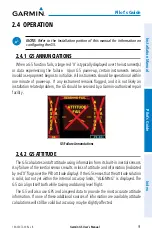
Страница 103: ...lated problem the G5 should be serviced by a Garmin authorized repair facility G5 Failure Annunciations 2 4 2 G5 ATTITUDE The G5 calculates aircraft attitude using information from its built in inerti...

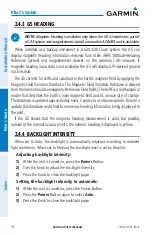
Страница 104: ...ield IGRF The IGRF is a mathematical model that describes the Earth s main magnetic field and its annual rate of change The database is updated approximately every 5 years via a software update Failur...

Страница 105: ...or navigation data source is configured ARINC 429 or RS 232 AND The G5 is not configured as the 1 backup unit OR a GDU is present PFD Page HSI Page Displaying the HSI page from the PFD page 1 From th...

Страница 106: ...02072 00 Rev B 94 Pilot s Guide Installation Manual Pilot s Guide Index 2 5 2 MENU Press the Knob to access the G5 Menu Navigate the menu by rotating the Knob and make selections by pressing the Knob...

Страница 107: ...16 8 17 20 21 5 7 6 2 9 11 13 14 19 22 10 1 Airspeed Indicator 2 Attitude Indicator 3 Pitch Scale 4 Current Airspeed 5 Aircraft Symbol 6 Course Deviation Indicator 7 Slip Skid Indicator 8 Ground Spee...

Страница 108: ...A color coded red white green yellow and red white barber pole speed range strip is located on the moving tape The colors denote flaps operating range normal operating range caution range and never e...

Страница 109: ...be kept below a certain limit If configured the G5 can displayVNE based onTAS or Mach in addition to IAS which will cause the displayed value forVNE to be reduced at high altitudes A solid red band i...

Страница 110: ...all pitch ranges Refer to the Installation Manual section to configure the pitch scale The inverted white triangle indicates zero on the roll scale Major tick marks at 30 and 60 and minor tick marks...

Страница 111: ...eet The current altitude is displayed in the black pointer The Selected Altitude is displayed above the Altimeter in the box indicated by a selection bug symbol A bug corresponding to this altitude is...

Страница 112: ...ed Altitude to the current altitude Altimeter Selected Altitude Selected Altitude Bug Barometric Setting BAROMETRIC PRESSURE The barometric pressure setting is displayed below theAltimeter in inches o...

Страница 113: ...e Passing within 1000 feet of the Selected Altitude the Selected Altitude shown above the Altimeter flashes for 5 seconds When the aircraft passes within 200 ft of the Selected Altitude the Selected A...

Страница 114: ...m of the PFD Page Tick marks to the left and right of the displayed heading denote standard turn rates 3 deg sec A magenta Turn Rate Trend Vector shows the current turn rate A standard rate turn is sh...

Страница 115: ...e navigation course When displaying the Selected Heading a light blue bug on the tape corresponds to the Selected Heading When displaying Ground Track a magenta bug is displayed on the tape The select...

Страница 116: ...02072 00 Rev B 104 Pilot s Guide Installation Manual Pilot s Guide Index PFD Page Selected Heading Current Heading Ground Track Selected Heading Bug PFD Page Selected Ground Track Current Ground Trac...

Страница 117: ...Vertical Speed Indicator Current Vertical Speed 2 6 7 PFD PITCH ATTITUDE OFFSET The Pitch attitude offset function allows the yellow aircraft symbol on the attitude indicator to be adjusted up or dow...

Страница 118: ...powered by the battery the estimated time until the battery is empty is displayed Otherwise the current charge level of the battery in percent is displayed as a numeric value When the G5 is connected...

Страница 119: ...a GDU is present Horizontal Situation Indicator HSI 6 5 2 3 1 Distance To Waypoint 2 Battery Status Indicator 3 Aircraft Symbol 4 Rotating Compass Rose 5 Ground Speed 6 Selected Heading or Ground Trac...

Страница 120: ...and minor tick marks at 5 intervals The current track is represented on the HSI by magenta triangle and a dashed line The HSI also presents course deviation bearing and navigation source information B...

Страница 121: ...se The Course Deviation Indicator CDI moves left or right from the course pointer along a lateral deviation scale to display aircraft position relative to the course If the course deviation data is no...

Страница 122: ...Ground Track NOTE Heading is displayed if magnetometer data is available from another ADAHRS via the CAN network Otherwise Ground Track is displayed Adjusting the selected heading or ground track fro...

Страница 123: ...rse If the course deviation data is not valid the CDI is not displayed The CDI is capable of displaying two sources of navigation GPS or NAV VOR localizer depending on the external navigator configure...

Страница 124: ...2 VERTICAL DEVIATION INDICATOR AND VNAV INDICATOR NOTE An external navigator i e GTN GNS GNC 255 or SL30 Nav Comm Transceiver must be configured to receive glideslope and or glidepath vertical deviat...

Страница 125: ...to the left of the altimeter whenever an ILS frequency is tuned in the active NAV field of an external navigator A green diamond acts as the VDI Indicator like a glideslope needle on a conventional i...

Страница 126: ...altimeter during a GPS approach The glidepath is analogous to the glideslope for GPS approaches supporting WAAS vertical guidance LNAV V L VNAV LPV The Glidepath Indicator appears on the G5 as a magen...

Страница 127: ...magenta chevron VNAV Indicator to the left of the altimeter on the Vertical Deviation Scale displays the VNAV profile VNAV Indicator VNAV Indicator 2 8 3 COURSE SELECTION When the G5 is receiving VOR...

Страница 128: ...commands are displayed on the PFD Page as Command Bars When the Flight Director is active the pitch and roll commands can be hand flown by the pilot or when coupled with the autopilot the autopilot se...

Страница 129: ...lize the aircraft pitch attitude during flight director maneuvers Flight director pitch commands are rate and attitude limited combined with pitch damper control and sent to the pitch servo motor The...

Страница 130: ...een AP annunciation is temporarily replaced by a white CW for the duration of Control Wheel Steering maneuvers In most scenarios releasing the CWS Button reengages the Autopilot with a new reference R...

Страница 131: ...ng modes LVL PIT ROL TRK GPS VS IAS ALT ALTS GP and VNAV GP mode requires ARINC 429 data from an IFR navigator The HDG button on the GMC is used for TRK mode VNAV mode requires RS 232 data from a port...

Страница 132: ...nication Autopilot AP Autopilot operation occurs within the pitch and roll servos It also provides servo monitoring and automatic flight control in response to flight director steering commands Air Da...

Страница 133: ...Autopilot ENGAGE using AP CWS button or AP button on mode controller 2 Flight controls CHECK verify autopilot can be overpowered in both pitch and roll 3 AP DISC button PRESS verify autopilot disenga...

Страница 134: ...rtical Speed Indicated Airspeed and Altitude Hold modes 6 IAS Key Selects deselects Indicated Airspeed Mode 7 ALT Key Selects deselects Altitude Hold Mode 8 VNV Key Selects deselects Vertical Path Tra...

Страница 135: ...r s Manual 190 02072 00 Rev B 123 Pilot s Guide Installation Manual Pilot s Guide Index 1 2 3 4 5 6 7 8 10 9 12 11 GMC 305 AFCS Control Unit Active Mode 13 12 3 4 5 6 14 7 10 9 1 11 GMC 307 AFCS Contr...

Страница 136: ...rvos and interrupt autotrim operation The pilot can then hand fly the aircraft to a new attitude and release the AP DISC CWS button to re engage the autopilot servos and synchronize the flight directo...

Страница 137: ...unciation CWS Button if equipped press and hold Roll Hold ROL Pitch Hold PIT HDG Heading HDG Pitch Hold PIT NAV Navigation GPS Pitch Hold PIT ALT Roll Hold ROL Altitude Hold ALT VS Roll Hold ROL Verti...

Страница 138: ...ta Inability to compute default autopilot modes Detection of a GDU display on the CAN network when installed as part of a G3X G3X Touch system Disengaging the autopilot when a malfunction is suspected...

Страница 139: ...out of trim condition or cause the trim to hit the stop if the action is prolonged In this case larger than anticipated control forces may be required after the autopilot is disengaged The following s...

Страница 140: ...Takeoff on ground Go Around in air TO GA ALT Key Roll Hold default ROL Altitude Hold ALT VS Key Roll Hold default ROL Vertical Speed VS VNV Key Roll Hold default ROL Vertical Navigation VNV IAS Key R...

Страница 141: ...ble the flight director automatically reverts to the default mode for that axis A flashing yellow mode annunciation and annunciator light indicate loss of sensor or navigation data required to compute...

Страница 142: ...d Bars Pilot Hand Flying Aircraft FD Only Command Bars Single Cue Flight Director Aircraft Symbol Solid Command Bars Autopilot Engaged Flight Director Dual Cue Flight Director If the attitude informat...

Страница 143: ...ormal The Flight Director enters Altitude Hold ALT Mode Sync Selected Altitude The Flight Director enters Altitude Hold ALT Mode and the Selected Altitude Altitude Bug changes to the current aircraft...

Страница 144: ...t changes to the Selected Altitude will cause ALT Mode to climb or descend towards the new Selected Altitude Subsequent vertical speed adjustments are in increments of 100 fpm with the exception that...

Страница 145: ...ange of values for each of these references using the NOSE UP DN Wheel are also listed in the table Vertical Mode Description Control Annunciation Reference Change Increment Pitch Hold Holds the curre...

Страница 146: ...keoff Commands a constant pitch angle and wings level on ground in preparation for takeoff GA Button TO Go Around Commands a constant pitch angle and wings level in the air GA ALTS armed automatically...

Страница 147: ...h Hold Mode the flight director maintains a constant pitch attitude The pitch reference is set to the aircraft pitch attitude at the moment of mode selection If the aircraft pitch attitude exceeds the...

Страница 148: ...indicated by the green ALTS annunciation flashing for up to 10 seconds and the appearance of the white ALTS annunciation At 50 feet from the Selected Altitude the flight director automatically transit...

Страница 149: ...pture Mode Selected Altitude Capture Mode automatically transitions to Altitude Hold Mode when within 50 feet of the Selected Altitude In this case the Selected Altitude becomes the Altitude Reference...

Страница 150: ...tivation This mode may be used for climb or descent to the Selected Altitude shown above the Altimeter since Selected Altitude Capture Mode is automatically armed when Vertical Speed Mode is selected...

Страница 151: ...RSPEED MODE IAS Indicated Airspeed Mode is selected by pressing the IAS Key on the GMC This mode acquires and maintains the Airspeed Reference IAS while climbing or descending When Indicated Airspeed...

Страница 152: ...ence Bug Indicated Airspeed Reference VERTICAL NAVIGATION MODE VNV NOTE If another vertical mode is touched while VNV Mode is selected VNV Mode reverts to armed NOTE Pressing the CWS Button if equippe...

Страница 153: ...ting is adjusted while VNV mode is active the autopilot increases decreases the descent rate by up to 500 fpm to re establish the aircraft on the descent path without commanding a climb For large chan...

Страница 154: ...s provide a vertical descent angle as an aid in flying a stabilized approach These approaches are NOT considered Approaches withVertical Guidance APV Approaches that are annunciated on the HSI as LNAV...

Страница 155: ...itch is used to activate both modes The mode entered by the flight director depends on whether the aircraft is on the ground or in the air Takeoff Mode provides an attitude reference during rotation a...

Страница 156: ...Track Captures and tracks the Selected Ground Track HDG Key TRK Navigation GPS Captures and tracks the selected navigation source GPS NAV Key GPS Approach GPS Captures and tracks the selected navigati...

Страница 157: ...mode is annunciated as ROL in the Autopilot Status Box The current aircraft bank angle is held subject to the bank angle condition Roll Hold Mode Annunciation Bank Angle Flight Director Response 6 Ro...

Страница 158: ...f the HSI Changing the selected heading 1 Press the Knob to display the Menu 2 Select Heading and use the Knob to change the Selected Heading Or Rotate the HDG Knob GMC 307 only Activating heading mod...

Страница 159: ...use the Knob to change the Selected Ground Track Or Rotate the HDG Knob on the GMC Activating track mode Press the HDG Key on the GMC Holding the CWS Button if equipped and hand flying the aircraft d...

Страница 160: ...ires and tracks the navigation source The flight director follows GPS roll steering commands when GPS is the navigation source Navigation Mode can also be used to fly non precision GPS approaches wher...

Страница 161: ...t to activate capture and track the selected navigation source Example Control Lateral Mode Annunciation Description LNAV NAV Key Approach GPS GPS Captures and tracks the selected navigation source GP...

Страница 162: ...ion LPV LNAV VNAV LNAV V APR Key Lateral GPS GPS Captures and tracks the lateral portion of a GPS approach Vertical Glidepath GP Captures and tracks a WAAS approach glidepath Lateral Vertical Approach...

Страница 163: ...as a critical fault condition and the unit is about to power off to avoid damage to the battery Battery fault Battery has a fault condition examine fault display in config mode and contact Garmin if i...

Страница 164: ...valid return to Garmin Magnetic field model database out of date Internal magnetic field database is out of date software update required Using external GPS data GPS data from another network LRU is b...

Страница 165: ...eering CWS 118 D Display Overview 89 F Flight director FD 120 Modes vertical 133 147 Flight Level Change Mode 139 G Glidepath Mode GP 142 H Heading 95 Heading Select Mode 146 147 Heading Strip 102 Hor...

Страница 166: ...Pilot s Guide Index System Annunciations 91 Functionality 93 Initialization 90 Power up 90 T Takeoff Mode 143 Transponder Status Box 95 True Airspeed TAS 95 V Vertical Deviation Indicator VDI 112 Vert...

Страница 167: ...Garmin G5 User s Manual 190 02072 00 Rev B Blank Page...

Страница 168: ...r Road SE Salem OR 97302 U S A Tel 503 581 8101 Fax 503 364 2138 Garmin Europe Ltd Liberty House Hounsdown Business Park Southampton Hampshire SO40 9LR U K Tel 44 0 238 052 4000 Fax 44 0 238 052 4004...

Отзывы: