background image

Operating Procedures for Immobilizer Registration


71


7-3 Operating Procedures for Immobilizer Registration 

7-3-1. Registration menu 

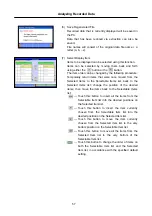
Select 

Registration 

button from the IMMOBILIZER system. 

Registration menu is displayed. 

The 1st key Registration 

    Register the key information for the IMMOBILIZER 
    system with no registered keys is registered. 
   

 go to section 7-3-2. 

VIN Registration 

    Send the VIN from Engine system and store the 
  information on the IMMOBILIZER system. 
   

 go to section 7-3-3. 

Additional key Registration 

    Add and register the information for new key to the 
  IMMOBILIZER system. 
   

 go to section 7-3-4. 

Erasing Registered key 

    The key information registered on the IMMOBILIZER   
    system is erased. Except the Master key information with   
  key-on currently. 
   

 go to section 7-3-5. 


7-3-2.  The 1st key Registration 

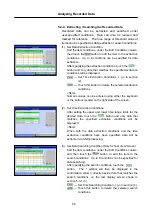
(1)  The confirming screen if the 1st registrable key is at the 

“ON” position is displayed. 

--- OK : go to section (2). 


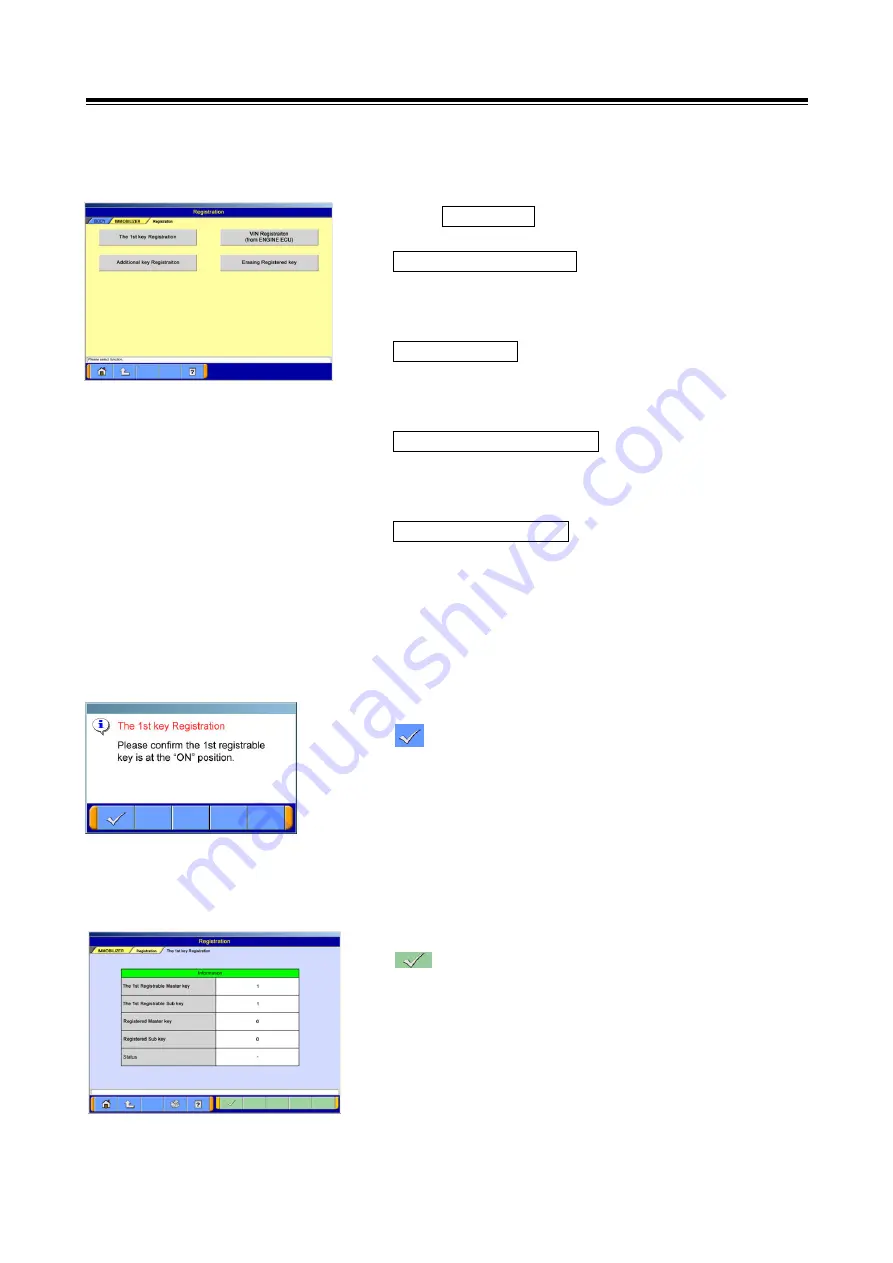
(2)  The screen of the 1

st

 key registration is displayed. 

Register both Master key and Sub key. 

--- The 1

st

 key registration 


Содержание Multi Use Tester III

Страница 1: ...Multi Use Tester III MUT III Instruction Manual ...

Страница 2: ... of Contents Chapter 1 Product Overview 1 1 1 Precautions 2 1 2 V C I Exterior Diagram and Part Names 3 1 3 Description and Usage of MUT III Components 4 1 4 Harness Connection Procedures and Connection Order 6 1 5 Connection Harness and Vehicle Combinations 7 Chapter 2 MUT III Functions 8 2 1 Basic Functions 8 2 2 V C I Function 8 Chapter 3 MUT III Operating Procedures 10 3 1 Start Up Procedures ...

Страница 3: ...gine VIN Writing 70 7 3 Operating Procedures for Immobilizer Registration 71 7 4 Operating Procedures for Pulse Converter 74 7 5 Operating Procedures for the OBD II Test Mode menu 76 7 6 Operating Procedures for Air Suspension Calibration 79 7 7 Operating Procedures for Language Switching 82 Chapter 8 Troubleshooting Measures 83 8 1 Troubleshooting Measures Classified by Symptom 83 Chapter 9 Refer...

Страница 4: ...ction that must be enforced Drivers should not operate the unit while driving Operating the unit while driving may result in a traffic accident Do not plug in or unplug the power AC adapter with wet hands Doing so results in the risk of electric shock When using the cigarette lighter plug to supply power to the V C I unit be sure the power voltage supplied is DC32V or less Applying a voltage great...

Страница 5: ...arness by pulling on the cord Pulling the cord rather than the connector may result in damage to the lead wire inside the cord thereby causing a short and possibly starting a fire Unplug the power AC adapter from the outlet when the unit is not in use Failure to do so may result in injury burns electric shock caused by insulation deterioration or fire due to a short circuit When the harness is con...

Страница 6: ...d Also do not clean the PC or V C I case using solutions such as thinner or benzene Doing so may result in deterioration of the case surface Prior to connecting the MUT III main harness between the V C I and vehicle turn the IG switch to OFF Connecting the V C I harness with the IG switch ON may damage the V C I programming Use only the power AC adapter included with the PC or approved replacement...

Страница 7: ... Overview 1 1 Precautions P 2 1 2 V C I Exterior Diagram and Part Names P 3 1 3 Description and Usage of MUT III Components P 4 1 4 Harness Connection Procedures and Connection Order P 6 1 5 Connection Harness and Vehicle Combinations P 7 ...

Страница 8: ...driving the target vehicle first verify that all parts are properly assembled While driving always have an assistant operate MUT III Be sure that the MUT III maintenance harness and other cables will not interfere with driving Install and remove the PC and V C I with the vehicle parked IG switch OFF PC Usage Limitations Do Not Install Software on the PC The MUT III PC is a special service tool Do ...

Страница 9: ... MH062930 Harness MUT III TYPE E MH063661 MH063662 Only for Europe Sub harness for drive recorder MH063663 Harness MUT III TYPE D MH062951 Part Names 1 I F Cartridge Port 5 Power Switch 2 LCD Display Screen 6 Harness Port 3 Indicator Lamp 7 USB Port 4 Control Buttons Used for V C I stand alone functions 8 Trigger Port Measuring Adapter MH063670 Trigger Harness MH063669 USB Cable MH063668 1 2 4 5 6...

Страница 10: ...can be supplied to the V C I via the cigarette lighter plug depending upon the particular model of vehicle Refer to section 1 5 for connection of harness and vehicle combinations 3 Harness MUT III TYPE C MH062930 This harness is used for checking or data recording of the Air Suspension ECU manufactured by WABCO This harness is used with Air Suspension I F Cartridge 4 Harness MUT III TYPE D MH06295...

Страница 11: ... during data recording while using the drive recorder function 9 Measurement Adapter MH063670 This adapter is used to connect the V C I to the measuring probes 10 Measuring Probes MH063671 The measuring probes are used with the voltmeter and ohmmeter Either MUT II accessory probes MB991499 or off the shelf probes can be utilized 11 I F Cartridge The I F Cartridge is used to perform special functio...

Страница 12: ...f the version of the V C I software installed in the PC is different from the version of the firmware within the V C I itself then a V C I software version upgrade will be initiated If a version upgrade error occurs restart the V C I while simultaneously depressing the button on the V C I in order to resume diagnostic testing 1 4 Harness Connection Procedures and Connection Order Open the lid cove...

Страница 13: ...f harnesses either a TYPE B or TYPE C or TYPE E O and either a TYPE D or Drive recorder depending upon the performing operation 1 Thailand Chile Harness Name Appearance 01 TYPE B MH062962 02 TYPE C MH062930 03 TYPE E MH063661 MH063662 Only for Europe 04 TYPE D MH062951 05 Drive recorder MH063663 01 02 03 04 05 Harness Name Vehicle TYPE B TYPE C TYPE E TYPE D Drive recorder EURO3 EPA04 Taiwan 3rd t...

Страница 14: ...e or forcibly stop the actuators required for servicing Only for ECUs that support serial communications Using its voltage measuring function the MUT III can measure DC voltage ranging from 40V Using its resistance measuring function the MUT III can measure resistance ranging from 0 100kOhm 2 2 V C I Function Using the V C I with a PC 2 2 1 Fault Diagnosis The V C I can perform fault diagnosis by ...

Страница 15: ...e measuring probes MB991499 etc to the adapter matching the color of each probe plug to the appropriate color on the adapter jack 2 Connect the vehicle to the V C I using the appropriate harness then turn the V C I power switches ON 3 Press the button to select either the Voltmeter or the Ohmmeter from the main menu refer to the photo at left then press the button to perform the measurement For Yo...

Страница 16: ...reens P 13 3 4 Operating Procedures for the MUT III System 3 4 1 Selecting Desired Functions P 15 3 4 2 Help Screen Functions P 16 3 4 3 Displaying the Instruction Manual P 16 3 5 Shutdown Procedures for the PC and MUT III System 3 5 1 Shutdown Procedures for the MUT III System P 17 3 5 2 Shutdown Procedures for the PC P 17 3 6 Removing a memory card from PC 3 6 1 Removal Procedures for a memory c...

Страница 17: ...d the password to logon as an administrator then select the OK button MUT III Start Up Once the desktop screen is displayed touch the FUSO MUT III icon which is located on the desktop twice quickly This action will start MUT III Information about Trademarks Microsoft WindowsXP and Internet Explorer are trademarks and registered trademarks of Microsoft Corporation in the USA and other countries Acr...

Страница 18: ...n is used to view the MUT III Instruction Manual on the PC Refer to section 3 4 3 for operating procedures On the system selection screen different main item categories can be viewed by selecting the different tabs located at the top of the screen Service Guide Display Additional functions will be included later This screen displays titles for 3 hierarchies in order to allow the user to understand...

Страница 19: ...formation Displays vehicle information Button Image Button Name Button Function Select item Select an item Item group registration Item group is registered Item group clearance Registered item group is cleared Item sort Sorts a chosen item View text Displays text View graph1 Displays four items on four graphs View graph2 Displays overwrites four items on one graph Change time scale Changes the gra...

Страница 20: ...mps to the trigger point Data Retrieval Opens the search condition settings screen Data extraction settings Opens the extraction condition data screen Time setting Opens the extraction condition time screen Add Adds items Correlation chart Opens the correlation chart settings screen Distribution map Opens the distribution chart settings screen Pause Pause Record finish Record finish Trigger settin...

Страница 21: ... change the group select the desired tab located in the upper area of the screen 4 If ENGINE is selected the screen shown in the figure to the left will appear The functions available for diagnosis are then displayed as buttons Note Certain diagnostic functions may not be available even though the buttons are displayed depending upon the particular ECU utilized in the vehicle to be diagnosed 5 If ...

Страница 22: ...on the left hand side of the screen the screen shown in the figure to the left will appear Selecting one of the bookmarked items will cause the screen to jump to the corresponding page If the symbol on the bookmark is selected lower hierarchies will be displayed and made available for selection Select the button located in the upper right corner of the screen to close the instruction manual If the...

Страница 23: ...s for the PC and MUT III System 3 5 1 Shutdown Procedures for the MUT III System Return to the MUT III start up screen by selecting either the icon or the icon then touch the Exit button located in the bottom right corner of the screen 3 5 2 Shutdown Procedures for the PC 1 After confirming that MUT III has been shut down touch the Start button located in the bottom left corner of the screen and s...

Страница 24: ...memory card double click the icon for removal of adaptor displayed on the bottom right corner 2 Select PCMCIA IDE ATAPI Controller or the other appropriate device then press Stop button 3 Verify the contents of the selection then press OK button 4 After displayed the message The device can now be safely removed from the system push the lever on the side of PC m card slot and remove the memory card...

Страница 25: ...Frame Data P 20 4 2 Operating Procedures for the Data List 4 2 1 Displaying the Data List P 21 4 2 2 Saving and Regenerating the Data List P 24 4 2 3 Displaying the Data List Saved Previously P 24 4 2 4 Group registration P 27 4 2 5 Other Functions P 29 4 3 Operating Procedures for the Actuator Test 4 3 1 Operating Procedures for the Actuator Test P 31 4 3 2 Simultaneously Displaying the Actuator ...

Страница 26: ...4 1 2 Displaying PAST DTC display Both current and prior DTCs can be acquired and displayed simultaneously Select this button to return to section 4 1 1 Select this button to display the service guide Select this button to delete DTCs both current and prior 4 1 3 Diagnostic Trouble Code Erasing A dialogue requesting confirmation of DTC deletion will be displayed Select this button to delete the DT...

Страница 27: ...lect display item refer to section 5 2 Text View When the number of items displayed must be reduced or when the order in which items are displayed must be changed use the button to forward to the item selection screen refer to section 4 Graph View 1 refer to section 2 Graph View 2 refer to section 3 Text View Select this button to move forward to the display screen showing the final gear ratio set...

Страница 28: ...r to section 4 2 4 3 Select display item refer to section 4 Switch displays of individual function button 1 3 view Switch displays of individual function button 2 3 view Switch displays of individual function button 3 3 view Select this button to move forward to the display screen showing the final gear ratio setting and tire information refer to section 4 2 4 4 Note The order in which items are d...

Страница 29: ...ble Item list into the desired positions on the Selected Item list Please note that voltage values cannot be moved Touch this button to insert the item currently chosen from the Selectable Item list into the desired position on the Selected Item list Touch this button to move the item currently chosen from the Selected Item list to the very bottom position on the Selectable Item list Touch this bu...

Страница 30: ...a saved immediately after the recording will be displayed The display format can be changed by using the following buttons Graph View 1 Graph View 2 overlay graph view Text View Note The order in which items are displayed can be changed refer to section 4 2 4 1 The data range can be changed to user specified values while the graph is displayed refer to section 4 2 4 2 4 2 3 Displaying the Data Lis...

Страница 31: ...s a reference The most recent data is displayed first DR files saved via the Drive Recorder SD files saved via the Data List Including the Data List saved via the actuator test 3 Text View The data recorded via the Data List recording operation will be displayed as text Graph View 1 go to section 4 Graph View 2 go to section 5 Select Item Set Data Extraction Condition Set Data Searching Condition ...

Страница 32: ... go to section 3 Select Item Set Data Extraction Condition Jump to Triggering Point Save Regenerated File Set Correlation Chart Set Distribution Chart Change Time Scale Change Data Scale Switch displays of individual function button 1 3 view Switch displays of individual function button 2 3 view Switch displays of individual function button 3 3 view Note The order in which items are displayed can ...

Страница 33: ...egistered contents can be corrected if you press the button after selecting the registered item group Registered item group can be used for Displaying the Data List Function the Actuator Test Function simultaneously displaying the Data List and Drive recorder Function selecting the recorded item 2 Input Item Group Name Enter up to 16 characters of group name to be registered OK go to section 3 Can...

Страница 34: ...e Item list into the desired positions on the Selected Item list Touch this button to insert the item currently chosen from the Selectable Item list into the desired position on the Selected Item list Touch this button to move the item currently chosen from the Selected Item list to the very bottom position on the Selectable Item list Touch this button to move all the items from the Selected Item ...

Страница 35: ...e item for which the data range must be changed by touching the screen Once the selected item becomes highlighted in yellow numeric values can be entered Methods for entering values PC input or scroll button input If a PC is used to enter values enter user specified values using the keyboard and either press the Enter key or touch the graph This action will cancel the input state and will finalize...

Страница 36: ... gear ratio This screen is displayed only for certain vehicle models when the system transmission has been selected Enter the final gear ratio using either the numeric buttons located on the right side of the screen or using the keyboard After entering the final gear ratio touch the button to finalize the entered values ...

Страница 37: ... List Graph button on the screen shown in section 4 3 1 1 will cause the item group selection screen to be displayed Selected the item group of the Data List to be displayed OK go to section 2 3 Cancel go to section 4 3 1 1 Registered group is cleared Group registration refer to section P 26 4 2 4 1 Group registration Selecting item group to be displayed go to section 5 2 Simultaneous Display with...

Страница 38: ...o be displayed from the Data List go to section 4 Graph View Pause refer to section 4 3 4 3 Save Data List touch this button once to save the data list currently displayed No dialogue boxes or messages will be displayed to confirm the save operation Note The order in which items are displayed can be changed refer to section 4 3 4 1 The data range can be changed to user specified values refer to se...

Страница 39: ... the Selected Item list Please note that voltage values cannot be moved Touch this button to insert the item currently chosen from the Selectable Item list into the desired position on the Selected Item list Touch this button to move the item currently chosen from the Selected Item list to the very bottom position on the Selectable Item list Touch this button to move all the items from the Selecte...

Страница 40: ...hat are not fixed using the up and down scroll buttons Touch the item again to cancel the selection This function cannot be utilized in Graph View during the selection of the data range display area using the data range change function Functions such as Select Item Cancel Scroll cannot be utilized 2 Changing the Data Range Select the item for which the data range must be changed by touching the sc...

Страница 41: ...Data List is displayed as a graph then Graph View will pause temporarily If the button is touched again Graph View will resume The section where the Graph View was temporarily paused will be indicated on the graph by a solid black line While Graph View is paused the data recording function will not operate ...

Страница 42: ...ding onto a PC Sampling Rate Fast Slow Sampling Time Short Long 5 1 Recording with the Drive Recorder 5 1 1 Recording with the Stand Alone V C I P 37 5 1 2 Recording with the PC P 42 5 1 3 Recording by Using the Previous Settings P 48 5 1 4 Group registration P 49 5 2 Handling the Recorded Data 5 2 1 Transferring Recorded Data from the V C I to the PC P 51 5 2 2 Regenerating the Recorded Data P 52...

Страница 43: ...will be performed The procedures used for setting up the Drive Recorder for the engine system are explained in this section Select the ENGINE button 2 Select Function Select the Drive Recorder button 3 Select Drive Recorder Function Select the Record button from the Drive Recorder menu screen 4 Select Triggering Method Select the triggering method Manual Trigger Touch this button for manual trigge...

Страница 44: ...o the desired position on the Selected Item list Touch this button to move the item currently chosen from the Selected Item list to the very bottom position on the Selectable Item list Touch this button to move all the items from the Recording Selection Item list to the very bottom of the Selectable Item list The selected position and items are fixed V C I Settings go to section 8 Sort Touch this ...

Страница 45: ... than the fastest interval the available recording time will be displayed Please note that this available time is only an estimate obtained by calculation thus may differ from the actual amount of recording time available The triggering distribution ranges from 0 100 100 0 in increments of 1 9 Display V C I Data The settings will be displayed for each item for data recorded in the selected V C I r...

Страница 46: ...on to transfer settings OK go to section 14 Cancel go to sections 11 12 14 Transfer Settings Settings are now being transferred to the V C I Please wait for a moment until the transfer has completed Upon transfer completion a dialogue box will appear that states Transfer of Settings Completed Note If recording operations must be performed immediately after the transfer of setting has completed unp...

Страница 47: ...he V C I s LCD screen displays the number of the recording area for the Drive Recorder within the V C I 17 Triggering Manual triggering can be initiated by pressing either the button located on the trigger harness or the button Once triggering has occurred the letter T will be displayed on the screen Data produced subsequent to triggering will be recorded When using Diag Trigger triggering will be...

Страница 48: ...ive recording will be performed The procedures used for setting up the Drive Recorder for the engine system are explained in this section Select the ENGINE button 2 Select Function Select the Drive Recorder button 3 Select Drive Recorder Function Select the Record button from the Drive Recorder menu screen 4 Select Triggering Method Select the triggering method Manual Trigger Touch this button for...

Страница 49: ...em currently chosen from the Selectable Item list into the desired position on the Selected Item list Touch this button to move the item currently chosen from the Selected Item list to the very bottom position on the Selectable Item list Touch this button to move all the items from the Recording Selection Item list to the very bottom of the Selectable Item list The selected position and items are ...

Страница 50: ...te that this available time is only an estimate obtained by calculation thus may differ from the actual amount of recording time available The Graph View item list will be displayed when Graph View is selected as the display format for the recording operation The name of the file currently displayed is composed of DR date time The time at which data was downloaded into the PC is used as a referenc...

Страница 51: ... shown on the screen 11 Recording Settings List Recording settings can be confirmed with this function Touch the button to confirm the items to be measured on the Recording Item list screen go to section 12 OK go to sections 13 14 12 Recording Item List The row items to be displayed in graph format during the recording operation will appear with the background highlighted in yellow under the Item ...

Страница 52: ... if triggering occurs the recording operation will continue until the button is touched Once the recording screen is displayed the amount of available PC hard disc space will be checked If 100 MB or less space is available a message will be displayed and the recording operation will be canceled Once 20 000 data points have been recorded a message will be displayed and the recording operation will ...

Страница 53: ...13 or 14 data will be saved and a dialogue will appear to confirm the completion of the data save operation Once data has been saved the display will return to the Drive Recorder menu screen OK go to section 3 16 No Recorded Data If no recorded data is present a dialogue will appear to confirm whether the recording operation should be ended OK Go to the fault diagnosis menu once the button is sele...

Страница 54: ... Setting Condition button from the Drive Recorder menu screen 2 Select the data for which settings must be restored from the Setting Conditions File list After displaying the Setting Conditions File list the recording conditions can be reset OK When displaying the data recorded with the stand alone V C I go to section 5 1 1 7 When displaying data recorded with the PC go to section 5 1 2 7 Touch th...

Страница 55: ...corrected if you press the button after selecting the registered item group Registered item group can be used for Displaying the Data List Function the Actuator Test Function simultaneously displaying the Data List and Drive recorder Function selecting the recorded item 2 Input Item Group Name Enter up to 16 characters of group name to be registered OK go to section 3 Cancel go to section 1 Note A...

Страница 56: ...Item list into the desired positions on the Selected Item list Touch this button to insert the item currently chosen from the Selectable Item list into the desired position on the Selected Item list Touch this button to move the item currently chosen from the Selected Item list to the very bottom position on the Selectable Item list Touch this button to move all the items from the Selected Item li...

Страница 57: ... on the Regenerated File List 3 Display V C I Data The conditions of the V C I recording areas can be displayed Drive Recorder data recorded in the V C I can be transferred to the PC As well the data within the V C I can be deleted Touch the button after selecting the data to be transferred Touch the button to delete the data 4 Confirm V C I Data Transfer OK go to section 5 Cancel go to section 3 ...

Страница 58: ...from the regenerated file list then touch the button to view the text data Also touch the and buttons to view the graph data The background color of the selected file row will change Note The name of the file currently displayed is composed of DR SD date time The time at which data was downloaded into the PC is used as a reference The most recent data is displayed first DR files saved via the Driv...

Страница 59: ... files can be marked Note Move the curser onto the check box and click This action will cause the mark to appear To select The mark will disappear if the check box is clicked again To cancel A confirmation dialogue will be displayed after the delete button is touched Follow the instructions 3 Saving Regenerated Data Mark the check box beside the file to be saved then touch the button Multiple file...

Страница 60: ... product and must be obtained separately Caution Never remove the PC memory card while data is being saved as the data may become corrupted 5 2 4 Loading Recorded Data 1 Regenerated files that have been saved on removable media can be loaded into the PC After selecting the Special Function button from the function selection menu screen select the Drive Recorder button to display the screen shown t...

Страница 61: ...ed as a reference The most recent data is displayed first DR files saved via the Drive Recorder SD files saved via the Data List Including the Data List saved via the actuator test 3 Text View The data recorded via the Drive Recorder recording operation will be displayed as text Triggering points are displayed in red font Graph View 1 go to section 4 Graph View 2 go to section 5 Select Item go to ...

Страница 62: ...t area will be divided into 3 Graph View 2 go to section 5 Text View go to section 3 Select Item go to section 7 Set Data Extraction Condition go to section 5 3 2 1 Jump to Triggering Point Save Regenerated File go to section 6 Set Correlation Chart go to section 5 3 3 1 Set Distribution Chart go to section 5 3 3 2 Change Time Scale Change Data Scale Switch displays of individual function button 1...

Страница 63: ...e Selected Items list change the position of the desired items then move the items back to the Selectable Items list Touch this button to insert all the items from the Selectable Item list into the desired positions on the Selected Item list Touch this button to insert the item currently chosen from the Selectable Item list into the desired position on the Selected Item list Touch this button to m...

Страница 64: ... using either the keyboard or the buttons located on the right side of the screen 2 Set Time Extraction Conditions After setting the upper and lower time range limits for the desired data touch the button and only data that matches the specified extraction conditions will be displayed Note When both the data extraction conditions and the time extraction conditions have been specified data will be ...

Страница 65: ...e data that is at the point where its status changes from not matching the specified conditions to matching the specified conditions 5 3 3 Displaying the Correlation Chart Distribution Chart 1 Set Correlation Chart Touch the button to display the correlation chart after first specifying the time range for the subject data as well as the item names and display ranges for each data group Analog data...

Страница 66: ... can be plotted on the distribution chart Time Range time range for the data to be plotted Subject Items items plotted Data Range range of data for the items plotted Data Division Width width of data divisions Frequency Range maximum frequency for the Y axis if 0 set to the optimum value to display the maximum frequency for each division width Note Numeric values can be entered using either the ke...

Страница 67: ... scroll the non selected items changing their order while the selected items remain fixed Touch the items again to cancel their selection 5 3 5 Data Range Change Function Select the item for which the data range must be changed by touching the screen Once the selected item becomes highlighted in yellow numeric values can be entered Methods for entering values PC input or scroll button input If a P...

Страница 68: ...res for Measurement Functions 62 Chapter 6 Operating Procedures for Measurement Functions 6 1 Operating Procedures for Measurement Functions 6 1 1 Measurement Function Menu P 63 6 1 2 Voltmeter P 63 6 1 3 Ohmmeter P 63 ...

Страница 69: ...n shown in section 6 1 1 The voltage is read from the trigger port by using the measuring probes The numeric values are displayed on the PC screen Prior to measurement perform zero point calibration by touching the button while the probes are short circuited Note DC voltages ranging from 40V can be measured 6 1 3 Ohmmeter Select the Ohmmeter button from the menu screen shown in section 6 1 1 The r...

Страница 70: ... P 70 7 2 3 Displaying of VIN information P 70 7 3 Operating Procedures for Immobilizer Registration 7 3 1 Registration menu P 71 7 3 2 The 1st key Registration P 71 7 3 3 VIN Registration P 72 7 3 4 Additional key Registration P 72 7 3 5 Erasing Registered key P 73 7 4 Operating Procedures for Pulse Converter 7 4 1 Pulse Converter menu P 74 7 4 2 Parameter Setting P 74 7 4 3 Parameter Display P 7...

Страница 71: ...es for Air Suspension Calibration 7 6 1 Calibration Menu P 79 7 6 2 Height Sensor Calibration P 79 7 6 3 Pressure Sensor Calibration P 81 7 6 4 Calibration Data P 81 7 7 Operating Procedures for Language Switching 7 7 1 Language Switching P 82 ...

Страница 72: ...the function selection menu to enter special function mode Select the V C I Stand alone Diagnosis button 3 Select removable media The Database which is only for V C I Stand alone diagnosis is transferred to the selected removable media removable disk drive Database Transfer procedure written above has completed remove the memory card from PC after stopping memory card by the procedures refer to 3 ...

Страница 73: ...e then press Enter button The display scrolls in the direction of the arrow displayed on the first line To switch the direction press Esc button once Note If you press Esc button twice in quick succession the screen goes back to the Main Menu 1 The scrollable last line is displayed as 3 DTCs Display The DTCs that have been read from ECU are displayed The number shown on the right edge of first lin...

Страница 74: ...ored and updating the screen If the system supports status recognition current status of each DTC is expressed by the following symbols which appears after code Active blank Stored Note If you press Esc button twice in quick succession the screen goes back to the Main Menu 1 The scrollable last line is displayed as ...

Страница 75: ...is because the systems you selected are not supported for the V C I Stand alone diagnosis 2 Confirm that if the system you selected exists or not 2 Error has happened during communication between V C I and ECU Communication line between V C I and ECU got disconnected or loosed connection from any cause ECU power OFF 1 Verify that the IG switch is turned ON 2 Check if the communication wire between...

Страница 76: ...ting Start VIN Writing go to section 7 2 2 VIN Information Display VIN Information go to section 7 2 3 7 2 2 VIN Writing 1 The VIN that has been read from ECU is displayed on Current VIN Input the desired VIN to be written into New VIN Performing VIN Writing go to section 2 2 The result screen of VIN Writing is displayed 7 2 3 Displaying VIN information VIN information that has read from ECU is di...

Страница 77: ...nd store the information on the IMMOBILIZER system go to section 7 3 3 Additional key Registration Add and register the information for new key to the IMMOBILIZER system go to section 7 3 4 Erasing Registered key The key information registered on the IMMOBILIZER system is erased Except the Master key information with key on currently go to section 7 3 5 7 3 2 The 1st key Registration 1 The confirm...

Страница 78: ...layed OK go to section 2 2 VIN Registration screen is displayed Performing VIN registration 7 3 4 Additional key Registration 1 The confirming screen if Master key is at the ON position is displayed OK go to section 2 2 Additional key Registration screen is displayed Register either Master key or Sub key Performing Additional key Registration ...

Страница 79: ...Registered key 1 The confirming screen if Master key is at the ON position is displayed OK go to section 2 2 The Erasing Registered key screen is displayed The registered key is erased except the key being at the ON position currently Performing Erasing Registered key ...

Страница 80: ...displayed Parameter Setting Change the parameter value of Pulse Converter go to section 7 4 2 Parameter Display Display the parameter registered on Pulse Converter go to section 7 4 3 7 4 2 Parameter Setting The parameter value that Pulse Converter recognizes is displayed is displayed as the numeric value being out of the setting ranges Insert the value by the numeric keypad As pressing the SET bu...

Страница 81: ...tton from Pulse Converter menu screen System information screen displays Software Version Basic Software Software for Fault Diagnostics System Database for Fault Diagnostics System and VCI Serial Number of current MUT 3 system installed on PC Return to Pulse Converter menu screen go to section 7 4 1 1 ...

Страница 82: ...ode 03 Diagnostic Trouble Code displaying screen is displayed go to section 7 5 2 On Board Test Result Mode 06 Monitor System selection screen is displayed go to section 7 5 3 Pending DTCs Mode 07 Pending DTCs displaying screen is displayed go to section 7 5 4 Vehicle Information Mode 09 Vehicle Information selection screen is displayed go to section 7 5 5 Readiness Tests Readiness Test result dis...

Страница 83: ...t Mode 06 1 Select the desired Monitor System to be displayed go to section 2 2 The result of On Board Test is displayed 7 5 4 Pending DTCs Mode 07 1 Pending DTCs are displayed Freeze Frame Data Freeze Frame Data screen is displayed go to section 2 2 Freeze Frame Data is displayed ...

Страница 84: ...to section 2 2 Selected VIN is displayed 7 5 6 Readiness Tests Readiness Test results are displayed Not Available Monitor not supported Complete Monitor complete Incomplete Monitor not complete 7 5 7 Monitor System The corresponding state of Monitor System is displayed Available Monitor supported Not Available Monitor not supported ...

Страница 85: ...t state is set Cancel go to section 7 6 1 Enlarged view of the 4 buttons go to section 5 The operate mode display go to section 4 For ensuring safety the declining operation is stopped automatically by the consecutive operation in a given time It stops after 3 Seconds for Front 10 Seconds for Rear Press the button again if you continue declining operation 2 Set the Upper Level Car height on each o...

Страница 86: ...stopped automatically by the consecutive operation in a given time It stops after 3 Seconds for Front 10 Seconds for Rear Press the button again if you continue declining operation 4 Select the operate mode Setting Return to the previous screen 5 The button display can be enlarged in order that the up and down setting of car height is performed easier without looking at a screen Front Rear change ...

Страница 87: ...ure Sensor Calibration 1 Go on to the Pressure Sensor Calibration after height sensor calibration ends Exhaust Air Intake Ending Calibration Cancel Operate mode display go to section 2 2 Select the operate mode 7 6 4 Calibration Data Calibration data list is displayed ...

Страница 88: ...language setting menu Select Language for Display System Language switching for Display System is performed go to section 3 Select Language for Display Service manual Language switching for Display Service manual is performed go to section 4 3 Select Language for Display System Select the desired Language to be used for Display System Setting the selected Language to be used for Display System 4 S...

Страница 89: ...uest an inspection of the hardware as well as the harness 1 Check to ensure that the PC is powered up 2 Check to ensure that the PC and V C I are connected directly together A USB hub should not be utilized 3 Check the quality of the cable connections 4 Check whether any wires are broken in the cable Try connecting using another cable 3 The V C I does not power up when connected to the PC under th...

Страница 90: ...Voltage DC 40V 1 min Stand alone Power Consumption Max 1A Only Within Guaranteed Operating Voltage Range The above values do not apply under special operating conditions such as if an upgraded control port or other component is short circuited to GND as well as under conditions outside of the guaranteed operating voltage range Current consumption is 420mA or less when the unit is used at the rated...

Страница 91: ...nction in signal inputs details of the error and the data at the time of malfunction are recorded by the computer Directory A structure created to organize and manage data files A directory can be referred to as a folder Information about each file is compiled within the directory E ECU Abbreviation for the term Electronic Control Unit A control device for an electronic control system I I F Cartri...

Страница 92: ...mmunication in which bits of digital data are transmitted one after the other using a communication line When using MUT this type of communication method is called Serial Communication in order to provide contrast with the alternate method called Pattern Diagnosis particularly when DTCs are read from the ECU via communications Slide Bar A data entry method in which values are entered by moving a s...

Отзывы: