FinePix S602 ZOOM SERVICE MANUAL
5. Inspection
69
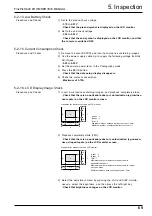
5-2-14.Low Battery Check
Procedure and Checks
1) Set to the preend check voltage.
· 3.70+/-0.01V
· Check that the preend symbol is displayed on the LCD monitor.
2) Set to the end check voltage.
· 3.50+/-0.01V
· Check that the end symbol is displayed on the LCD monitor, and that
the camera is switched OFF.
5-2-15.Current Consumption Check
Procedure and Checks
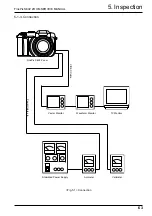
1) Remove the card (SSFDC) and insert a microdrive containing images.
2) Use the power supply cable Jig to supply the following voltage from the
DC-IN jack.
· 5.00+/-0.05V
3) Set the camera power lever to the Photography mode.
4) Press the BACK button.
· Check that the date setup display disappears.
5) Check the current consumption.
· Maximum of 0.70A.
5-2-16. LCD Display Image Check
Procedure and Checks
1) Insert a microdrive containing images, and playback completely black.
· Check that there is no noticeable dust or contamination (eg lumines-
cent spots) on the LCD monitor screen.
2) Playback completely white (75%).
· Check that there is no noticeable dust or contamination (eg uneven-
ness, dropout spots) on the LCD monitor screen.
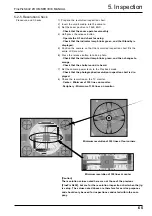
.%&Ṍὐⷙᩰ
1/4
H
1/2
1/4
1/4
1/2
1/4
V
A
B
#࠱ࡦ
$࠱ࡦ
ว⸘
᳓ᐔᣇะㅪ⛯Ṍὐ એή߈ߎߣ
ု⋥ᣇะㅪ⛯Ṍὐ ή߈ߎߣ
Ṍὐ㑆〒㔌
OOએ
A zone : 3
B zone : 4
Total : 7
Maximum number of adjacent dropout spots in
horizontal direction : 2
Maximum number of adjacent dropout spots in vertical
direction : None
Minimum distance between dropout spots : 5mm
Standards for dropout spots on LCD monitor
.%&ノὐⷙᩰ
1/4
H
1/2
1/4
1/4
1/2
1/4
V
A
B
#࠱ࡦ
$࠱ࡦ
ว⸘
ノὐ㑆〒㔌OOએ
ㅪ⛯ノὐએή߈ߎߣ
A zone : 1
B zone : 3
Total : 4
Minimum distance between luminescent spots : 5mm
Maximum number of adjacent luminescent spots : 1
Standards for luminescent spots on LCD monitor
3) Select the adjustment menu by pressing the shift and DISP simulta-
neously, select the brightness, and then press the left-right key.
· Check that brightness changes on the LCD monitor.

