62
5. Inspection
FinePix S2 Pro (U/E) SERVICE MANUAL
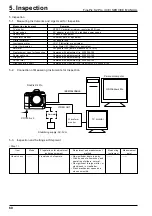
<Step 8>
Item
Check play-
back image
(Flash / Expo-
sure for a long
time)
Mode
PLAY
Mode
Preparations for adjustment
and measurement
(1)Place the smart media which
contains the photograph re-
corded in STEP4 and 5 in
image check camera.
(2)The PLAY button is
pushed.
(3)Playback flash check photo-
graphic image.
(4)Playback Exposure for a
long time photographic image.
Adjustment and measurement
method
(3)Playback image within 48+22,-
17 [IRE] on waveform monitor
display.
(4)That is, no white floating in
image.
Measuremen
point
tester
Measuring
instrument
Check cam-
era
Waveform
monitor
TV monitor
(3) Waveform monitor
Item
Slot cover
detection
confirmation
Mode
Preparations for adjustment
and measurement
(1)Turn on the Power_on of
the main body.
(2)Open and tighten the slot
cover.
Adjustment and measurement
method
(2)The any Rear display panel
disappears.
Measuring
instrumen
Visual
Measurement
point
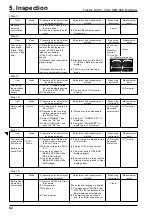
<Step 7>
Item
Confirming
the operation
of alkaline
battery
Mode
Preparations for adjustment
and measurement
(1)The DC_IN cable is pulled
out, and the alkaline battery
(4) is put in BATT CART.
(2)The power on.
Adjustment and measurement
method
(2)The any which LCD monitor
displays.
Measuring
instrumen
Measurement
point
LCD monitor
<Step 9>
Item
Delete mode
check
Mode
Delete
Preparations for adjustment
and measurement
(1)DC cable jig is inserted in
DC_JACK.
(2)Reproduce the recording
picture image, and push
the "MENU" key.
(3)Select "FORMAT", and
push the "OK" key.
(4)Select "MENU/OK", and
push the "OK" key.
Adjustment and measurement
method
(2) Playback screen disappears.
(3)Thing that “FORMAT OK?" is
displayed.
(4)Thing that “NO IMAGES" is
displayed in LCD monitor.
Measuring
instrument
LCD monitor
Recorded
smart media
Measurement
point
LCD monitor
<Step 10>
Item
Confirmation
of operation of
MicroDrive
Battery down
check(DSC)
Mode
PLAY
Mode
Preparations for adjustment
and measurement
(1)Replace SmartMedia with
the MicroDrive and push
the PLAY button.
(2)Set the voltage to 5.00V+-
0.1V.
(3)Lower the voltage to
3.8V+-0.1V
little by little.
(PRE_END voltage)
(4)Lower the voltage to
3.6V+-0.1V
little by little.
(END voltage)
Adjustment and measurement
method
(1)The test image is played by the
LCD monitor.
(2)Thing of 1[A] or less current.
(3)Thing that battery PRE-END
display appears
(4)The end mark is a thing that the
blinking display is done in Rear
display panel.
Measuring
instrument
LCD monitor
Recorded
MicroDrive
Measurement
point
LCD monitor
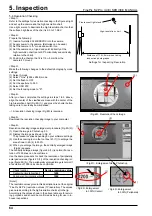
<Step 11>
<Step 12>
Item
Built-in flash
prohibition
confirmation
Mode
Preparations for adjustment
and measurement
(1)Remove CR123A (2) from
the camera.
(2)The power on.
(3)Do pop_up.
(4)Take a picture.
Adjustment and measurement
method
*When the use language is English
(3)The message of "CLOSE Arrow
W/O CR-123" is displayed in the
Rear display panel.displayed.
(4)The warning sound sounds,
and, the shutter cannot be cut.
Measuring
instrument
Visual
Measurement
point

