background image

60

5. Inspection

FinePix S2 Pro (U/E) SERVICE MANUAL

5.Inspection

5-1.

Measuring Instruments and Jigs Used for Inspection

Measuring instrument

Remarks

TV monitor

NTSC TV monitor, minimum resolution 600 lines

Power supply

AC adapter (eg AC-5VH), stabilized power supply

Pattern box

PTB450 or equivalent

Waveform monitor

LEADER: 5870 or equivalent

Digital voltmeter

For general use

Luminance meter

LS-110 (Minolta) or equivalent

Color thermometer

Color Meter IIIF (Minolta) or equivalent

Ammeter

For general use (able to measure up to 1mA)

Replacement Lens for Inspection

Common with adjustment jig: ZJ00396-100

Power cable jig

Common with adjustment jig: ZJ00213-100

Grey chart

Common with adjustment jig: ZJ00254-100

LB140 filter

Common with adjustment jig: ZJ00006-100

High-resolution chart

Common with FinePixS1Pro, FinePix4700Z: ZJ00398-100

5-2.

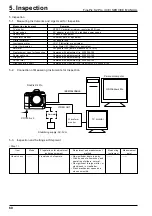
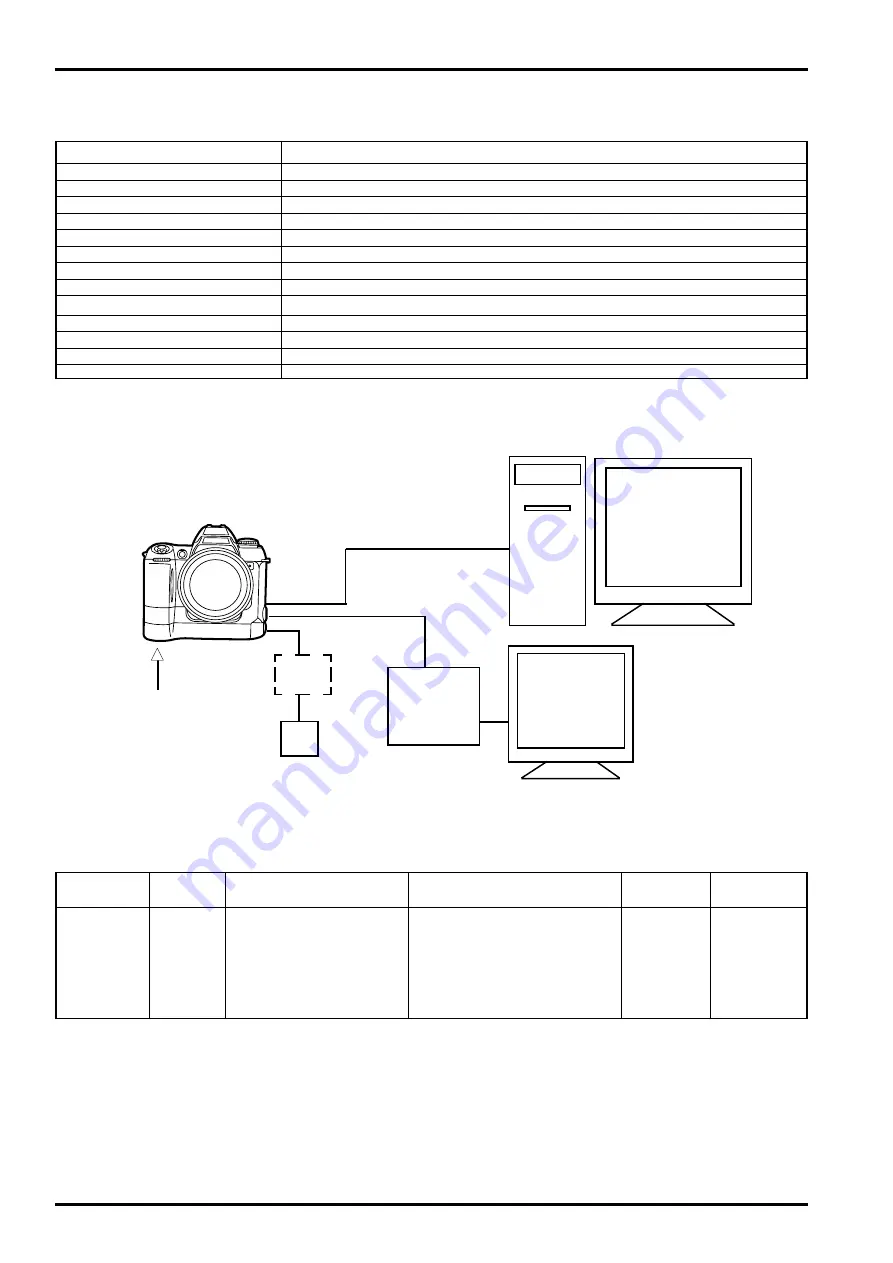
Connection of Measuring Instruments for Inspection

5-3.

Inspection and Settings at Shipment

<Step 1>

FinePix S2 Pro

VIDEO OUT

Stabilizing supply, AC-5VH

TV monitor

Ammeter

OS:Windows Me

IEEE1394CABLE

CR123A x 2

Waveform
monitor

Personal computer

Item

Visual check

Mode

------

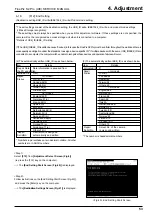
Preparations for adjustment

and measurement

Visual check of camera.

Adjustment and measurement

method

• No significant dents in body.
• Click sound of all switches, and

operation of sliders, normal.

• No significant foreign matter, or

cloudiness, in viewfinder.

• Flash mechanism opens and

closes smoothly.

Measuring
instrument

------

Measurement

point

------

Содержание FinePix S2 Pro

Страница 1: ...FETY PLEASE REPLACE ONLY BY THE COMPORNENTS SPECIFIED ON THE SCHMATHIC DIAGRAMAND IN THE PARTS LIST IF YOU USE WITH PART NUMBER UN SPECIFIED IT MAY RESULT IN A FIRE AND AN ELECTORICAL SHOCK FUJI PHOTO FILM CO LTD Ref No ZM00438 105 Printed in Japan 2002 06 T S U E Model SERVICE MANUAL FinePix S2 Pro DIGITAL CAMERA ...

Страница 2: ...UT After correcting the original problem perform the following safety check before returning the product to the customer 1 Check the area of your repair for unsoldered or poorly sol dered connections Check the entire board sur face for solder splasher and bridges 2 Check the interboard wiring to ensure that no wires are pinched or contact high wattage resistors 3 Look for unauthorized replacement ...

Страница 3: ...vation methods and notes 32 4 8 Install the DSC jig driver and the PC adjustment software 34 4 9 Adjustment Software Initial Setup 35 4 10 Starting the Adjustment Software 37 Page 4 11 F4 CCD Defect Correction Adjustment 38 4 12 F5 CAM Adjustment 40 4 13 F1 Battery Voltage Adjustment Adjustment 42 4 14 F11 REAR DISPLAY PANEL Adjustment 44 4 15 F7 Flash Adjustment 45 4 16 F6 AF Adjustment 46 4 17 F...

Страница 4: ...ocus area selected from 5 focus areas AF area mode Single area AF Dynamic AF with a closest subject priority dynamic AF function AF lock AE AF lock button Can also be operated by pressing the shutter button halfway in single AF servo mode Metering modes TTL open metering Selectable from 3 metering modes restrictions apply on some lenses z 3D 10 zone Matrix Center weighted Spot Exposure modes P Mul...

Страница 5: ... 1536 1440 960 Quality Mode HIGH FINE NORMAL HIGH FINE NORMAL HIGH FINE NORMAL HIGH FINE NORMAL TIFF RGB CCD RAW TIFF RGB TIFF RGB TIFF RGB Image File Size Approx Approx Approx Approx Approx Approx Approx Approx Approx Approx Approx Approx Approx 35 5MB 12 4MB 4 7MB 2 2MB 17 9MB 2 3MB 1 1MB 10 4MB 1 3MB 660KB 4 1MB 690KB 350KB MG 16S 16MB 0 1 3 6 0 6 13 1 10 23 3 22 44 MG 32S 32MB 0 2 6 13 1 12 27...

Страница 6: ... 2000 Professional read only iMac DV and Power Macintosh PCs with FireWire as a standard feature Mac OS 8 5 1 to 9 1 z PC AD3 PC Card Adapter z Hyper Utility Software HS S2 IEEE1394 Interface 1 Images shot in high sensitivity photography ISO 400 or higher may appear coarse and may also be affected by noise such as white dots 2 CCD RAW is a format specific to the FinePix S2 Pro The enclosed FinePix...

Страница 7: ...ra off to prevent battery depletion and to avoid wasting power when the camera is connected to the AC power adapter Preview image display is also cancelled when this function operates z The Auto Power Off function does not operate when a USB connection is being used or when the Auto Power Off function is switched off during setup CCD RAW This is the image data prior to signal processing the recons...

Страница 8: ...still looks white On the other hand devices such as digital cameras see a white subject as white by first adjusting the color balance to suit the color of the ambient light around the subject This adjustment is called matching the white balance A function that automatically matches the white balance is called an Automatic White Balance function Exif Print Exif Print Format is a newly revised digit...

Страница 9: ...stem selector dial PLAY button FUNC button F1 button F2 button F3 button F4 button LCD monitor Microphone Rear display panel Synchro mode button Auto Exposure Bracketing button Flash pop up button Diopter adjustment knob Rubber eyecup Viewfinder Focus mode selector switch AA size battery holder release catch Lens release button Strap mount Flash USB socket IEEE1394 socket IEEE1394 socket cover VID...

Страница 10: ... U E SERVICE MANUAL SW PWB ASSY LCD MONITOR SYNCHRO CCD HOLDER ASSY BATT HOLDER BATT CART FRONT CABI BATT LID CR SPACER ASSY CAMERA BODY ASSY MAIN PWB ASSY MIC REAR LCD PANEL R CABI ASSY 2 Disassembly 2 1 Names of internal Components ...

Страница 11: ...FRONT CABI 1 A part must be engaged and combine FRONT CABI 2 Confirm there is no space when FRONT CABI and MAIN BODY are combined and the screw is tightened 2 2 Removing BATT CART ASSY Remove in the order indicated by circled numbers Step 1 Step 1 Remove in the order indicated by circled numbers 1 Remove five screws BB14857 100 M1 7x3 0 2 Remove FRONT CABI in the direction of the arrow ...

Страница 12: ...arrow 4 Remove the harness from connector CN300 of MAIN PWB ASSY 5 Remove the lock of connector CN500 of MAIN PWB ASSY and remove FFC 3 2 1 2 2 5 4 Notes of assembly of DSC BlOCK 1 Note diagonal insertion and the half insertion when you lock FFC and the harness to the connector 2 Confirm there is no space when DSC BLOCK and MAIN BODY are combined and the screw is tightened Remove in the order indi...

Страница 13: ...4 Remove the hook of BATT HOLDER and float MAIN PWB ASSY in the direction of the arrow 5 Remove the hook of R CABI ASSY and float MAIN PWB ASSY in the direction of the arrow 2 1 1 1 2 1 3 3 2 5 4 hook hook hook 6 6 Remove MAIN PWB ASSY in the direction of the arrow Notes of assembly of MAIN PWB ASSY Note diagonal insertion and the half insertion when you lock FFC and the harness to the connector R...

Страница 14: ...hree screws 2 Remove MAIN FRAME ASSY in the direction of the arrow 3 Remove LCD MONITOR in the direction of the arrow 1 2 1 1 3 2 Notes of assembly of MAIN FRAME ASSY Assemble MAIN FRAME ASSY to pinch neither FPC of LCD MONITOR nor FPC of back light when you assemble MAIN FRAME ASSY Step 1 Step 1 Remove in the order indicated by circled numbers Remove in the order indicated by circled numbers ...

Страница 15: ...one screws 2 Remove the harness from connector CN900 of SW PWB ASSY 3 Remove SW PWB ASSY in the direction of the arrow 1 Remove two screws 2 Remove REAR DISPLAY PANEL in the direction of the arrow 1 2 1 3 2 Step 1 Step 1 Remove in the order indicated by circled numbers Remove in the order indicated by circled numbers ...

Страница 16: ... ASSY 1 Remove four screws 2 Remove CCD HOLDER ASSY in the direction of the arrow Notes of assembly of CCD HOLDER ASSY Tighten the machine screw according to one side direction of the arrow when you stop four screws 1 1 2 Remove in the order indicated by circled numbers Step 1 ...

Страница 17: ...2 12 Removing GRIP BASE 1 2 1 2 1 Remove two screws 2 Remove PLATE BOTTOM in the direction of the arrow 1 Remove SHAFT 2 Remove GRIP BASE in the direction of the arrow Remove in the order indicated by circled numbers Step 1 Remove in the order indicated by circled numbers Step 1 ...

Страница 18: ...CHANGE LEVER 5 Remove two screws 6 Remove two screws 7 Remove FRONT COVER UNIT in the direction of the arrow 8 Remove two screw 9 Remove GLIP COVER in the direction of the arrow 10 Remove two screws 11 Remove SIDE COVER in the direction of the arrow 12 Do the lens cap 13 Remove five screws 14 Float TOP COVER UNIT in the direction of the arrow Remove in the order indicated by circled numbers Step 1...

Страница 19: ...OP COVER side and remove TOP COVER UNIT to the grip side As for the grip side the harness is stopped with solder 16 Discharge electricity before removing the harness 17 Remove six harness and remove TOP COVER UNIT completely Notes of assembly of TOP COVER UNIT Hang part A inner EYE PIECE BARREL UNIT And build in TOP COVER UNIT Step 3 Step 4 ...

Страница 20: ...ng BODY FPC HARNESS 1 Remove soldering from CAMERA BODY and remove BODY FPC HARNESS 2 15 Removing SB LOWER CASE UNIT 1 Remove two screws 2 Remove the hook in two places 3 Remove two screws 4 Float TOP COVER FPC Remove in the order indicated by circled numbers Step 1 Remove in the order indicated by circled numbers Step 1 Step 2 ...

Страница 21: ... 5 6 7 A 8 5 Pull out the harness of the flash in the direction of the arrow after floating TOP COVER FPC 6 Remove FLASH UP SPRING in the direction of A 7 Remove one screws 8 Remove SB LOWER CASE UNIT in the direction of the arrow Step 3 Step 4 Step 5 ...

Страница 22: ...s used 4 The camera body used is based on the Nikon F80 camera and takes Nikon s interchangeable lenses 5 In response to strong demand from business users a high speed IEEE 1394 interface has been provided along with the addition of a CCD RAW format recording function 1The Honeycom signal processing roughly doubles the valid number of image pixels concentrating the data for 4 pixels into one This ...

Страница 23: ...6 as 8 bit image data and then sent to SDRAM IC307 to IC310 via the media control unit the DMA unit and the internal buffer control unit The image data temporarily stored in SDRAM IC307 to IC310 is then returned to the signal processor IC abbreviated as UCS1 IC306 and sent to the signal processor unit via the media controller and JPEG calculation unit The signal processor unit performs postprocess...

Страница 24: ...DET X TAL 24 5MHz X TAL 48MHz AUDIO A D AUDIO SERIAL DC DC BLOCK CONTROL IC IC702 EVR 4ch DATA TIME IC302 A D 12bit FLASH ROM IC314 16Mb EEPROM SDRAM IC309 310 256Mb x16 SDRAM IC307 308 256Mb x16 LCD Monitor EVR D A 8ch IC502 EVR D A 8ch IC502 AMP BRIDGE BUS 32bit 75MHz VIDEO OUT CCD_IN AVD AHD ADCK FI CCD CLK 24 5MHz MIC CCD PWB UNIT MAIN PWB ASSY IEEE1394 DRV IC1001 16Mb 1394 OUT RxD TxD DSC_DET...

Страница 25: ... 2 CANCEL 2 MD3 3 EXE 3 MD2 4 DISP 4 MD UNREG 5 FUNC 5 MD0 2 CAM_BATT 6 KEY_L 6 3 UNREG_GND 7 KEY_CL 7 MWAIT 8 KEY_CR 8 MRDY 9 KEY_R 9 0 BLR_ON 0 MIC_VCC MIC 3 3V 2 MIC GND MIC MIC CARD_LED HOT GND COLD 2 CS DSC_DET 2 DSC_ON 3 Release 4 TESTL 24 Shutter 5 COM 23 RXD 6 VST 22 TXD 7 VCK 21 SYNC 8 EN 20 GND 9 DWN VDD VSS VDDG 16 VSSG 15 TEST2 14 WIDE 13 HST 12 REF HOT TEST 10 GND 2 C REXT 9 HCK2 8 HC...

Страница 26: ... 6 1 Printed wiring board of MAIN PWB ASSY CN800 CN800 CN700 CN701 F701 A A CN702 F707 F703 F704 F700 J700 J701 CN304 CN303 CN301 CN500 CN1001 CN200 CN300 IC500 IC501 CN302 IC201 IC306 IC314 BZ300 BT300 IC302 IC307 IC308 IC309 IC310 CN810 B B IC600 IC1001 IC502 IC319 F705 F708 F702 F706 IC702 ...

Страница 27: ...27 3 Schematic FinePix S2 Pro U E SERVICE MANUAL 3 6 2 Printed wiring board of SW PWB ASSY A side B side CN901 CN900 A B ...

Страница 28: ... copied data to implement CCD defect correction Supplement As with previous models this is due to the difficulty of removing and using the Flash_ROM IC314 mounted on the MAIN PWB ASSY in the FinePix S2 Pro 2 You must always select END Settings at the end of a series of adjustments If the camera is returned to the customer without specifying the exit settings in this way the camera will not communi...

Страница 29: ...th the DS 30 DS 20 DS 7 AF solid chart ZJ00553 100 AF adjustment Only FinePix S2 Pro AF Adjustment Lens J18266 AF adjustment Only FinePix S2 Pro Gray Chart Reflective type ZJ00254 100 Flash adjustmen Common with the MX700 MX500 CCD defect data ZJ00556 100 CCD defect data Only FinePix S2 Pro USB cable FZ04205 100 System adjustment IEEE1394 cable FZ04797 100 AF adjustment Hyper Utility Software HS S...

Страница 30: ...dify the lens so it can be used for adjustment The modification procedure is shown below Step 1 Turn the focus ring 1 so that the interchangeable lens s dis tance scale reads 0 45 then place the lens upside down Step 2 Cut the stopper for the camera using side cutters etc Side cutter Step 3 Remove the screws holding the opening F value linkage guide in the order shown by the circled numbers in the...

Страница 31: ...a Color Meter IIIF or equivalent Color temperature measurement method Stick a filter LB140 to the pattern box With the filter LB140 and color temperature meter in place adjust the pattern box color temperature to 6100 50K 2 Brightness 160 5 cd m2 with LB140 filter Measurement position Center of pattern box Measurement instrument Minolta brightness meter LS 110 or equivalent Brightness measurement ...

Страница 32: ...om Fig D 1 FinePix S2 Pro PC adjustment software Fig D 1 ZJ00558 100 zip 2 Environment settings for AF adjustment fig B 1 Set the distance between the AF chart and the front of the F mount to 953 5 mm 1 mm 2 Use a light source to illuminate the AF chart Set the AF chart surface brightness as 9 0 to 11 5 Ev 3 Set the camera on the stand for the AF solid chart 3 Environment settings for flash adjust...

Страница 33: ...ng Step3 The folder named ZJ00558 100 can be made by defrosting without specifying anything Fig D 2 Then copy the folder named S2Pro_UE in this folder in C drive Fig D 3 The folder of ZJ00558 100 becomes unnecessary at the end and delete this folder ZJ00558 100 S2Pro_UE My Computer 3 5inch FD A C Fig D 2 My Computer 3 5inch FD A C Fig D 3 ZJ00558 100 Caution Important a PC adjustment software can ...

Страница 34: ...y to install it The procedure is given below 1 Installation of DSC jig driver Step 1 DSC jig driver ZJ00476 100 ZIP is downloaded from Web server http fujifilm di intranets com Step 2 Defrost the downloaded compression software Step 3 Double click setup exe in the folder of defrosted ZJ00476 100 and install Fuji FILM DSC Jig Driver as follows Step 4 Install the software in C ProgramFiles Fjig acco...

Страница 35: ...red Do not change the content of the program S2Pro_UE ff un der any circumstances Any changes will prevent the soft ware running Step 1 Double click on the adjustment software executable file FFW exe Fig D 2 to display the FFW Start up Screen Fig E Step 2 Select Mode Settings Fig F 2 from the Setting menu Fig F 1 on the MENU Screen Step 3 Select the EVR Communications menu on the Cus tomize dialog...

Страница 36: ...ct Hardware on the Customize setup screen Fig I 1 Setup as follows on the Hardware menu Fig I 2 Item Setup details Debug Mode Select Ignore Focus Step 6 When the settings have been entered in the EVR Oth er and Hardware menus noted above click on Apply on the Customize Dialog screen Fig I 3 to terminate Further setup is unnecessary once the settings have been applied note Setting Don t show OK NG ...

Страница 37: ...Set the aperture ring on the adjustment lens to F5 6 4 Load 2 fully charged CR123A batteries into the camera 5 Set the mode dial to M mode 6 Set the focusing mode switch to MF 7 Open the slot cover 8 Connect the USB cable to the camera 9 Supply 5 00 volts to the camera from the Power cable jig 10 Hold down the BACK button and switch the camera on 11 When you have completed the preparation in steps...

Страница 38: ... the F4 key on the computer The CCD Defect Correction Start Screen Fig 5 is displayed Step 2 Follow the instructions on the CCD Defect Correction Start Screen Fig 5 and make the following prepa rations 1 Prepare the CCD defect data floppy disk for the camera being adjusted 2 Enter the 8 digit CCD serial number figure 5 1 in the defect data input dialog box There is no need to enter the extension d...

Страница 39: ...ensions If so change the Windows settings so that file extensions are displayed 2 Letters as well as numbers may be used in CCD serial numbers If so use the same method as that described above to obtain the file name 3 Be sure to note the CCD serial number correctly If a file with the wrong file name is used for defect correction the data for a different camera will be written to the file Step 2 D...

Страница 40: ...reen Fig 9 is displayed Step 2 Follow the instructions on the CAM Adjustment Preparation Screen Fig 9 and make the following preparations 1 Have an LB 140 filter handy 2 Set the pattern box PTB450 color temperature to 6100 50K See 4 6 Environment Settings for the adjustment procedure 3 Set the pattern box PTB450 brightness to 160 50 cd m2 See 4 6 Environment Settings for the adjustment procedure 4...

Страница 41: ...CCD Type Selection Fig 11 1 and make the following preparations Note Select A Type when there is no mark of A to E CCD Type Here assume that A was selected as an example The A E CCD Type selection screen Fig 11 2 is displayed Step 6 A E CCD Type selection screen Fig 11 2 is displayed Press the Enter key on the computer Step 7 When adjusted data is saved normally CAM Adjustment Complete Screen Fig ...

Страница 42: ...ayed Step 2 Follow the instructions on the Battery Voltage Adjustment Preparation Screen Fig 13 and make the following preparations 1 Check that the power cable jig is connected to the camera If the camera and jig are not connected return to the Jig mode setup window and connect the camera to the power cable jig When you have completed the preparations press the Enter key on your computer The 3 80...

Страница 43: ... to the flash ROM when adjust ment is completed normally The Battery Adjustment Complete Screen Fig 17 is displayed when the adjusted data is saved normally Step 6 Press the Enter key on the computer while in the Battery Voltage Adjustment Complete Screen Fig 17 The Adjustment Select Screen Fig 4 is displayed Always select F12 End Setting to complete adjustment Fig 16 5 00V Input Screen Fig 17 Bat...

Страница 44: ...ownbelowappearsonthereardisplay panel In the optimum setting no cross talk shadowing appears in the areas adjacent to the black sections A and B and the black sections appear completely black Sample of the rear display panel adjustment pattern When you have finished the adjustments press the Enter key on your computer Save the adjusted data to the flash ROM The Rear display panel Adjustment Comple...

Страница 45: ...20 and make the following preparations 1 Have a gray chart handy 2 Set the camera on a tripod 3 Set the adjustment lens aperture to F5 6 and the focal distance to infinity 4 Turn the mode dial to set the ISO sensitivity to 200 When you have completed the preparations press the Enter key on your computer The Flash Adjustment Start Screen Fig 21 is displayed Step 3 Follow the instructions on the Fla...

Страница 46: ...ication such as Photoshop to compare the images 2 Use a flat light source to illuminate the entire chart If the light source illuminates the chart surface unevenly the appearance of the optimum focal point will change To avoid this use a light source which illuminates the top and bottom of the chart uniformly 2 The X Y stage used for AF adjustment is movable Make a note of the shooting distance wh...

Страница 47: ...ion data so press the N key Press the Y key if there is correction data The Correction data acquisition method 1 Fig 24 is displayed Step 3 Perform the following as directed by the instructions in the Correction data acquisition method window 1 Fig 24 1 Disconnect the USB cable from the camera Stops communication between the camera and the computer 2 Set the power switch to OFF 3 Close the slot co...

Страница 48: ...er of the AF solid chart 3 Set the AF adjustment lens aperture to fully open F1 4 4 When you have completed steps 1 to 3 above press the Enter key on your computer The Correction data acquisition method 3 Fig 26 is displayed Step 5 Perform the following as directed by the instructions in the Correction data acquisition method window 3 Fig 26 1 Double click S2Pshoot exe Fig 27 1 Before using the ab...

Страница 49: ...Step 11 Perform the following as directed by the instructions in the Correction data acquisition method 4 window Fig 30 1 Left click the Eject icon in the Windows taskbar 2 Click Stop for FUJIFILM FinePix S2Pro IEEE 1394 Device 3 When the It is now safe to disconnect message appears click the OK button not shown 4 Disconnect the IEEE 1394 cable from the camera NOTE If the IEEE 1394 cable is discon...

Страница 50: ...step 7 in the AF correction data input dialog box Here enter 40 and then click OK or press the Enter key on your computer AF adjustment is performed When the adjustments are successfully completed the adjustment data is written to the flash ROM Step 16 When the adjusted data is saved normally the AF Ad justment Complete Screen Fig 35 is displayed Press the Enter key on the computer while in the AF...

Страница 51: ...equired Do not use this adjustment procedure until then 2 As at 15 6 02 the firmware version for the FinePix S2 Pro is 1 56 Step 1 Select F8 from Adjustment Select Screen Fig 4 ie press the F8 key on the computer The Run Download Screen Fig 36 is displayed Step 2 Follow the instructions on the Run Download Screen Fig 36 and press the Enter key on the computer The Downloading Screen Fig 37 is displ...

Страница 52: ...er The Jig Mode Settings window not shown appears Step 4 Set the camera to Jig mode as directed by the instructions in the Jig Mode Settings window not shown and then press the Enter key on your computer The Adjustment Select Screen Fig 39 is displayed Step 5 Check that firmware version displayed in the Adjustment Select Screen window Fig 39 1 is updated Fig 39 Adjustment Select Screen Fig 38 Down...

Страница 53: ...cally written USB_ID is as shown below 3 The automatically written IEEE_ID is as shown below Step 1 Select F12 from Adjustment Select Screen Fig 4 ie press the F12 key on the computer The End Setting Start Screen Fig 40 is displayed Step 2 Follow instructions on the End Setting Start Screen Fig 40 and press the Enter key on the computer The Destination Settings Screen Fig 41 is displayed The numbe...

Страница 54: ...ect the base at which repairs were carried out In the Repair base selection USB window Fig 43 select the base at which repairs were carried out In the description given in this manual The U S A is se lected as the repair base Select A USA ie press the A key on the computer The USA selection screen USB Fig 44 is displayed Step 7 Press the Enter key on your PC as directed by the instructions in the ...

Страница 55: ...The Destination Settings Screen Fig 46 is displayed Step 9 Follow instructions on the Destination Settings Screen Fig 46 and press the A key on the computer The Repair base selection Fig 47 is displayed Step 10 In the Repair base selection IEEE window Fig 47 select the base at which repairs were carried out In the description given in this manual The U S A is se lected as the repair base Select A ...

Страница 56: ...ons on the FinePix S2 Pro Adjustment end Screen Fig 50 1 Disconnect the DC cable from the camera 2 press the Enter key on your computer The display returns to the Jig Mode Setup Screen Fig 51 after pressing the Enter key on the computer Step 14 When adjustment is complete select Operation End on the adjustment software menu bar in the Jig Mode Setup Screen Fig 51 to terminate the adjustment softwa...

Страница 57: ...or camera body replacement This setting procedure resets the AF adjustment data and flash adjustment data in the EEPROM installed on the camera body by Nikon Step 1 Double click the executable file in the adjustment software FFW exe Fig 52 1 The FFW EXE Startup window Fig 53 appears Step 2 In the FFWJ EXE Startup window Fig 53 menu bar select Program Fig 53 1 and then Select Fig 53 2 The Select us...

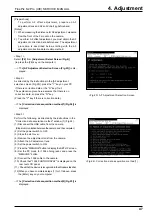
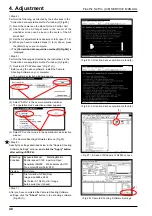
Страница 58: ... 1 and then Re_road Fig 55 2 The Reload confirmation window Fig 56 appears Step 5 In the Reload confirmation window Fig 56 click Yes Fig56 1 The FFWJ EXE Startup window Fig 57 appears Confirm the thing that s2pro_UE_nikon ff is displayed to Fig 57 3 Step 6 In the FFW EXE Startup window Fig 57 menu bar select Operation Fig 57 1 and then Start Fig 57 2 The Nikon repair request settings Screen Fig 58...

Страница 59: ...MENU OK button 7 Open the slot cover 8 Switch the power off 9 Connect the USB cable to the camera 10 Hold down the BACK button and switch the camera on 11 When you have completed steps 1 to 10 above press the Enter key on your computer The Nikon repair request settings Compiete Screen Fig 59 is displayed Step 8 Press the Enter key on the computer while in the Nikon repair request settings Compiete...

Страница 60: ... Common with adjustment jig ZJ00213 100 Grey chart Common with adjustment jig ZJ00254 100 LB140 filter Common with adjustment jig ZJ00006 100 High resolution chart Common with FinePixS1Pro FinePix4700Z ZJ00398 100 5 2 Connection of Measuring Instruments for Inspection 5 3 Inspection and Settings at Shipment Step 1 FinePix S2 Pro VIDEO OUT Stabilizing supply AC 5VH TV monitor Ammeter OS Windows Me ...

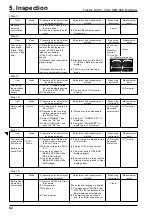
Страница 61: ...ND contact The resistance value at this time should be inf Pop down the flash and take a photograph 3 Take photograph Adjustment and measurement method 3 Thing which does decrease change by resistance momen tarily and returns to origin immediately Measuremen point tester Measuring instrument Item Power switch check Power supply confirmation from DSC side to camera Step 2 Mode P Mode Preparations f...

Страница 62: ... DC cable jig is inserted in DC_JACK 2 Reproduce the recording picture image and push the MENU key 3 Select FORMAT and push the OK key 4 Select MENU OK and push the OK key Adjustment and measurement method 2 Playback screen disappears 3 Thing that FORMAT OK is displayed 4 Thing that NO IMAGES is displayed in LCD monitor Measuring instrument LCD monitor Recorded smart media Measurement point LCD mo...

Страница 63: ... Reset from Set tings menu to return to defaults 2 Defaults are as follows Image display OFF High mode TIFF RGB Media SmartMedia Test Shooting no card ON Voice memo OFF Frame no RENEW PC mode 1394DOWN LOADING Beep LOW LCD monitor ON Language ENGLISH Date Not set 3 Mode dial P Setting at M mode Shutter speed 1 125 Aperture F5 6 Setting at A mode Aperture F5 6 4 Focus mode S 5 AE L AF L Multi patter...

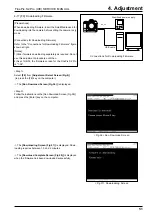
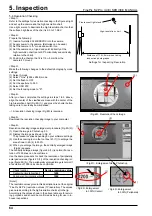
Страница 64: ...ecking image to your computer Step 6 Resolution checking image enlargement procedure Fig 60 2 1 Open the image in Photoshop 5 0 2 Display the image as shown in Fig 61 The procedure varies depending on your software settings 3 Use the zooming tool in the tool box 61 1 to enlarge the area shown in 60 2 to 300 4 When you enlarge the image the centrally enlarged image Fig 62 appears The centrally enla...

Страница 65: ...amera is switched off and remove the lithium batteries Step 2 Connect the AC power adapter to the camera Step 3 Remove the interchangeable lens from the camera Step 4 Set the camera s exposure mode dial to M Step 5 Hold down the release mode switch lock release button and set the release mode switch to S1 Frame Step 6 Hold down the Synchro mode and Illuminator buttons and switch the camera on Step...

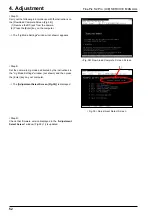
Страница 66: ... SSFDC A CCD dust check image figure 66 is recorded Step 4 Open the image on your computer using Photoshop and mea sure the size of any soiling The selection tool for the enlarged CCD dusting check image figure 67 is useful for checking individual pixels Step 5 If the dusting is 12 pixels or larger it can be regarded as CCD OLPF dusting and the CCD should be cleaned again At ship ment from the fac...

Страница 67: ...rt AF target for inspection Center chart Step 1 Take out the camera stand for the AF Solid chart and set the X Y stage for AF adjustment on the base plate Step 2 Mount the camera on the X Y stage for AF adjustment Step 3 Remove the hexagonal bolt in the top of the AF solid chart block and remove the upper level solid chart Step 4 Align the AF intermediate chart surface horizontally and vertically ...

Страница 68: ...y to shoot Step 3 Manually set the focusing ring on the checking lens to the nearest distance and click the Shoot button in the shooting software A preview image is displayed and then transferred to the specified folder Step 4 Repeat step 3 three times 3 near focus shots are saved Step 5 Manually set the focusing ring on the checking lens to INF the furthest distance and click the Shoot button in ...

Страница 69: ...butable to how the camera is used Resolution setting Can be resolved by selecting a high quality mode 12M JPEG Fine RAW in the resolution settings Sharpness setting Check the resolution problems in SOFT mode Diffraction when shots are taken using an excessively small aperture 1 Check the F stop setting and try taking the shot with an aperture that is slightly larger than the one causing the proble...

Страница 70: ...TANT SAFETY A106 FZ31400 101 EX3 1 CD ROM A107 FZ31400 200 CD ROM PhotoShop_E A108 AZF0000 111 BAG PLASTIC NO 1 A109 BB13437 100 LCD CAP A110 BL00188 200 SOFTWEARGUIDE E Store the A part in the dotted line on the reticulation after tucking in UNITARY BOX B A111 FZ04793 100 ALKALINE BATTERY A112 FZ04089 100 LITIUM BATTERY CR123A A113 BB11758 100 SHOULDER BELT A114 FZ04797 100 IEEE1394 CABLE A115 BF...

Страница 71: ...100 SHAFT GRIP M208 BB13429 100 PLATE GRIP M209 ATG1724 0ND SCREW BT2P17 40B M210 BB13428 100 PLATE BOTTOM 1 BODY CAP attached to CAMERA BODY ASSY delivered as an after parts has the logo of Nikon Therefore the thing not distributed to the user 2 Never disassemble the inside of CCD HOLDER ASSY N S Not Supply Revised 9 Oct 2002 M211 BB14857 100 SCREWM1 7X3 0BNS M212 BB10000 200 CCD BADGE S M213 FZ0...

Страница 72: ...G 2 0 M308 BB13367 100 LED GUIDE M309 BB13368 100 OK BUTTON M310 BB13369 100 BACK BUTTON M311 BB13370 100 CHANGE BUTTON M312 BB13371 100 FUNC BUTTON M313 BB13372 100 PLAY BUTTON M314 BB13373 100 RUBBER KEY F M315 BB13374 100 RUBBER KEY C M316 BB13375 100 CARD COVER M317 BB13376 100 SHAFT CARD M318 BB13377 100 LABEL CARD M319 BB13378 100 CARD KNOB M320 BB13379 100 KNOB HOLDER M321 BB13380 100 CSP C...

Страница 73: ...04774 100 FFC SW MAIN M407 ATG1724 0ND SCREW M408 FZ03776 100 REAR DISPLAY PANEL M409 BF03968 100 LCD MONITOR M410 FZ04772 100 LCD MONITOR HARNESS M411 BU02655 100 MAIN FRAME ASSY M412 BB14857 100 SCREW M1 7X3 0BNS M413 BF03999 100 SYNCHRO CONST M414 BB13387 100 BATT HOLDER M415 BU02563 100 BATT HARNESS ASSY M416 BU01989 100 BOTTOM FRAME ASSY M417 BU01991 100 CR SPACER ASSY M418 BB13390 100 SHAFT ...

Страница 74: ...REW M506 1B060 713 SB LOWER CASE UNIT M507 1C998 070 MODE DIAL UNIT M508 1C998 071 WINDING DIAL UNIT M509 1K078 011 CLICK BALL M510 1K220 532 MODE DIAL CLICK SPRING M511 1S700 355 BACKING PLATE M512 1K001 077 SCREW M513 1K611 833 LUG PLATE A M514 1K682 420 AF ASSIST LAMP COVER M515 1K631 102 SB CASE AXLE M516 1S758 089 ILLUMINATION RUBBER SW M517 1K208 244 ILLUMINATION ON OFF BUTTON M518 1K119 318...

Страница 75: ...82 423 RELEASE BUTTON SLEEVE M616 1K206 171 POWER DIAL M617 1K060 054 E RING M618 1S998 506 SB UP FPC UNIT M619 1C998 038 SB UP SWITCH UNIT M620 1K241 313 METERING MODE CLICK SPRING M621 1S998 504 MEASURING MODE DIAL UNIT M622 1C998 046 METERING MODE DIAL UNIT M623 G1 14030FA SCREW M624 1K220 548 SB LOCK LEVER SPRING M625 1K601 630 POWER DIAL CLICK PLATE M626 1K241 311 POWER DIAL SW BRUSH M627 1K0...

Страница 76: ...DSC FPC HANESU M709 1G950 099 FOCUS SCREEN M710 1B002 275 FRONT COVER UNIT M711 1K010 464 SCREW M712 1K010 463 SCREW M713 1K119 201 A M COVER PLATE M714 1K010 259 SCREW M715 1K206 170 A M CHANGE LEVER M716 1K010 291 2 SCREW M717 1K010 292 2 SCREW M718 1K208 241 FLASH UP BUTTON M719 1K404 086 BAYONET MOUNT M720 1K240 468 4 BAYONET RING SPRING M721 1K010 259 SCREW M722 1C998 016 Fmin COUPLING UNIT M...

Страница 77: ...400 I F MANUAL G A108 FZ31400 101 EX3 1 CD ROM A109 FZ31400 200 CD ROM PhotoShop_E A110 AZF0000 111 BAG PLASTIC NO 1 A111 BB13437 100 LCD CAP A112 BL00188 200 SOFTWEARGUIDE E A113 BL00188 300 SOFTWEARGUIDE F A114 BL00188 400 SOFTWEARGUIDE G A115 FZ04793 100 ALKALINE BATTERY A116 FZ04089 100 LITIUM BATTERY CR123A A117 BB11758 100 SHOULDER BELT A118 FZ04797 100 IEEE1394 CABLE A119 BF02369 100 VIDEO ...

Страница 78: ...100 SHAFT GRIP M208 BB13429 100 PLATE GRIP M209 ATG1724 0ND SCREW BT2P17 40B M210 BB13428 100 PLATE BOTTOM 1 BODY CAP attached to CAMERA BODY ASSY delivered as an after parts has the logo of Nikon Therefore the thing not distributed to the user 2 Never disassemble the inside of CCD HOLDER ASSY N S Not Supply M211 BB14857 100 SCREWM1 7X3 0BNS M212 BB10000 200 CCD BADGE S M213 FZ04876 100 SHOECAP M2...

Страница 79: ...G 2 0 M308 BB13367 100 LED GUIDE M309 BB13368 100 OK BUTTON M310 BB13369 100 BACK BUTTON M311 BB13370 100 CHANGE BUTTON M312 BB13371 100 FUNC BUTTON M313 BB13372 100 PLAY BUTTON M314 BB13373 100 RUBBER KEY F M315 BB13374 100 RUBBER KEY C M316 BB13375 100 CARD COVER M317 BB13376 100 SHAFT CARD M318 BB13377 100 LABEL CARD M319 BB13378 100 CARD KNOB M320 BB13379 100 KNOB HOLDER M321 BB13380 100 CSP C...

Страница 80: ...Z04774 100 FFC SW MAIN M407 ATG1724 0ND SCREW M408 FZ03776 100 REAR DISPLAY PANEL M409 BF03968 100 LCD MONITOR M410 FZ04772 100 LCD MONITOR HARNESS M411 BU02655 100 MAIN FRAME ASSY M412 BB14857 100 SCREW M1 7X3 0BNS M413 BF03999 100 SYNCHRO CONST M414 BB13387 100 BATT HOLDER M415 BU02563 100 BATT HARNESS ASSY M416 BU01989 100 BOTTOM FRAME ASSY M417 BU01991 100 CR SPACER ASSY M418 BB13390 100 SHAFT...

Страница 81: ...REW M506 1B060 713 SB LOWER CASE UNIT M507 1C998 070 MODE DIAL UNIT M508 1C998 071 WINDING DIAL UNIT M509 1K078 011 CLICK BALL M510 1K220 532 MODE DIAL CLICK SPRING M511 1S700 355 BACKING PLATE M512 1K001 077 SCREW M513 1K611 833 LUG PLATE A M514 1K682 420 AF ASSIST LAMP COVER M515 1K631 102 SB CASE AXLE M516 1S758 089 ILLUMINATION RUBBER SW M517 1K208 244 ILLUMINATION ON OFF BUTTON M518 1K119 318...

Страница 82: ...82 423 RELEASE BUTTON SLEEVE M616 1K206 171 POWER DIAL M617 1K060 054 E RING M618 1S998 506 SB UP FPC UNIT M619 1C998 038 SB UP SWITCH UNIT M620 1K241 313 METERING MODE CLICK SPRING M621 1S998 504 MEASURING MODE DIAL UNIT M622 1C998 046 METERING MODE DIAL UNIT M623 G1 14030FA SCREW M624 1K220 548 SB LOCK LEVER SPRING M625 1K601 630 POWER DIAL CLICK PLATE M626 1K241 311 POWER DIAL SW BRUSH M627 1K0...

Страница 83: ...72 DSC FPC HANESU M709 1G950 099 FOCUS SCREEN M710 1B002 275 FRONT COVER UNIT M711 1K010 464 SCREW M712 1K010 463 SCREW M713 1K119 201 A M COVER PLATE M714 1K010 259 SCREW M715 1K206 170 A M CHANGE LEVER M716 1K010 291 2 SCREW M717 1K010 292 2 SCREW M718 1K208 241 FLASH UP BUTTON M719 1K404 086 BAYONET MOUNT M720 1K240 468 4 BAYONET RING SPRING M721 1K010 259 SCREW M722 1C998 016 Fmin COUPLING UNI...

Страница 84: ...TERY BUZZER BZ300 FZ03230 100 BUZZER JACK CN304 FZ03803 100 JACK USB J700 FZ02412 100 JACK J701 FZ04373 100 JACK CN801 FZ04925 100 JACK CF CN1001 FZ04363 100 JACK IEEE1394 CB0919 A100 SW PWB ASSY CONNECTOR CN900 FGA096 0021 CONNECTOR CJ 2P RN 1 0MM PH CN901 FGB088 0171 CONNECTOR CJ 17P FN 0 5MM NH E Model CB0917 A101 MAIN PWB ASSY U Model CONNECTOR J602 FGY051 0202 CONNECTOR CJ 20P SN 0 5MM NH SWI...

Страница 85: ...2 A203 Note Ref No Parts No Description Remarks A201 ZPK0100 100 Packing box for S2Pro CAMERA BODY With inside frame A202 ZPK0101 100 Protector for S2Pro CAMERA BODY One pair in the top and bottom A203 NAY0083 Bag for transportation S1Pro and commonness Note Pack the form of CAMERA BODY ASSY In dotted line of M201 on page 71 and page 78 Revised 24 Mar 2003 ...

Страница 86: ... MANUAL 7 1 List of Related Technical Updates Issued To ensure that after sales srevice is performed accuratety keep a record here of the technical updates issued that cover this device Technical Update No Date Title Details Other 7 Appendix ...

Страница 87: ...26 30 Nishiazabu 2 chome Minato ku Tokyo 106 8620 Japan FUJI PHOTO FILM CO LTD ...

Отзывы: