


4-3
4.1.4 Test
run
If the user set the function codes wrongly or without completely understanding this Instruction
Manual and the FRENIC-Mini User's Manual, the motor may rotate with a torque or at a speed
not permitted for the machine.
Accident or injury may result.
Follow the descriptions given in Section 4.1.1, "Inspection and Preparation prior to the Operation" to
Section 4.1.3, "Preparation before running the motor for a test," and begin test-driving of the motor.
If any abnormality is found to the inverter or motor, immediately stop operation and determine the
cause referring to Chapter 6, "TROUBLESHOOTING."
------------------------------------------------
Procedure for Test Run
------------------------------------------------
(1) Turn the power on and check that the LED monitor blinks while indicating the
Hz
frequency.
(2) With the built-in potentiometer clockwise, set a low frequency such as 5 Hz. (Check that the
frequency displayed on the LED monitor blinks.)
(3) Press
the key to start running the motor in the forward direction. (Check that the reference
frequency is displayed on the LED monitor correctly.)
(4) To stop the motor, press the
key.
<Check the following points>
• Check if the direction of rotation is correct.
• Check for smooth rotation without motor humming or excessive vibration.
• Check for smooth acceleration and deceleration.
When no abnormality is found, rotate the potentiometer clockwise to raise the reference frequency.
Check the above points for the test-driving of the motor.
-----------------------------------------------------------------------------------------------------------------------------------
4.2 Operation
After confirming that the inverter normally drives the motor in a test run, make mechanical
connections (connections to the machine system) and electrical connections (wiring and cabling),
and configure the necessary function codes properly before starting a production run.
Depending on the production run conditions, further adjustments can be required, such
as adjustments of torque boost (F09), acceleration time (F07/E10), and deceleration time
(F08/E11).
Содержание Frenic Mini FRN001C1E-2U
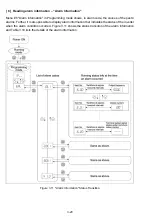
Страница 60: ...3 15 Figure 3 5 shows the status transition for Menu 1 Data setting Figure 3 5 Data Setting Status Transition ...
Страница 85: ...5 4 ...
Страница 88: ...5 7 ...
Страница 89: ...5 8 C codes Control Functions of Frequency ...
Страница 92: ...5 11 J codes Application Functions y codes Link Functions ...
Страница 167: ...8 6 8 3 Common Specifications ...
Страница 168: ...8 7 ...
Страница 171: ...8 10 8 5 External Dimensions 8 5 1 Standard models ...
Страница 172: ...8 11 ...
Страница 173: ...8 12 8 5 2 Models available on order EMC filter built in type ...
Страница 174: ...8 13 ...
Страница 192: ...MEMO ...
Страница 193: ...MEMO ...
Страница 194: ...MEMO ...
Страница 196: ...Fuji Electric FA Components Systems Co Ltd Fuji Electric Corp of America 2007 06 F07 F07 00CM ...


