


3-7
Using the
and
keys
(1) Set function code F01 to "0:
/
keys on the built-in keypad." This can be done only when the
remote keypad is in Running mode.
(2) Press the
or
key to specify the reference frequency. The lowest digit will blink.
(3) If you need to change the reference frequency, press the
or
key again. The new setting will
be automatically saved into the inverter’s memory. It is kept there even while the inverter is powered
off, and will be used as the initial frequency next time the inverter is powered on.
• If you have set the function code F01 to "0:
/
keys on the built-in keypad" but have
selected a frequency setting other than the frequency 1 (i.e., the frequency 2, set it via
communications, or as a multi-frequency), then you cannot use the
or
key for
setting the reference frequency even if the remote keypad is in Running mode. Pressing
either of these keys will just display the currently selected reference frequency.
• When you start specifying or changing the reference frequency or any other parameter
with the
or
key, the lowest digit on the display will blink and start changing. As you
are holding the key down, blinking will gradually move to the upper digit places and the
upper digits will be changeable.
• If you press the
or
key once and then hold down the
key for more than 1
second after the lowest digit starts blinking, blinking will move to the next upper digit place
to allow you to change the value of that digit (cursor movement). This way you can easily
change the values of the higher digits.
• By setting function code C30 to "0:
/
keys on the built-in keypad" and selecting
frequency set 2 as the frequency setting method, you can also specify or change the
reference frequency in the same manner using the
and
keys.
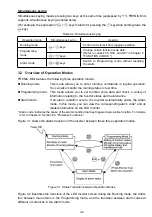
Alternatively, you can set up the reference frequency, etc. from other menu items, depending on the
setting of function code E48 (= 4, 5, or 6) "LED monitor (Speed monitor item)" as shown in the
following table.
Table 3.5 LED Monitor and Frequency Setting (with Speed Monitor selected)
Setting of E48 (displayed on LED monitor)
(with Speed Monitor selected)
Reference frequency
display
Conversion of displayed
value
0: Output frequency
(before slip compensation)
Frequency setting
1: Output frequency
(after slip compensation)
Frequency setting
2: Reference frequency
Frequency setting
4: Load shaft speed
Load shaft speed setting
E50
×
setting
Frequency
5: Line speed
Line speed setting
E50
×
setting
Frequency
6: Constant rate of feeding time
Constant rate of feeding
time setting
E39
setting
Frequency
E50
u
Содержание Frenic Mini FRN001C1E-2U
Страница 60: ...3 15 Figure 3 5 shows the status transition for Menu 1 Data setting Figure 3 5 Data Setting Status Transition ...
Страница 85: ...5 4 ...
Страница 88: ...5 7 ...
Страница 89: ...5 8 C codes Control Functions of Frequency ...
Страница 92: ...5 11 J codes Application Functions y codes Link Functions ...
Страница 167: ...8 6 8 3 Common Specifications ...
Страница 168: ...8 7 ...
Страница 171: ...8 10 8 5 External Dimensions 8 5 1 Standard models ...
Страница 172: ...8 11 ...
Страница 173: ...8 12 8 5 2 Models available on order EMC filter built in type ...
Страница 174: ...8 13 ...
Страница 192: ...MEMO ...
Страница 193: ...MEMO ...
Страница 194: ...MEMO ...
Страница 196: ...Fuji Electric FA Components Systems Co Ltd Fuji Electric Corp of America 2007 06 F07 F07 00CM ...


