3-16
Basic key operation
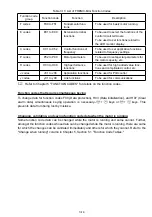
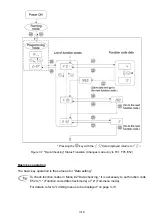
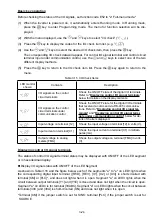
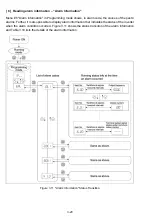
This section will give a description of the basic key operation, following the example of the function
code data changing procedure shown in Figure 3.6.
This example shows you how to change function code F01 data from the factory default "Built-in
potentiometer (POT) (F01 = 4)" to "
/
keys on the built-in keypad (F01 = 0)."
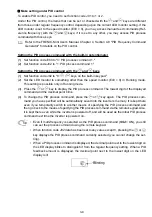
(1) When the inverter is powered on, it automatically enters Running mode. In Running mode,
press the
key to enter Programming mode. The menu for function selection will be dis-
played.
(2) With the menu displayed, use the
and
keys to select the desired function code group. (In
this example, select
HAA
).
(3) Press
the key to display the function codes in the function code group selected in (2). (In this
example, function code
H
will appear.)
Even if the function code list for a particular function code group is displayed, it is possible to
transfer the display to a different function code group using the
and
keys.
(4) Select the desired function code using the
and
keys and press the
key. (In this
example, select function code
H
.)
The data of this function code will appear. (In this example, data "
"
of
H
will appear.)
(5) Change the function code data using the
and
keys. (In this example, press the
key
four times to change data
to
.)
(6) Press
the key to establish the function code data.
The
UCWG
will appear and the data will be saved in the memory inside the inverter. The display
will return to the function code list, then move to the next function code. (In this example,
H
.)
Pressing
the
key before the
key cancels the change made to the data. The data reverts
to the previous value, the display returns to the function code list, and the original function code
reappears.
(7) Press
the key to return to the menu from the function code list.
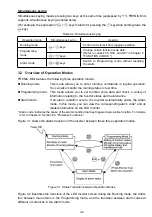
<Cursor movement>
You can move the cursor when changing function code data by holding down the
key
for 1 second or longer in the same way as with the frequency settings.
Содержание Frenic Mini FRN001C1E-2U
Страница 60: ...3 15 Figure 3 5 shows the status transition for Menu 1 Data setting Figure 3 5 Data Setting Status Transition ...
Страница 85: ...5 4 ...
Страница 88: ...5 7 ...
Страница 89: ...5 8 C codes Control Functions of Frequency ...
Страница 92: ...5 11 J codes Application Functions y codes Link Functions ...
Страница 167: ...8 6 8 3 Common Specifications ...
Страница 168: ...8 7 ...
Страница 171: ...8 10 8 5 External Dimensions 8 5 1 Standard models ...
Страница 172: ...8 11 ...
Страница 173: ...8 12 8 5 2 Models available on order EMC filter built in type ...
Страница 174: ...8 13 ...
Страница 192: ...MEMO ...
Страница 193: ...MEMO ...
Страница 194: ...MEMO ...
Страница 196: ...Fuji Electric FA Components Systems Co Ltd Fuji Electric Corp of America 2007 06 F07 F07 00CM ...

