


5
5
5
4
5
4
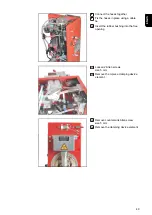
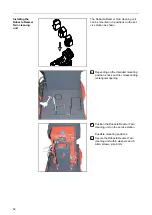
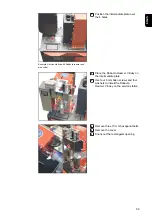
Place Robacta TC 2000 cleaning unit
in front of the service station
IMPORTANT!
When laying the control
cable, ensure that the correct cable
end is on the side of the TC 2000
cleaning unit.
5
Lay mains cable and control cable in
the mounting plate to the rear
6
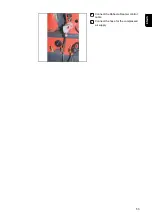
8
7
7
4 x TX25
IMPORTANT!
When positioning the
Robacta TC 2000 cleaning unit, ensure
that the mains cable and control cable
remain in the middle of the recess.
6
Apply Robacta TC 2000 cleaning unit
to the mounting plate
7
Use four TX25 screws to secure
Robacta TC 2000 cleaning unit to the
mounting plate
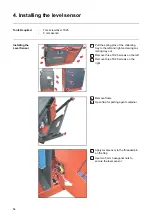
8
Connect control cable to the TC 2000
cleaning unit
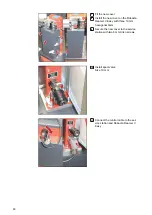
9
11
10
10
11
9
Attach control cable to the service sta-
tion
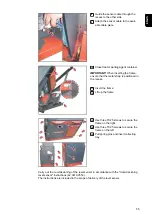
10
Connect hose for parting agent to the
service station and to the Robacta TC
2000 cleaning unit
11
Connect hose for compressed air to
the service station and to the Robacta
TC 2000 cleaning unit
47
EN-US
Содержание Robacta TSS /i
Страница 2: ......
Страница 11: ...General 11 ...
Страница 12: ...12 ...
Страница 18: ...18 ...
Страница 19: ...Operating controls connections and mechanical components 19 ...
Страница 20: ...20 ...
Страница 32: ...32 ...
Страница 33: ...Installation and Startup 33 ...
Страница 34: ...34 ...
Страница 53: ...4 5 4 5 4 Connect the Robacta Reamer control cable 5 Connect the hose for the compressed air supply 53 EN US ...
Страница 61: ...12 12 12 Connect the compressed air supply 61 EN US ...
Страница 64: ...64 ...
Страница 65: ...Cleaning Program Sequence 65 ...
Страница 66: ...66 ...
Страница 68: ...A B C D E F G 68 ...
Страница 79: ...Reset external signal Internal valve brush cleaning 79 EN US ...
Страница 84: ...Reset external signal Cut wire electrode End of the cleaning process Welding 84 ...
Страница 85: ...Troubleshooting Maintenance and Disposal 85 ...
Страница 86: ...86 ...
Страница 97: ...Appendix 97 ...
Страница 98: ...98 ...