


6
2 x TX20
7
7
6
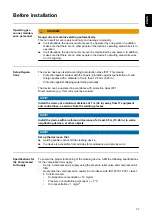
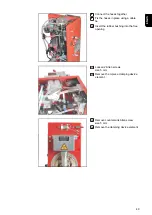
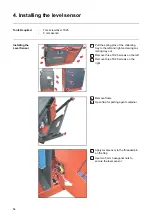
Position the Touch Sense on the
plastic support
7
Secure the Touch Sense with 2 TX20
screws
9
8
8
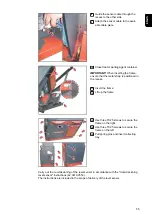
Secure the cable to the bottom of the
Touch Sense with a 3 mm Allen screw
9
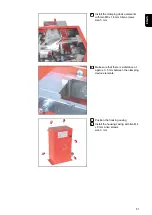
Insert the cable into the knocked-out
opening
10
10
2x TX20
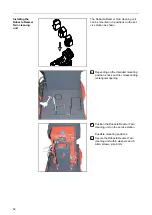
NOTE!
When installing the Touch Sense, do
not pinch, kink, shear off, or otherwise
damage the cable!
10
Install the Touch Sense on the service
station with 2 TX20 screws
The Touch Sense can be installed in
all 90° positions.
1,4
1,8
2,2
2,6
1,4
1,8
2,2
2,6
1,4
1,8
2,2
2,6
1,4
1,8
2,2
2,6
41
EN-US
Содержание Robacta TSS /i
Страница 2: ......
Страница 11: ...General 11 ...
Страница 12: ...12 ...
Страница 18: ...18 ...
Страница 19: ...Operating controls connections and mechanical components 19 ...
Страница 20: ...20 ...
Страница 32: ...32 ...
Страница 33: ...Installation and Startup 33 ...
Страница 34: ...34 ...
Страница 53: ...4 5 4 5 4 Connect the Robacta Reamer control cable 5 Connect the hose for the compressed air supply 53 EN US ...
Страница 61: ...12 12 12 Connect the compressed air supply 61 EN US ...
Страница 64: ...64 ...
Страница 65: ...Cleaning Program Sequence 65 ...
Страница 66: ...66 ...
Страница 68: ...A B C D E F G 68 ...
Страница 79: ...Reset external signal Internal valve brush cleaning 79 EN US ...
Страница 84: ...Reset external signal Cut wire electrode End of the cleaning process Welding 84 ...
Страница 85: ...Troubleshooting Maintenance and Disposal 85 ...
Страница 86: ...86 ...
Страница 97: ...Appendix 97 ...
Страница 98: ...98 ...