flexcell FX-5000 Скачать руководство пользователя страница 15


F

LEXCELL

®


I

NTERNATIONAL 

C

ORPORATION


9

elapsed regimen time, and the one on the right 
displays the remaining regimen time, using 
the following format:  dd:hh:mm:ss 
(days:hours:minutes:seconds). 
The block at the top right contains the current 
regimen 

Step

Cycle

Jump

 (when a regimen 

step is using the Jump Back to option), 
minimum level (

Min

), and maximum level 

(

Max

). The minimum and maximum levels 

will be listed according to the units specified 
under the Plot Units section as the minimum 
and maximum points at which the membrane 
stretches with each cycle. 
 
The major portion of the main display window 
is taken up with a 

plot

 designed to show the 

current state of a simulated or running 
regimen. This plot is generated from the data 
returned by the FlexLink

®

 during regimen 

activity. When using a platform configuration 
that uses vacuum to generate a downward 
stretching of the membrane (elongation), the 
vertical scale represents increasing 
elongation, vacuum or strain. When the 
selected unit of display is kPa, the vertical 
scale will start at 0.0 and move upwards as an 
increasing negative pressure level, indicating 
that a vacuum is being applied to the 
membrane to stretch it downwards. 
 
The scale on the x- and y-axes can be changed 
by clicking on one of the two small double-
arrow buttons at either end of the axis. The 
button with arrows pointing away from each 
other increases the axis scale, while the button 
with arrows pointing toward each other 
decreases the scale. 
 
Below the plot is a 

timeline

 that displays the 

percentage of the regimen that has been 
completed. 
 
To the right of the plot is a set of command 
buttons which allow the user to: 

1) 

Start

 a regimen. 

2) 

Stop

 a regimen. 

3) 

Pause

 a regimen. 

4) 

Resume

 a paused regimen. 

5) 

Simulate

 a regimen. 

6) 

Reset

 the controller. 

7) Control the vacuum 

pump

8)   Access 

Help.


9) 

Cancel

 the program. 


3.4  C

ONFIGURING 

U

SERS


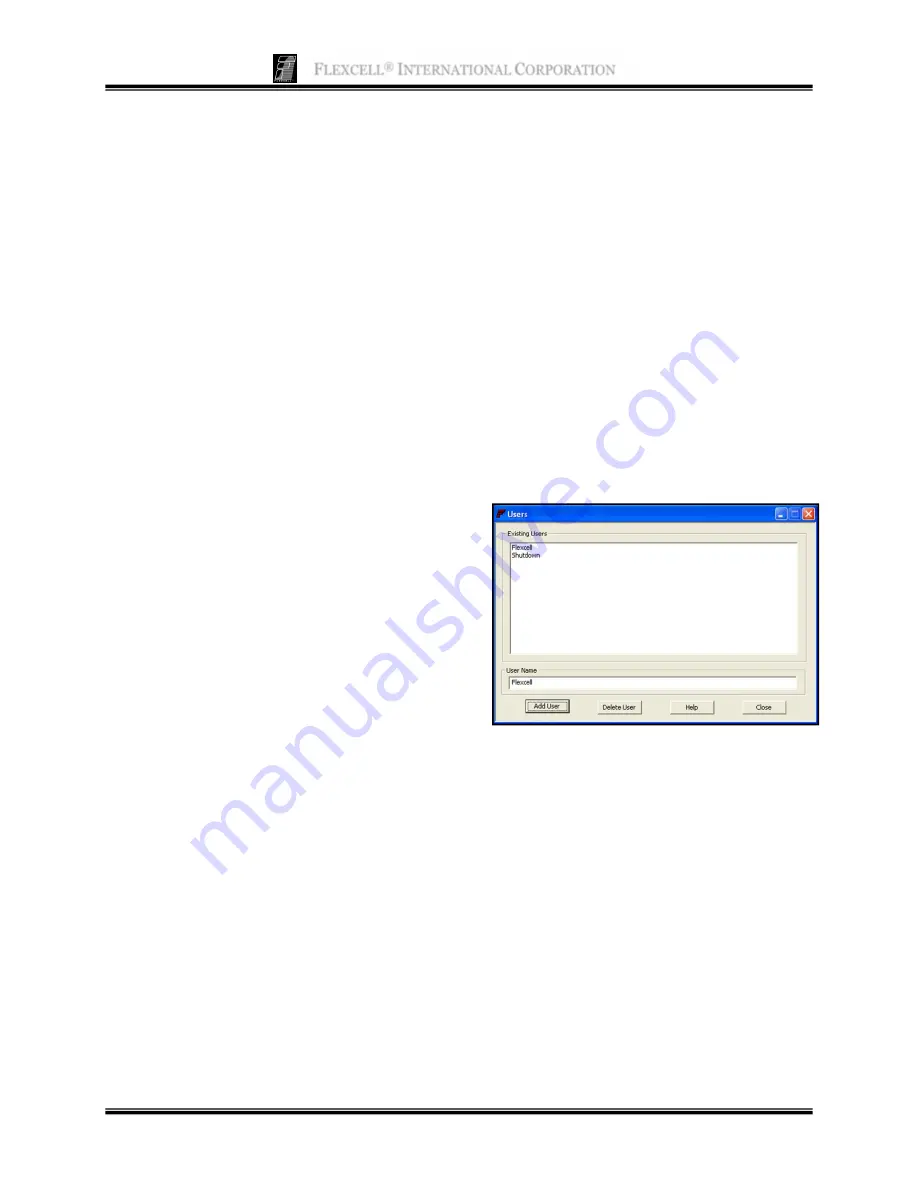
Prior to creating and downloading a 
regimen, a user needs to be registered. Once 
this task is completed, regimens can be 
personalized under the registered user name. 
 
In the 

Configure

 menu, select 

User Editor

A new window will appear entitled 

Users


(Fig. 11).  


Figure 11.

  FX-5000

™ 

user editor 

To add a user, type in a user name (must be 
at least 4 characters) in the provided space 
and click on 

Add User

. The new name 

should appear in the 

Existing Users

 box. 

 
To delete a user, click on the appropriate 
user name in the 

Existing Users

 box so that 

it is highlighted in blue and then click on 

Delete User

. The program will ask for a 

confirmation and issue a warning, click 

Yes 

to confirm deletion. The user and any of the 
user's defined regimens will be deleted. 
 
To exit the Users window, click on 

Close


Содержание FX-5000

Страница 1: ...21 0 Culturing Cells in a Mechanically Active Environment Flexcell International Corporation 2730 Tucker Street Suite 200 Burlington NC 27215 800 728 3714 919 732 1591 FAX 919 732 5196 www flexcellin...

Страница 2: ...uctions 7 3 1 Starting the FX 5000 Program 7 3 2 Using the FX 5000 Tutorial 7 3 3 Main Display Window 7 3 4 Configuring Users 9 3 5 Creating Regimens 10 3 6 Creating a Regimen with a Custom Waveform S...

Страница 3: ...than our factory or distributor Breaking the seal and opening the unit case or violating unit components will void the warranty Failure to run the drying regimen as recommended in this manual will vo...

Страница 4: ...nty are listed below You will need to have the service tag number and Express Service Code number which are located on the side of the computer Dell Hardware Limited Warranty Plus Onsite Service Exten...

Страница 5: ...to a properly grounded power outlet and used with the power cord supplied with the unit s unmodified 3 The unit must be operated with the factory installed cover in place 4 No modifications of the equ...

Страница 6: ...seplate s in the incubator a Insert the 6 4 mm and 9 5 mm tubing into the access opening of the incubator b Connect the quick disconnects for the 6 4 mm and 9 5 mm tubing to the baseplate s c Place fo...

Страница 7: ...D for vacuum source connection 16 Flexcell FX 5000 Tension System user s manual and other ancillary manuals for computer and monitor 17 Surge protected outlet strip 18 Water Trap x2 19 Vacuum source o...

Страница 8: ...the system is 48 37 lbs 21 96 kg Figure 3 Dell OptiPlex rear view 2 3 SETUP OF THE COMPUTER AND FX5K TENSION FLEXLINK Setup the Dell OptiPlex desktop computer and peripherals according to the manufac...

Страница 9: ...onto the fitting Tighten each nut by hand until the tubing is crimped to minimize vacuum leakage Connect the power cables 115 VAC or 230 VAC to the rear power inlet FlexLink Power of the FlexLink Fig...

Страница 10: ...ure that the gaskets are fully pressed onto the culture plates and that no parts are folded under 4 Place the culture plates and gaskets into the baseplate wells Check to be sure that the gaskets are...

Страница 11: ...use the auto control pump feature plug the vacuum pump power cable into the PUMP CONTROL CONNECTION outlet on the rear of the FX5K Tension FlexLink Fig 2 and 7 NOTE When using the auto pump control fe...

Страница 12: ...imen Ready User name Platform Regimen Name Flexcell International Corp www flexcellint com Regimen is running or being simulated 1 Regimen Left 5 min User name Platform Regimen Name Flexcell Internati...

Страница 13: ...ength as much as possible between the vacuum source and the baseplate See page 16 for more information on obtaining the optimal performance of your FX 5000 Tension System 3 1 STARTING THE FX 5000 PROG...

Страница 14: ...al data patterns may be confounded with noise For the case of the pressure plot as a function of voltage from the FX 5000 Tension System pressure transducer the rough data yield a plot with a coeffici...

Страница 15: ...changed by clicking on one of the two small double arrow buttons at either end of the axis The button with arrows pointing away from each other increases the axis scale while the button with arrows po...

Страница 16: ...boxes under Min and Max 4 Enter the frequency for the waveform 0 01 5 Hz in the box under Freq 5 If a static regimen is required enter the desired elongation at which the membrane is to be held in the...

Страница 17: ...ed regimen name in the Regimens for Selected User box and then click on Delete Regimen Confirm the deletion by clicking on Yes NOTE If the regimen to be deleted is currently assigned the regimen must...

Страница 18: ...ll be MAXIMUM and the regimen cannot be saved Adjust the time and or cycle number to decrease the total duration time 7 Click on Save Regimen 8 When finished with regimen editing click on Close 3 7 AS...

Страница 19: ...unusual elements is to accommodate for the lag time during sudden changes in pressure e g rising falling edge of a square wave Without these unusual elements the valve controllers may oscillate for a...

Страница 20: ...l turn the pump ON The software will turn the pump OFF when a regimen is complete This option also allows the pump to be turned OFF during a regimen step when a static waveform regimen is selected tha...

Страница 21: ...box can be set so that the data viewed in the plot begin at the specified time entered here Use the timeline at the top of the graph to navigate through the regimen Users can move the slider function...

Страница 22: ...the incubator and stored flat to prevent warping Do not hang the red gaskets on pegs to dry They will stretch over time 3 18 EXITING THE FX 5000 PROGRAM To exit the FX 5000 software in the Controller...

Страница 23: ...elongation and frequency a Shorten the FLEX IN FLEX OUT and SYSTEM tubing to their minimum possible lengths See section 2 2 for minimum lengths b Use a more powerful vacuum source if recommended spec...

Страница 24: ...Regimen wave is flatlining Solution 2 Remove the SYSTEM vacuum line at the back of the FlexLink and check to be sure that there is vacuum coming through the line Check the VENT port at the back of the...

Страница 25: ...of the cells in the middle of the well due to gravity or b incomplete trypsinization or over trypsinization of cells causing clumping and uneven distribution of cells Solution 8 a Use 2 3 ml of media...

Страница 26: ...y dry before connecting to the FX5K Tension FlexLink Contact time time surface remains wet of the above solutions is critical to the effectiveness of disinfecting Times given are minimal and longer co...

Страница 27: ...re from min to max Triangle Wave This waveform provides a linear ramped rise to the max and a linear ramped fall back to the min Square Wave This waveform provides the fastest possible rise to max fol...

Страница 28: ...inusoidal wave Heart wave Electronic and Pressure Triangular wave Square wave and custom waveforms Provides equibiaxial strain or unconstrained distension to the BioFlex culture plate membrane Optiona...

Страница 29: ...m design vacuum controller board o Microprocessor sampling rate for display data transducer 200 Hz o Microprocessor sampling rate for feedback error valve adjustment transducer 1 KHz 2 proportional so...

Страница 30: ...equibiaxial strain Minimum achievable elongation with the FX 5000 1 2 Maximum achievable elongation with the FX 5000 8 0 FX 5000 TENSION PHYSICAL SPECIFICATIONS FX 5000 Computer Size W x H x D 3 65 x...

Страница 31: ...ion 20 Frequency 1 Hz The maximum elongation achieved might only be 10 Reducing the frequency of the regimen to 0 5 Hz will produce an achievable elongation of 18 The maximum allowable elongation for...

Отзывы: